Bitrise ビルドをオンプレミスで実行する
BitriseエージェントをインストールしてBitrise Workspaceに接続することで、独自のハードウェアまたは仮想環境でBitriseビルドを実行できます。エージェントは macOS と Linux の両方にインストールできます
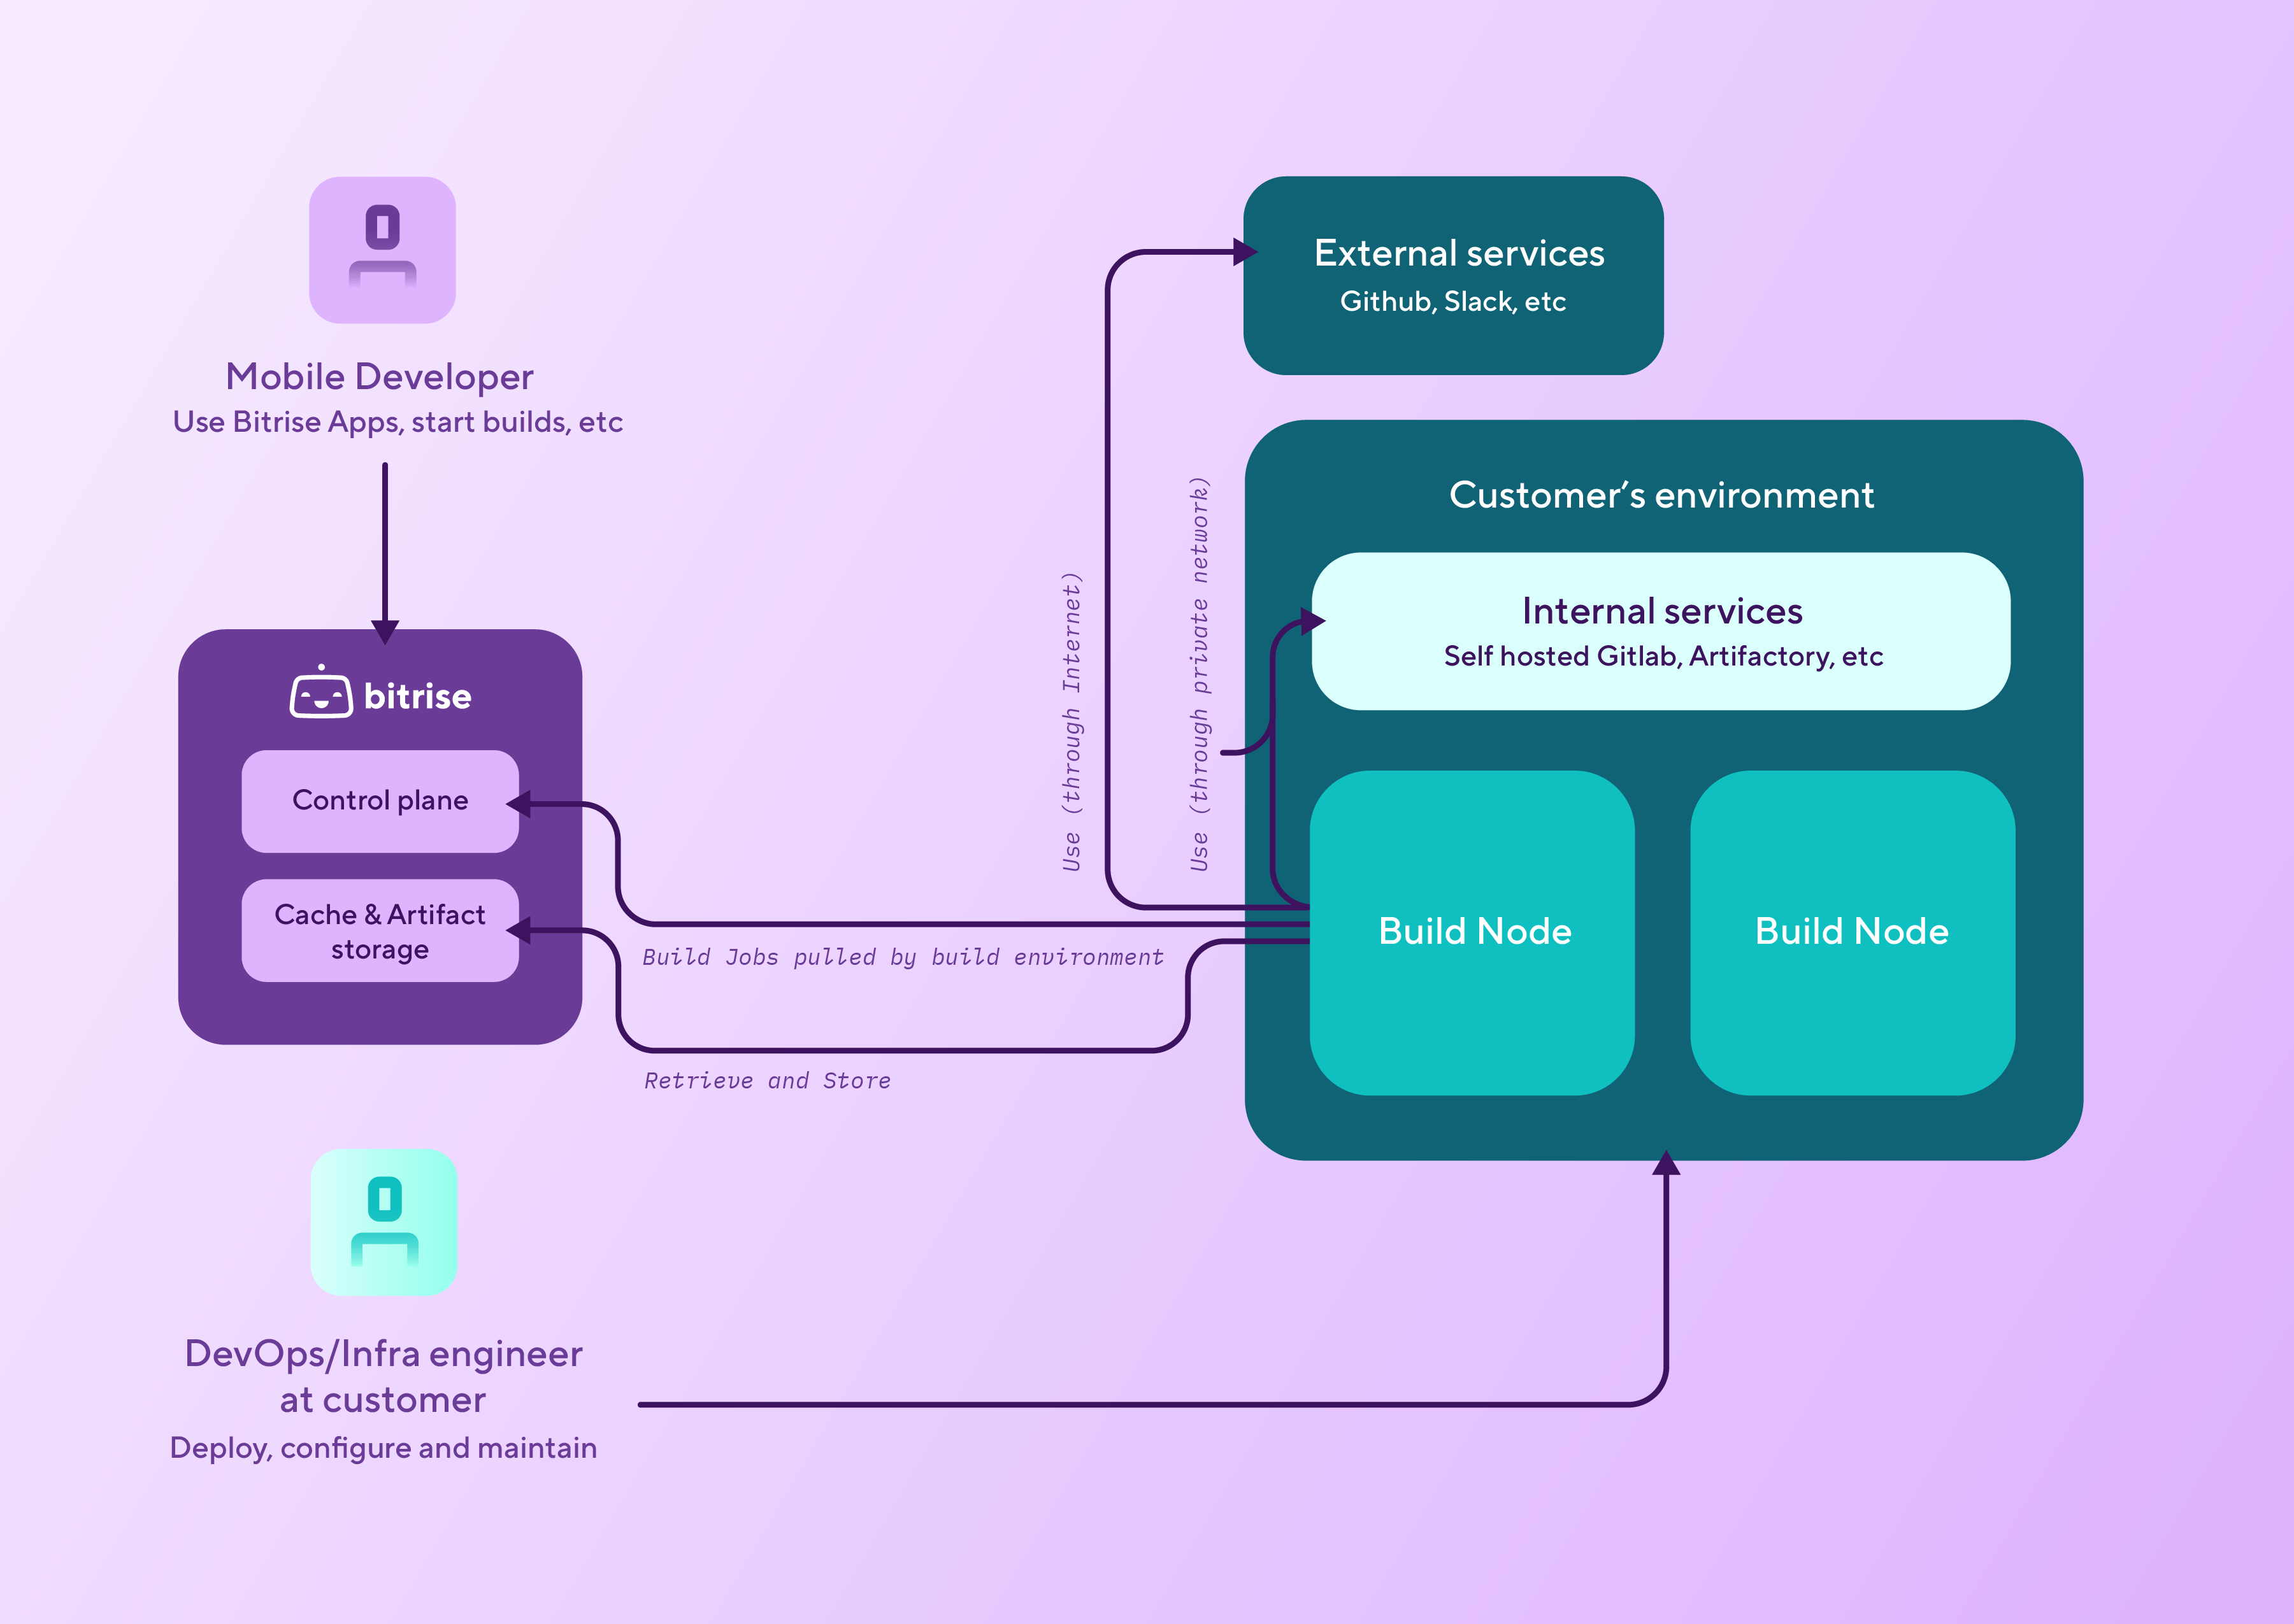
Bitriseウェブサイトが提供するすべての機能を活用しながら、セルフホストインフラストラクチャ、つまりあなたが管理するハードウェアまたは仮想化環境上でBitriseビルドを実行できます。そのためには、Bitriseエージェントを自分のインフラにインストールしてWorkspaceに接続するだけです。インストールが完了すると、Bitrise のUIを通常通り使って、Bitriseアカウントからビルドを実行できるようになります
オンプレミスランナーを使用する場合
あなたが管理するインフラ上でBitriseビルドを実行する必要がある場合、BitriseはAWS EC2 MacまたはLinuxインスタンスを使用するか、オンプレミスランナーオプションを使用するかの2つのオプションを提供しています。
必要なマシンがある場合にのみ、オンプレミスランナーを使用するか、インフラストラクチャのニーズに合わせて AWS 以外のクラウドプロバイダーを使用することをお勧めします。オンプレミスランナーはプラグアンドプレイではありません。必要なツールとサービスがすべてマシンにインストールされていることを確認する必要があります
インフラストラクチャを管理するための AWS アカウントをお持ちの場合は、以下を確認することをおすすめします。 AWS のサービス。
Bitriseをオンプレミスでセットアップする
Bitriseのビルドを自分のインフラで実行できるようにするには、以下からBitriseランナーを入手する必要があります 自作 そして、2つのBitriseサービスエンドポイントにアクセスできるようにネットワークを設定します。
これを行うには、Bitrise エージェントを次のサイトから入手する必要があります。 自作 次に、2 つの Bitrise サービス エンドポイントにアクセスできるようにネットワークを構成します。
ツールとサービス
この方法で Bitrise エージェントを使用する場合は、必要なツールがすべてマシンにインストールされていることを確認する必要があることに注意してください。現時点では、このオンプレミス ソリューション用のプレインストール ツールは提供されていません。
マックOS
Linux
-
Bitrise エージェント プールを構成します。 ワークスペースの設定 bitrise.io のページ: セルフホスト型ビルド用のエージェント プールの構成。
必ずプロセスからトークンを取得してください。
-
をフェッチします
bitrise-den-agentHomebrew の公式。brew tap bitrise-io/den-agent
-
最新バージョンをインストールします。
brew install bitrise-den-agent
特定のバージョンのインストール
次のコマンドのバージョン番号を修正して、特定のバージョンをインストールすることもできます。
brew install bitrise-den-agent@2.1.26
-
インストール ビットライズ CLI。CLI は YAML 設定に基づいてビルドを実行します
brew install bitrise
-
次の 2 つのサービスにアクセスできるようにネットワークを構成します。
-
https://den.services.bitrise.io -
https://build-log.services.bitrise.io
エージェントは、ビルドを実行し、Bitrise Web サイトと通信するために、これらの両方にアクセスできる必要があります。
-
-
サービスデーモンテンプレートを生成します。
プロセスを完了するには、ランナープールトークンが必要です。
sudo $(brew --prefix)/bin/create_bitrise_daemon.sh --bitrise-agent-intro-secret=YOUR_TOKEN --enable-agent-self-update
Linux Bitrise Runner バイナリを x86_64 アーキテクチャで提供しているのは、Google がまだアンドロイドツールで arm64 をサポートしていないためです。 このグーグル号では これを変更するためです。
お使いの Apple Silicon マシンでは、正しいフラグを使用して Linux Bitrise Runner を docker で実行できます。 --platform linux/x86_64。
arm64 Linux Bitrise Runner バイナリが必要な場合は、以下をご覧ください。 ビットライズロードマップ そして投票してください。
-
Bitrise エージェント プールを構成します。 ワークスペースの設定 bitrise.io のページ: セルフホスト型ビルド用のエージェント プールの構成。
必ずプロセスからトークンを取得してください。
-
GPG 公開キーを追加します。
curl -fsSL https://bitrise-den-agent-deb.s3.amazonaws.com/DEB-GPG-KEY-bitrise.pub |
sudo gpg --dearmor -o /usr/share/keyrings/DEB-GPG-KEY-bitrise.gpg
-
Bitrise DEN エージェント deb パッケージ リポジトリを追加します。
echo 'deb [arch=amd64 signed-by=/usr/share/keyrings/DEB-GPG-KEY-bitrise.gpg] https://bitrise-den-agent-deb.s3.amazonaws.com stable main' |
sudo tee /etc/apt/sources.list.d/den-agent-deb.list
-
エージェントをインストールし、マシン上の Bitrise ワークスペースに接続します。
プロセスを完了するには、エージェント プール トークンが必要です。
sudo apt update
sudo apt install bitrise-den-agent
/opt/bitrise/releases/bitrise-den-agent-configure.sh $TOKEN --enable-agent-self-update