パイプラインの設定
Configure a Bitrise Pipeline by adding Workflows and optionally, defining dependencies between the Workflows.
Pipelines with stages
If you have an existing Pipeline configuration from before December 2024, you probably have stages in your Pipeline. We strongly recommend to stop using stages and instead focus on configuring dependencies between Workflows. These dependencies determine the order of execution in a Pipeline. This eliminates unnecessary waiting time in stages and allows you to create more flexible CI configurations.
You can keep using Pipelines with stages but they will receive no new features in the future. You can have both types of Pipelines in the same configuration YAML file but you can't mix and match the two types: you can't have both stages and Workflow dependencies in the same Pipeline.
You can find the documentation for Pipelines with stages here: パイプラインの構築[ベータ版].
You can convert a Pipeline with stages into the new format: ステージのあるパイプラインをグラフパイプラインに変換.
パイプラインは以下で定義できます pipelines 設定 YAML ファイル内の要素。以下の要素を使用してパイプラインを設定できます
-
パイプライン名:人間が読めるパイプラインの識別子。
-
ザ・
workflows要素:パイプラインに含まれるワークフローのリストが含まれます。 -
ザ・
depends_onプロパティ:これは、のプロパティです。workflows elementワークフロー名の配列を受け入れます。ワークフロー間の依存関係を定義します。
たとえば、以下は単純なパイプライン設定です。
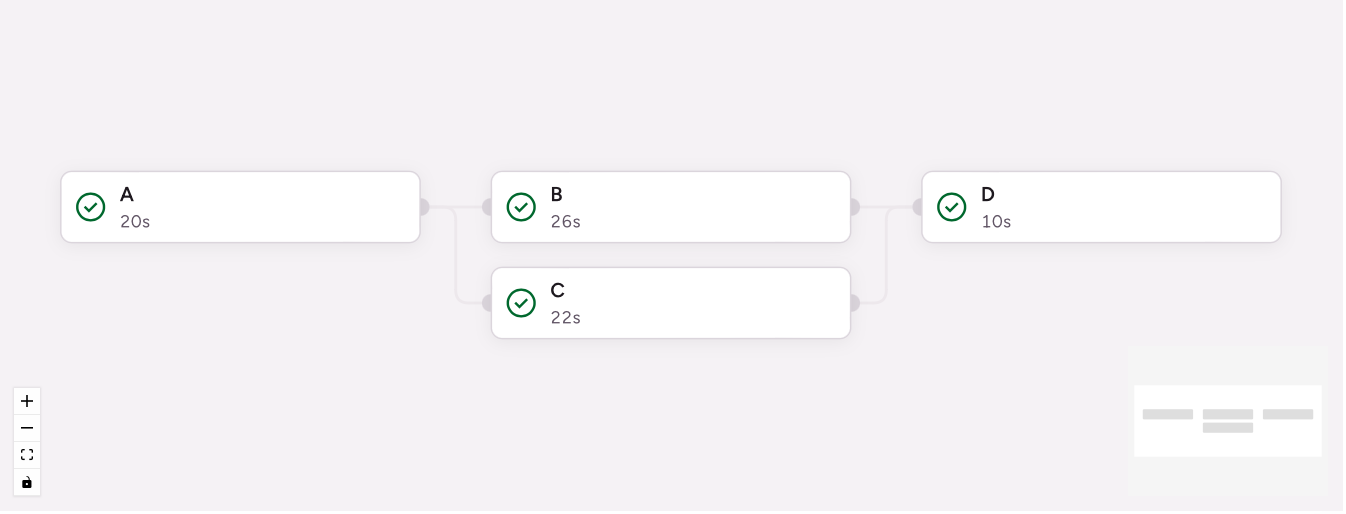
このパイプラインには、次の 4 つのワークフローがあります。
-
ワークフロー A が最初に実行されます。
-
ワークフロー A が終了すると、ワークフロー B と C が同時に開始されます。
-
ワークフロー D は、ワークフロー B と C の両方が正常に終了した場合にのみ開始されます。
Creating a Pipeline
ワークフローエディター
コンフィギュレーション YAML
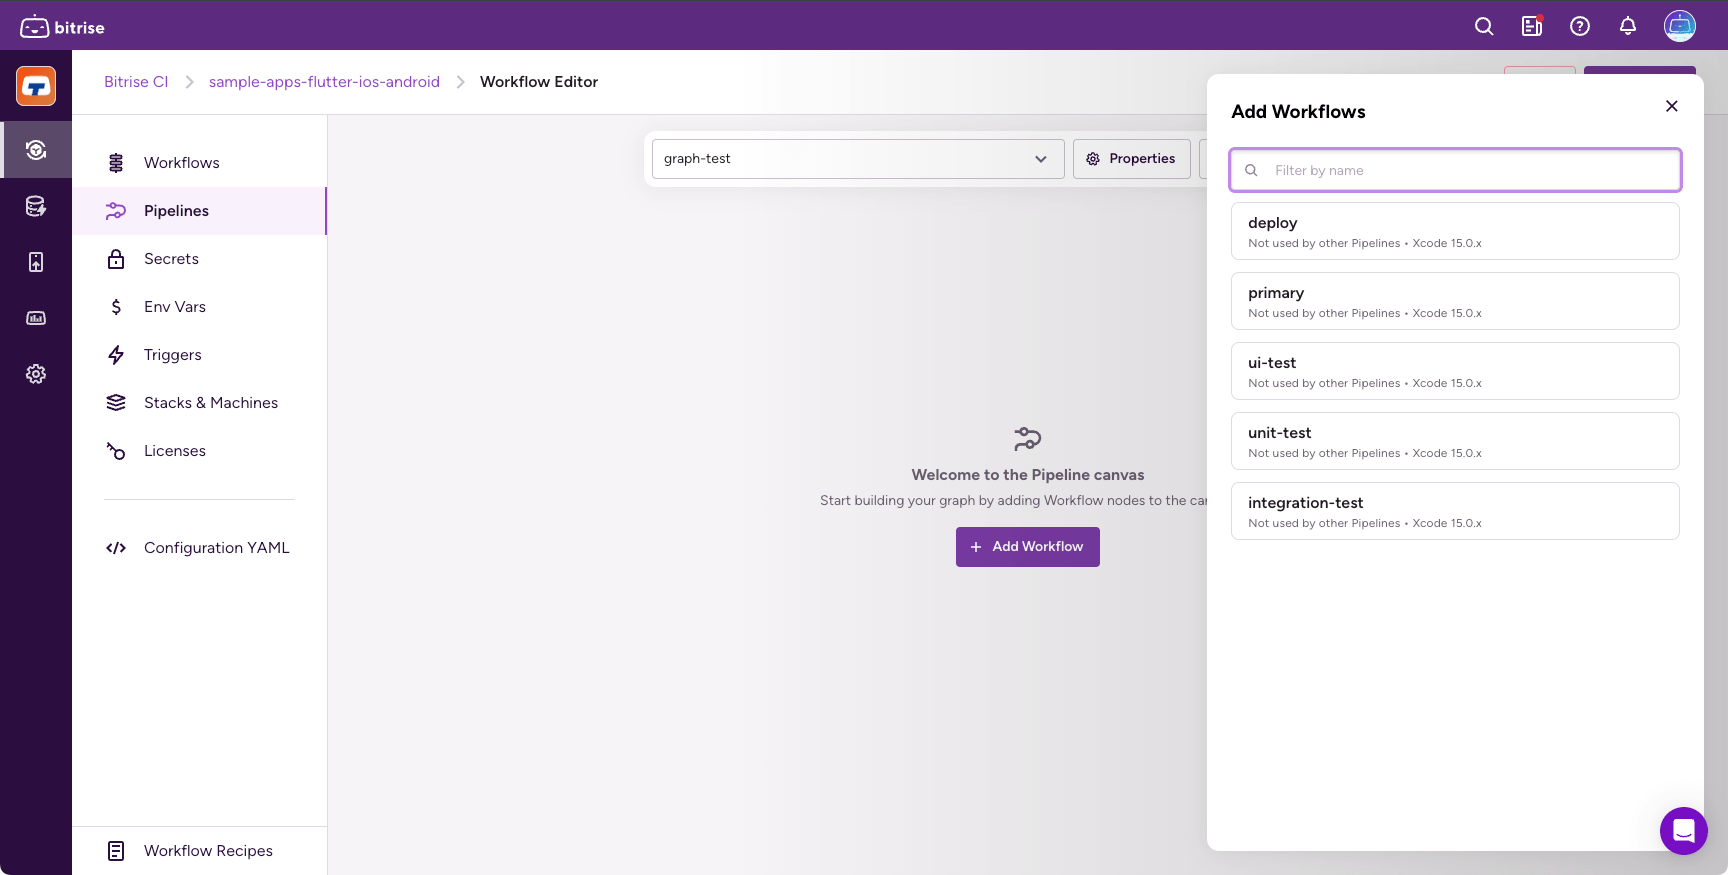
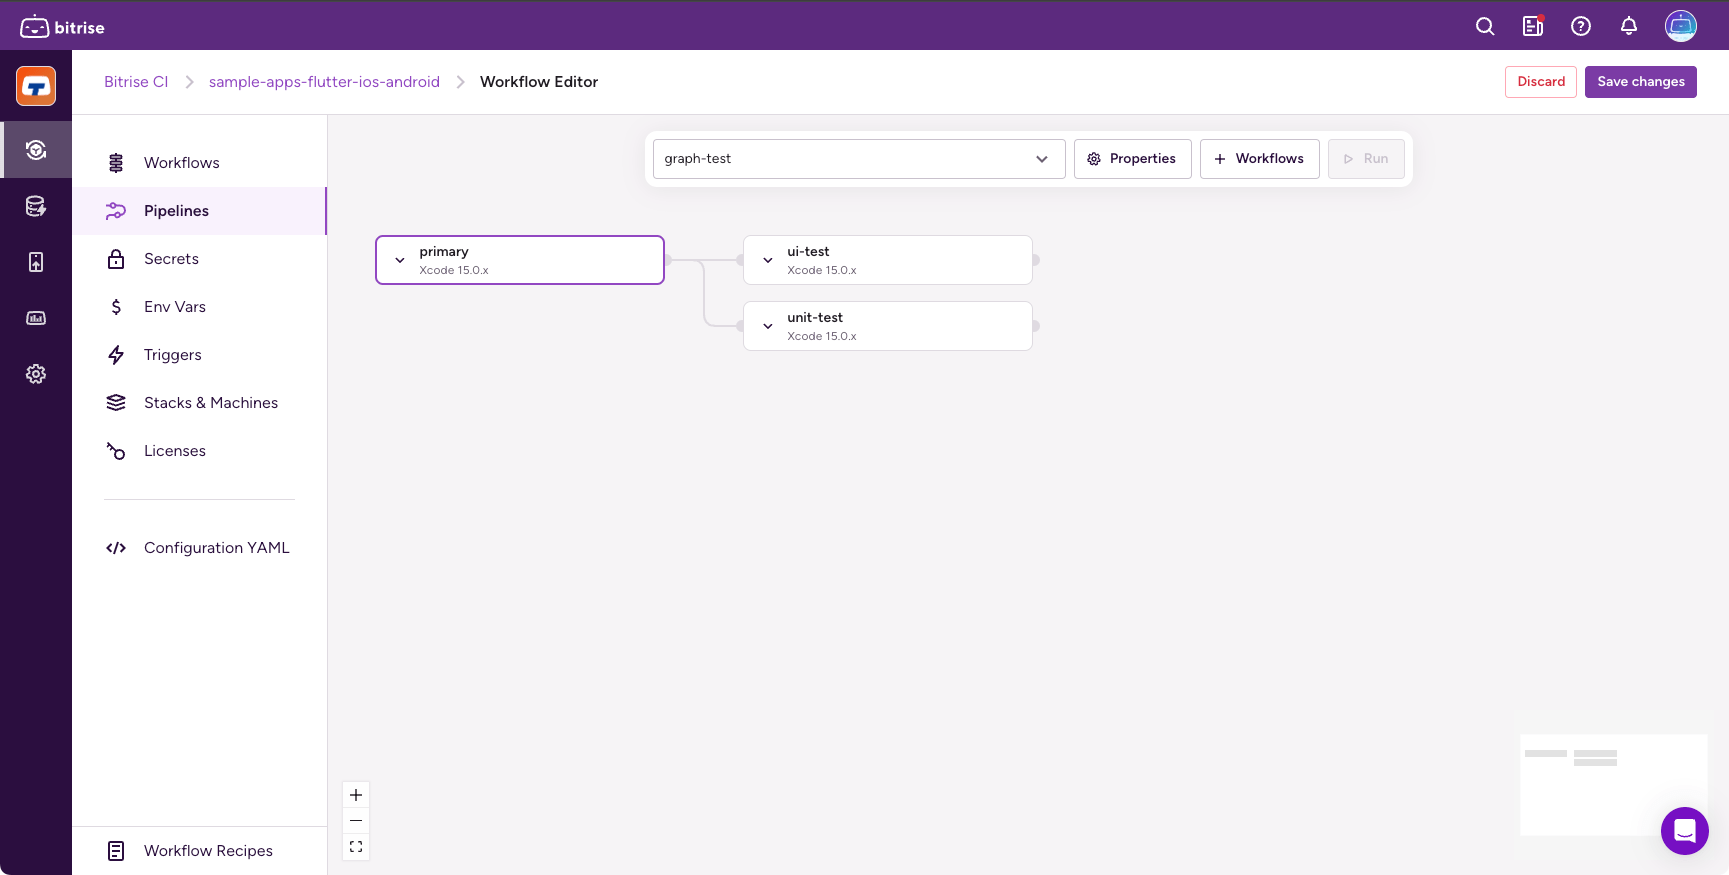
ワークフローエディターを開いて選択してください パイプライン 左側にあります。 名前を設定してクリック もう一度。
最初のワークフローを追加するには、をクリックします ワークフロー。
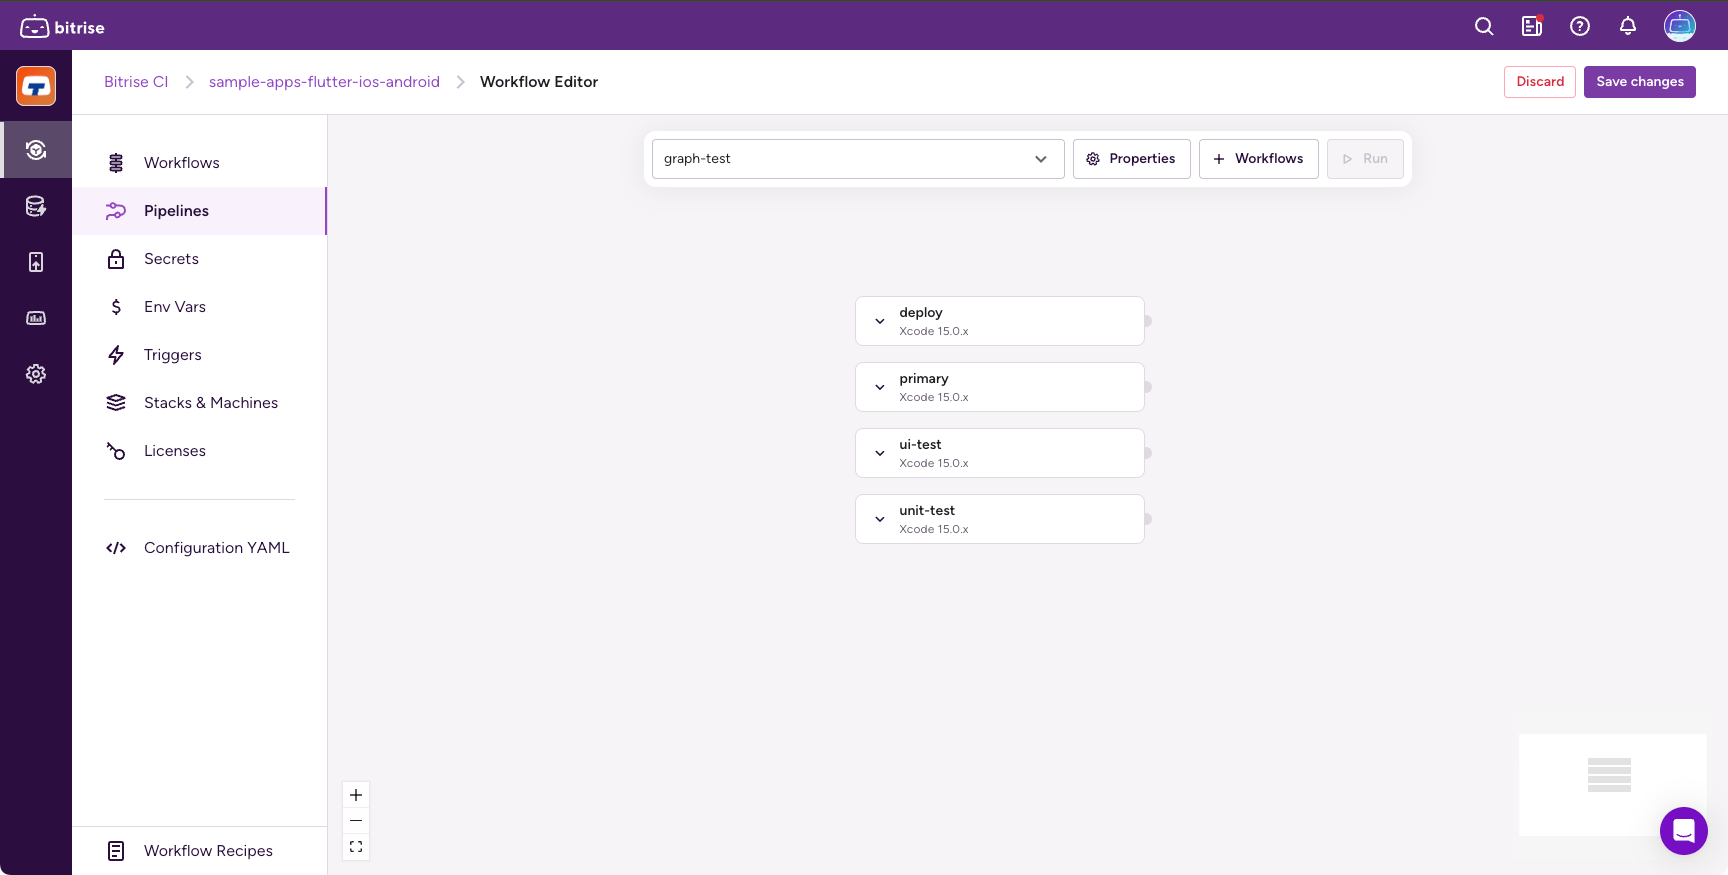
この方法でワークフローを追加し続けることができます。この方法では、ワークフロー間の依存関係は発生しません。すべてのワークフローが同時に実行されます。
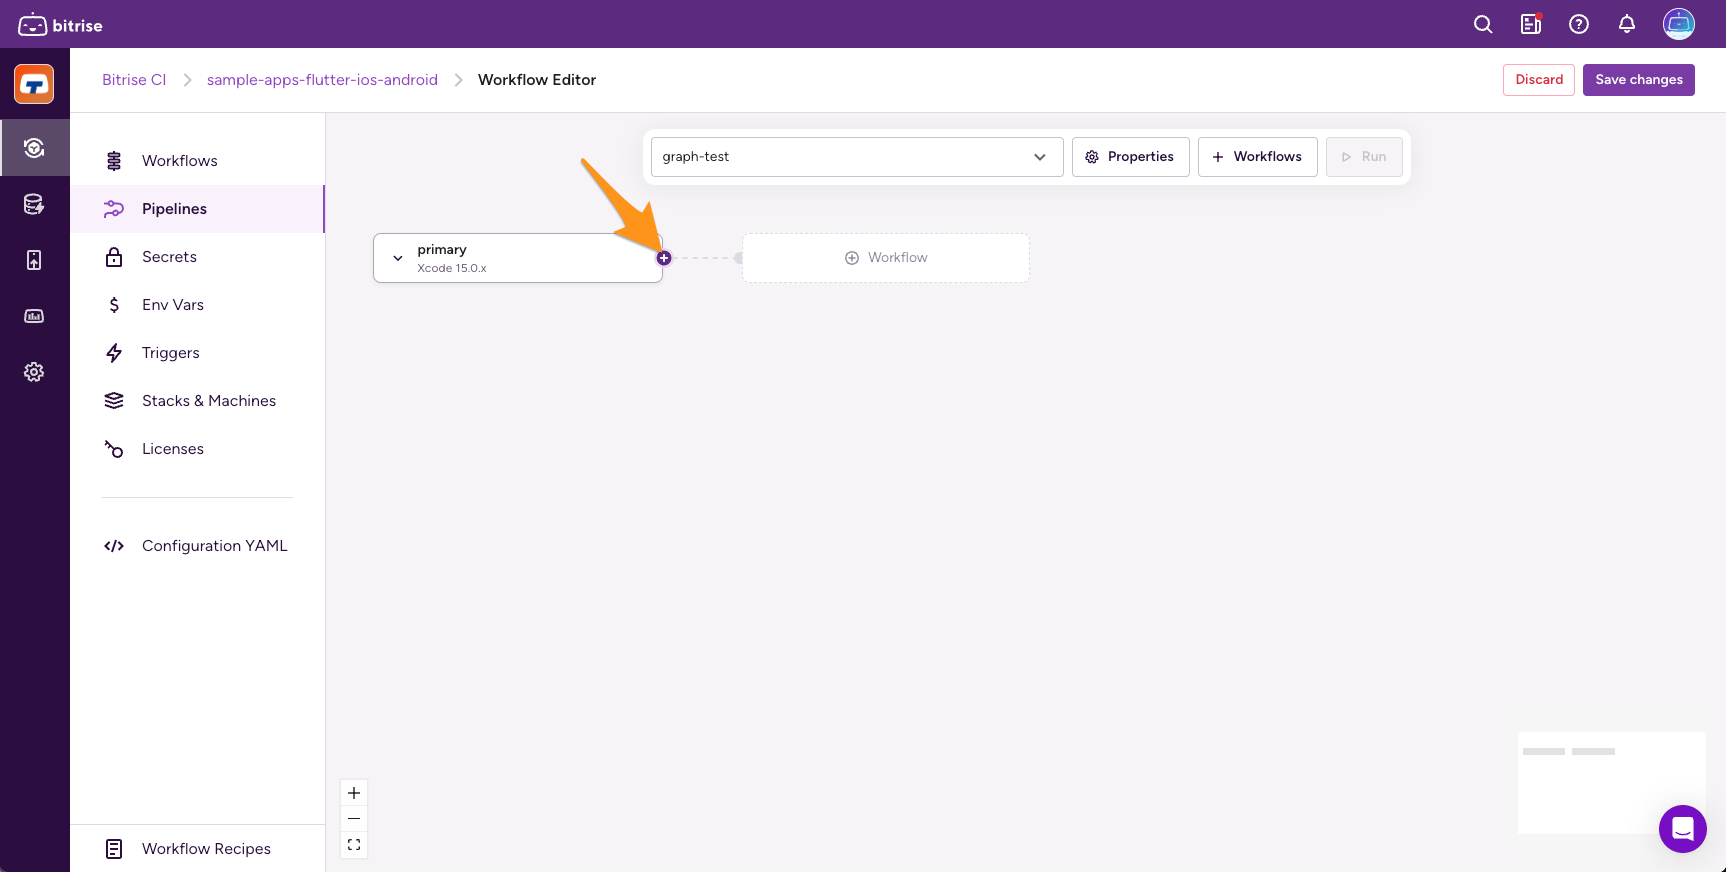
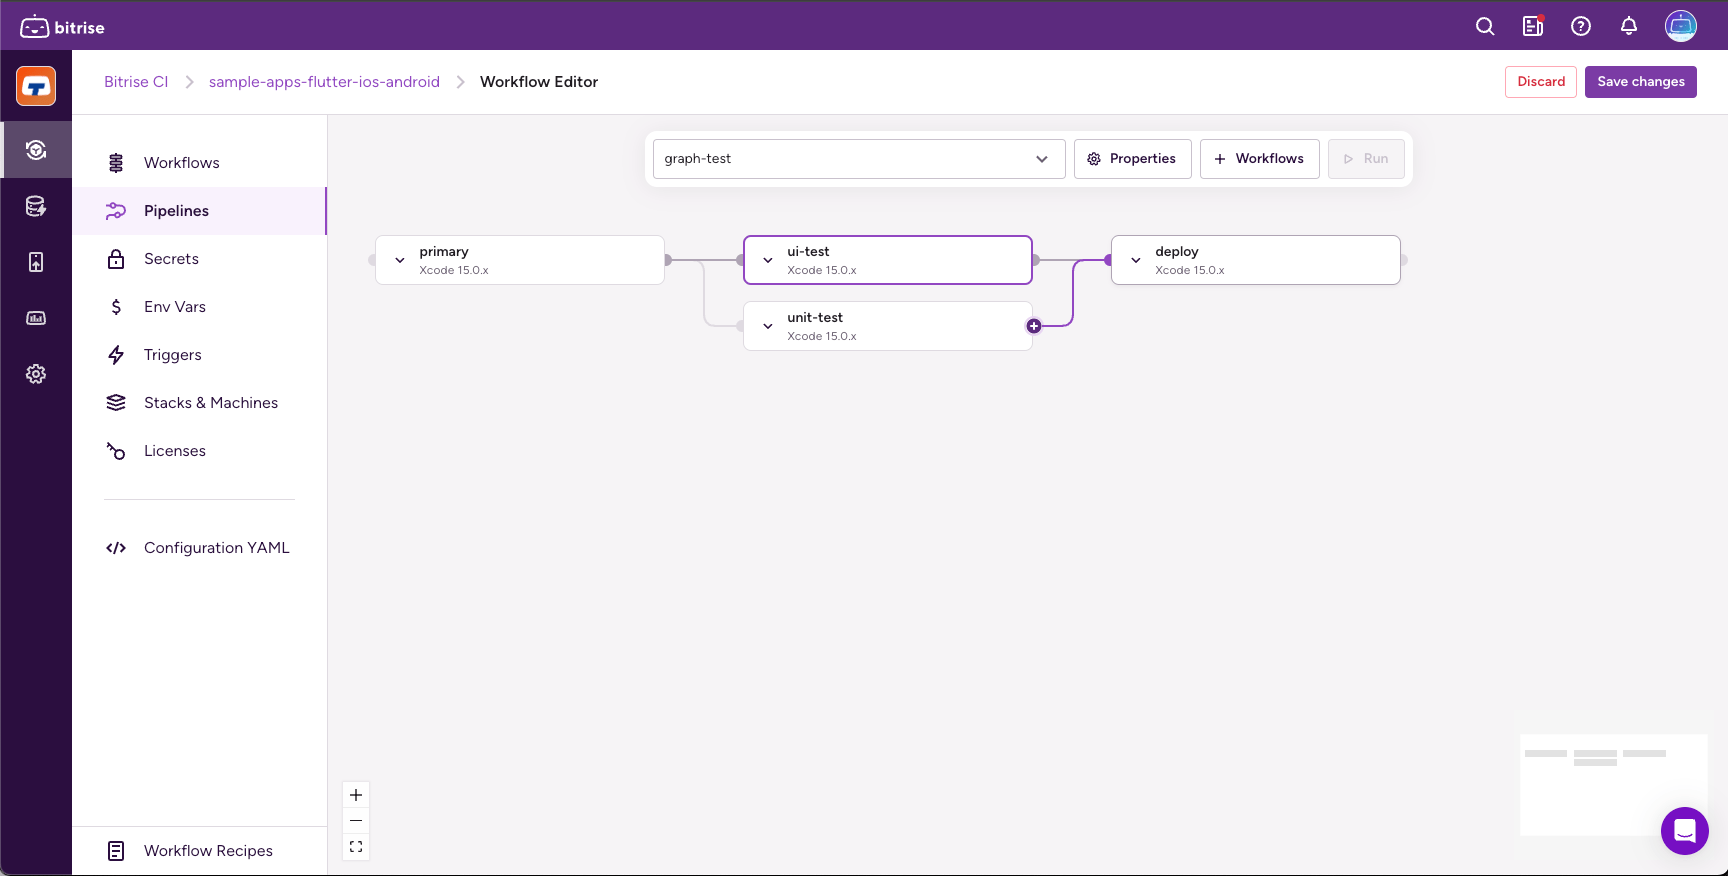
ワークフローは 1 つ以上のワークフローに依存できます。依存するワークフローのいずれかに障害が発生すると、ワークフローは実行されません。ワークフローの依存関係を作成するには、ワークフローの右端にカーソルを合わせ、プラス記号をクリックします
次の方法で、複数の依存ワークフローを同じワークフローに追加できます。
同じワークフローが複数の異なるワークフローに依存する場合があります。プラス記号からパイプラインにすでに存在する別のワークフローにドラッグしてパスを作成できます。
最低限のパイプライン設定は単一のワークフローで構成されています。
pipelines:
  example:
    workflows:
      A: {}
複数のワークフローをすべて並行して実行できます。
pipelines:
  example:
    workflows:
      A: {}
      B: {}
      C: {}
ワークフローは 1 つ以上のワークフローに依存できます。依存するワークフローのいずれかに障害が発生すると、ワークフローは実行されません。ワークフローの依存関係を作成するには、を使用する必要があります。 depends_on プロパティ:
pipelines:
  example:
    workflows:
      A: {}
      B:
        depends_on:
        - A
      C:
        depends_on:
        - A
      D:
        depends_on:
        - B
        - C
ワークフローが複数のワークフローに依存している場合、両方の YAML 配列構文を使用できます。
# Option 1
D:
  depends_on:
  - B
  - C
# Option 2
D:
  depends_on: [A, B]
構成上の制限事項
-
パイプラインには最大 200 のワークフローを含めることができます。それぞれがルートレベルの既存のワークフローでなければなりません
workflows要素。 -
ユーティリティワークフロー パイプラインには追加できません。ユーティリティワークフローを使用する場合は、通常のワークフローの一部として組み込んでください。
-
Each Workflow can be added to the same Pipeline only once. You can't include the same Workflow in multiple different parts of a Pipeline.
-
依存関係リストに定義されているワークフローは、すべて同じパイプラインの一部である必要があります。
-
設定によって生成されるディペンデンシーグラフには、円やループを含めることはできません。このようなエラーは最初から生成されます
パイプラインでの条件付きワークフロー実行
使用 run_if ワークフローの実行を制御する式:ワークフローを実行する条件と実行しない条件を設定できます。
ワークフローエディター
コンフィギュレーション YAML
-
パイプラインを開きます。
-
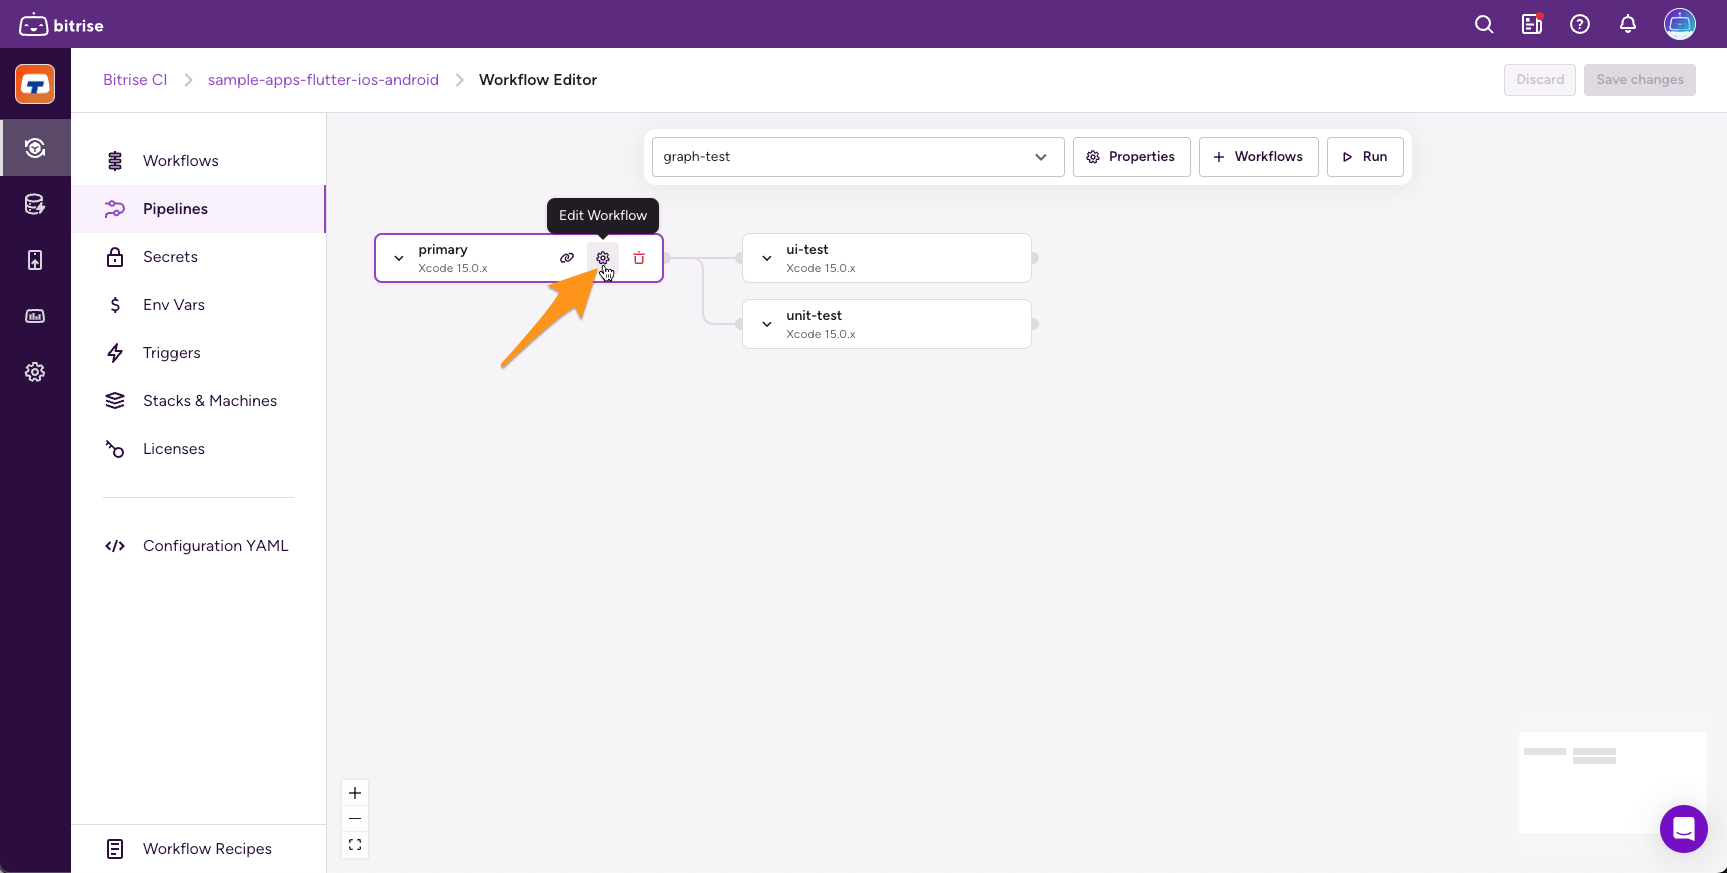
必要なワークフローにカーソルを合わせ、歯車アイコンをクリックして「ワークフローの編集」ダイアログを開きます。
-
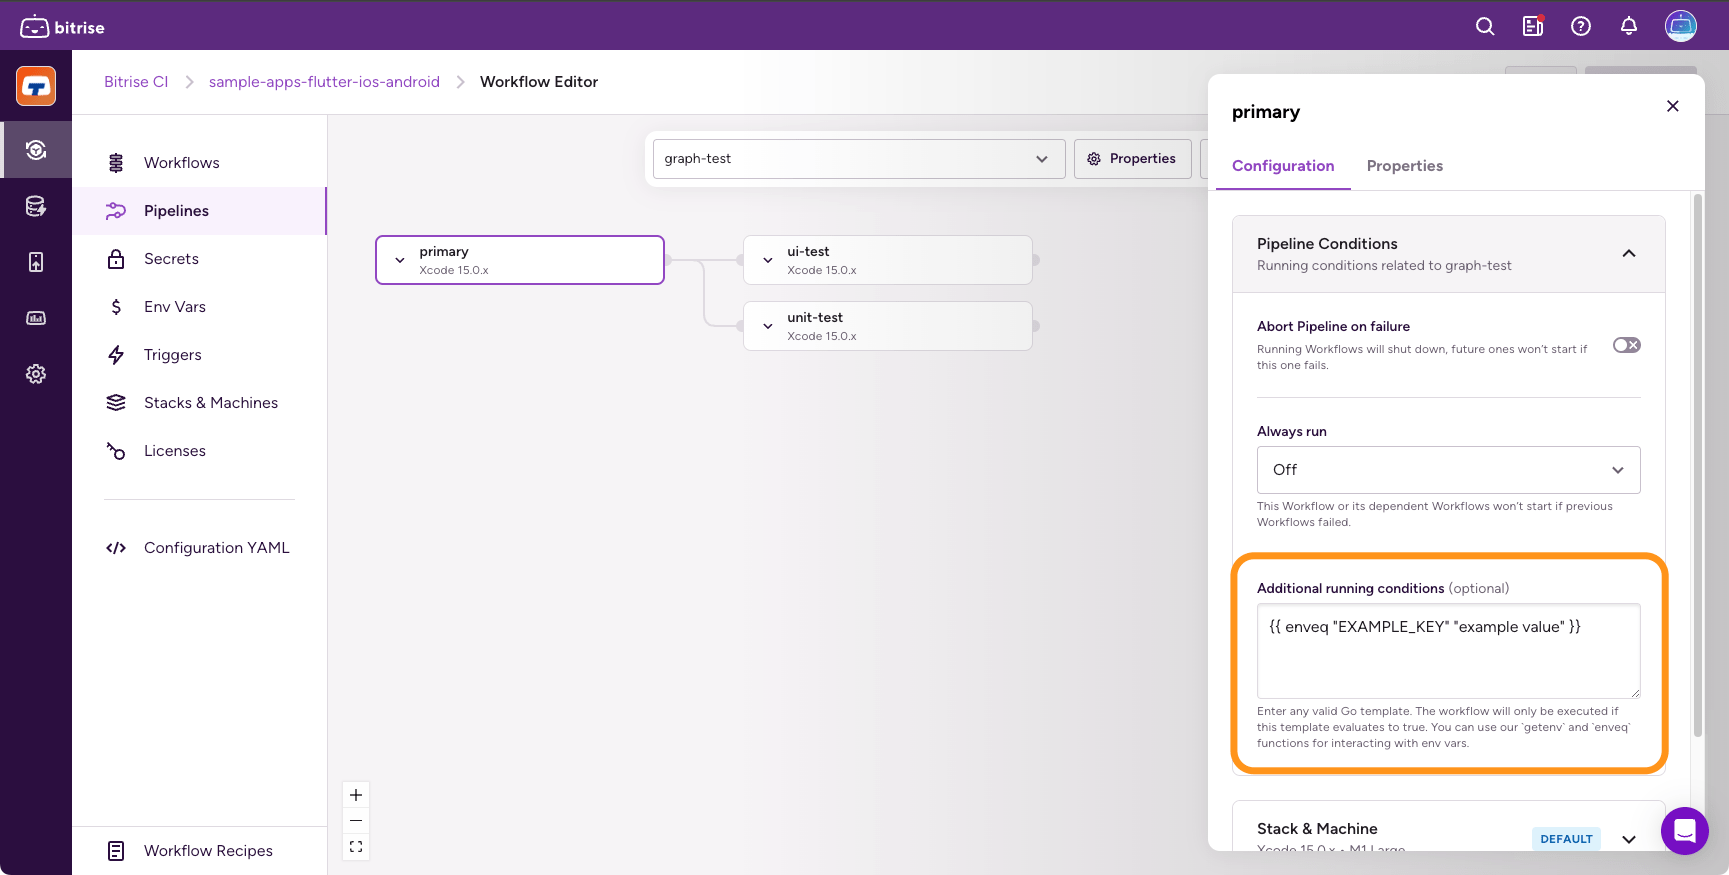
選択 パイプライン条件。
-
の中に その他の実行条件 入力、有効値の追加 テンプレートに移動。
入力は次の 3 つの補助関数を受け入れます。
-
getenv: 環境変数の値にアクセスします。 -
enveq: 環境変数を指定された値と比較します。 -
envcontain: Checks whether an Environment Variable contains a given string.
-
-
「ワークフローを編集」ダイアログを閉じて、をクリックします [変更を保存]。
パイプラインでは、 run_if プロパティには expression を含むフィールド Go テンプレート:
pipelines:
  example:
    workflows:
      A: {}
      B:
        run_if:
          expression: {{ enveq "EXAMPLE_KEY" "example value" }}
        depends_on: [A]
ザ・ expression field は次の 3 つの補助関数を受け入れます。
-
getenv: 環境変数の値にアクセスします。 -
enveq: 環境変数を指定された値と比較します。 -
envcontain: Checks whether an Environment Variable contains a given string.
Bitrise CLIは実行時に式を評価します。ワークフローは次の場合のみ実行されます run_if エクスプレッションは次のように評価されます。 true。が原因でスキップされたワークフロー run_if expression は成功したワークフローとしてカウントされるため、依存するワークフローが実行されます。
この例では、B は次の場合にのみ実行されます。 EXAMPLE_KEY 環境変数には次の値があります。 example value。
常にパイプラインでワークフローを実行する
ワークフローにマークを付けて、依存するワークフローが失敗した場合でも、確実に実行されるようにすることができます。
推移的依存
ワークフローが常に実行されるように設定されていても、その依存ワークフローは実行されない場合があります。1 つ以上の親ワークフローが失敗しても、問題のワークフローは引き続き実行されますが、依存するワークフローは実行されない可能性があります。
たとえば、ワークフロー C がワークフロー B に依存しているとします。ワークフロー B はワークフロー A に依存しています。3 つのワークフローのうち、B だけが常に実行されるように設定されています。
-
A が失敗すると B は実行されますが、その結果に関係なく、C は実行されません。B に依存することで、A にも依存するからです。
-
C は A と B の両方が成功した場合にのみ実行されます。
ワークフローエディター
コンフィギュレーション YAML
-
パイプラインを開きます。
-
必要なワークフローにカーソルを合わせ、歯車アイコンをクリックして「ワークフローの編集」ダイアログを開きます。
-
選択 パイプライン条件。
-
を設定 [常に実行] への入力 ワークフロー。
この設定は、1 つ以上の親ワークフローが失敗した場合でも、ワークフローが実行されることを意味します。ただし、依存するワークフローは実行されない可能性があります。
を使う should_always_run プロパティ。設定の範囲を指定する文字列が必要です。次の 2 つの値を使用できます。
-
none: 親ワークフローが失敗すると、そのワークフローは実行されません。これはデフォルト値です。 -
workflow: 親ワークフローが失敗しても、そのワークフローはとにかく実行されます。
pipelines:
  example:
    workflows:
      A: {}
      B:
        depends_on: [ A ]
        should_always_run: workflow
      C:
        depends_on: [ B ]
      D:
        depends_on: [ C ]
        should_always_run: workflow
この例では:
-
A に障害が発生しても、B は引き続き実行されます。
-
A または B のどちらかに障害が発生すると、C は実行されません。
-
C が実行されないか、実行されても失敗しても、D は引き続き実行されます。
ワークフロー障害時のパイプラインの中止
特定のワークフローが失敗したときにパイプラインをすぐに終了するように設定できます。デフォルトでは、パイプラインは終了しません
ワークフローエディター
コンフィギュレーション YAML
-
パイプラインを開きます。
-
必要なワークフローにカーソルを合わせ、歯車アイコンをクリックして「ワークフローの編集」ダイアログを開きます。
-
選択 パイプライン条件。
-
切り替え 障害発生時にパイプラインを中止 入力オン。
問題のワークフローが失敗すると、パイプラインはすぐに実行を停止します。
を追加 abort_on_fail フィールドが次のように設定されました true 選択したワークフローへ:
pipelines:
  example:
    workflows:
      A: {}
      B:
        abort_on_fail: true
この例では、ワークフロー B が失敗するとパイプラインは実行を停止します。ワークフロー A は中止され、以降のワークフローは実行されません。
Pipeline priority
You can set a priority for each Pipeline. The priority setting determines the position of the Pipeline build in the build queue: the higher the priority, the sooner the Pipeline build will run.
優先度は、ワークフローエディターまたはプロジェクトの設定 YAML ファイルのいずれかで割り当てることができます。優先度は常に -100~100 の間の整数です。数値が大きいほど優先度が高くなります。デフォルトの優先度は 0 です
ビルドの優先順位、およびさまざまなタイプの優先度間の優先順位の詳細については、以下をご覧ください。 ビルドの優先順位。
パイプライン内のワークフロー間でのファイルの共有
パイプライン内のワークフロー間でファイルを共有するには、 Bitrise.io にデプロイしてください ステップ 2 と パイプラインの中間ファイルをプルする ステップ 1。このステップは Pipeline 中間ファイルをローカルフォルダにダウンロードします。
ファイル共有を設定するには:
ワークフローエディター
コンフィギュレーション YAML
-
を追加 Bitrise.io にデプロイしてください 必要なファイルを生成するワークフローに進みます。
-
In the Pipeline Intermediate File Sharing input group, find the Files to share input and add the files as a newline-separated list of colon-separated items using the following structure:
<file_or_directory_path>:<environment_variable_key>.You can use another Environment Variable as a filepath: for an iOS project,
$BITRISE_IPA_PATH:BITRISE_IPA_PATHis a valid way to share a generated IPA with other Workflows. -
Add the Pull Pipeline intermediate files Step to any Workflow that needs the generated files.
-
Use the Artifact source input to specify a set of Workflows from which you need files.
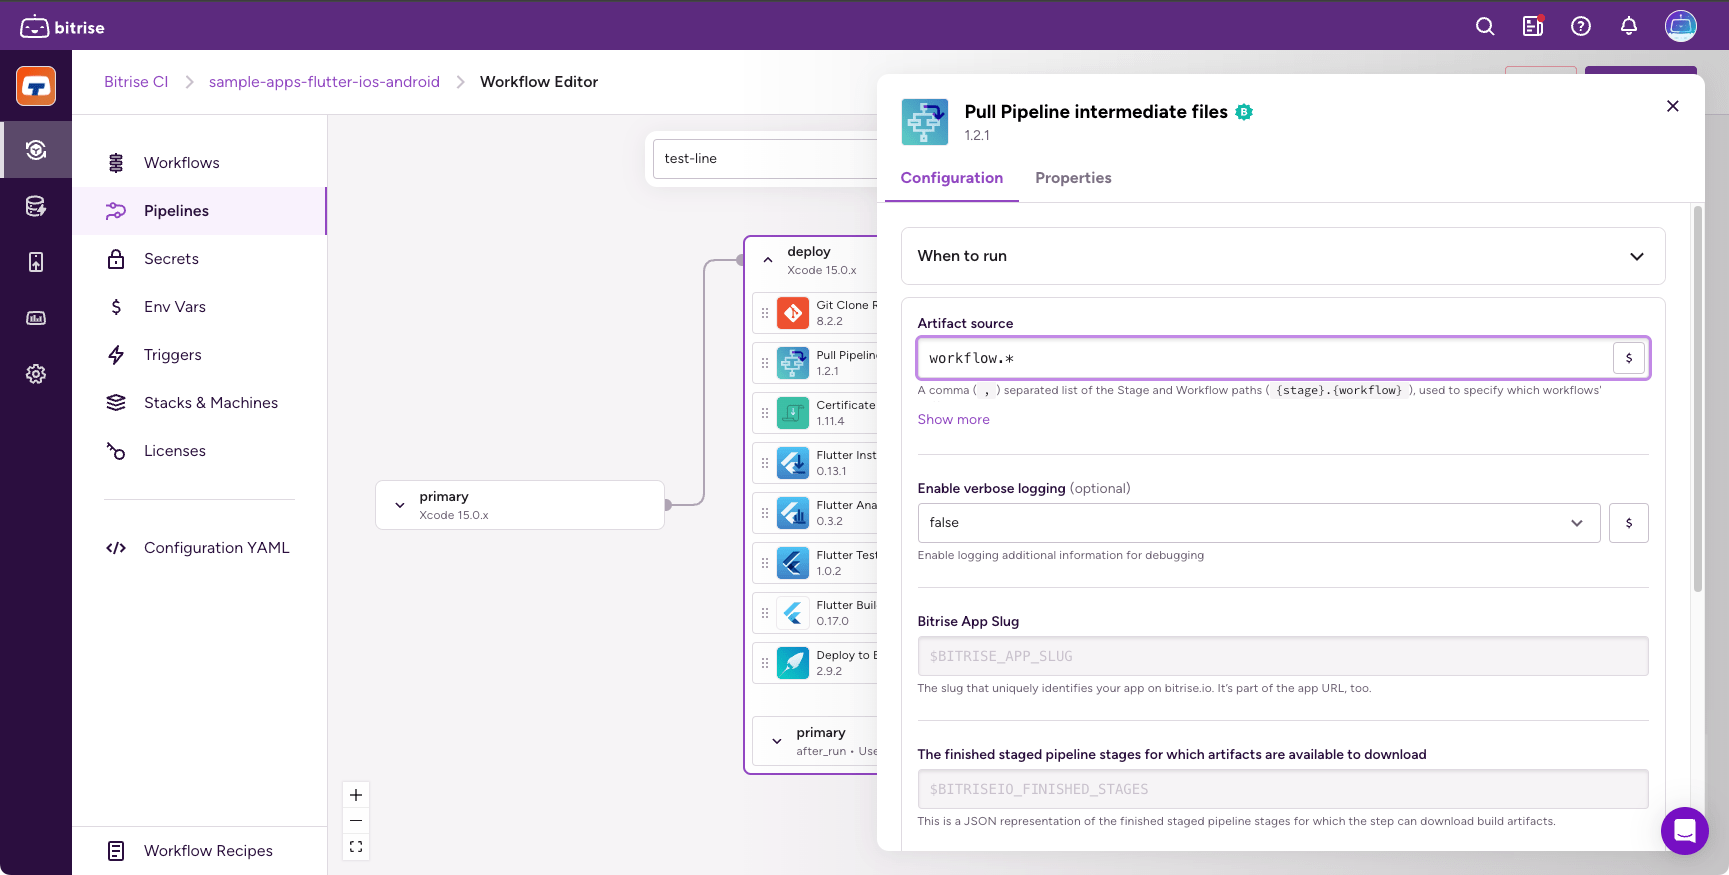
You can use wildcards in the input. In the example above, we’re pulling all artifacts from all Workflows which have a name starting with
workflow. -
When the Step finishes, your files and directories specified via the Deploy to Bitrise.io - Apps, Logs, Artifacts Step should be available.
-
を追加 Bitrise.io にデプロイしてください 必要なファイルを生成するワークフローに進みます。
-
Add the files to the
pipeline_intermediate_filesinput as a newline-separated list of colon-separated items using the following structure:<file_or_directory_path>:<environment_variable_key>.You can use another Environment Variable as a filepath: for an iOS project,
$BITRISE_IPA_PATH:BITRISE_IPA_PATHis a valid way to share a generated IPA with other Workflows.steps: - deploy-to-bitrise-io: { inputs: - pipeline_intermediate_files: "$BITRISE_IPA_PATH:BITRISE_IPA_PATH" -
を追加 パイプラインの中間ファイルをプルする 生成されたファイルを必要とする任意のワークフローへのステップ:
steps: - pull-intermediate-files: {} -
を使う
artifact_sourcesファイルが必要なワークフローのセットを指定するための入力:steps: - pull-intermediate-files@1: inputs: - artifact_sources: workflow.*入力にはワイルドカードを使用できます。上の例では、名前が「」で始まるすべてのワークフローからすべてのアーティファクトを抽出しています
workflow。 -
ステップが終了すると、ファイルおよびディレクトリは Bitrise.io にデプロイ-アプリ、ログ、アーティファクト ステップが利用できるはずです。
詳細については、 ステップ リポジトリ.
Sharing Env Vars between Workflows
から任意の環境変数を再利用できます。 ワークフロー その後で再利用します ステージ を使用して パイプライン変数を共有するステップ.このステップを使用して環境変数を共有しても、 アプリ.
run_if 条件を使用したオプションのワークフロー
簡単に組み合わせることができます パイプライン変数を共有する ステップ run_if オプションのワークフローでパイプラインを作成するための式。詳細については、こちらをご覧ください ステップを条件付きで有効または無効にする.
そうするために:
-
追加 パイプライン変数を共有する ワークフローに進みます。
-
必要に応じて、追加の実行条件を 追加の実行条件 入力。ステップは、ここで指定した条件が真の場合にのみ実行されます。
-
以降のワークフローで使用したい環境変数を パイプラインワークフロー間で共有する変数 入力。
環境変数キーの使用
を使用して環境変数を定義できます。
{key}={value}構文。例えば、MY_ENV_KEY=value、 またINSTALL_PAGE_URL=$BITRISE_PUBLIC_PAGE_URL.デフォルトの環境変数キーを使用する場合は、簡略構文を使用できます。例えば、
EXISTING_ENV_KEY.このステップを使用して環境変数を共有しても、 アプリ.
パイプラインの並列処理
並列処理により、パイプライン内の 1 つのワークフローの実行を、1 つの命令で複数のランナーに分割できます。これはテストシャーディングに特に役立ちます。シャードごとに定型コードを指定しなくても、1 つのテストワークフローを何度も再利用できます
並列処理により、パイプライン内の 1 つのワークフローの実行を、1 つの命令で複数のランナーに分割できます。これはテストシャーディングに特に役立ちます。シャードごとに定型コードを指定しなくても、1 つのテストワークフローを何度も再利用できます。実行時に、Bitriseは並列ワークフローのセットを自動的に作成し、シャード数とシャードの総数を環境変数として提供します
並列構成を使用して、同じコードベースから複数のホワイトラベルアプリを構築してテストしたり、同じ CI ジョブを複数回実行する必要があるその他の目標を達成したりすることもできます。
並列処理の概要
グラフパイプラインのみ
並列処理は、ステージを含むパイプラインでは使用できません。この機能を利用するには、ステージベースのパイプラインをグラフパイプラインに変換してください ステージのあるパイプラインをグラフパイプラインに変換.
を使用してワークフローの並列構成を作成できます parallel プロパティ。パイプラインには、並列構成の複数のワークフローを含めることができます。これらのワークフローは、他のワークフローに依存している場合があります。ワークフローが並列構成のワークフローに依存している場合、ワークフローのすべてのコピーの実行に依存します。
ザ・ parallel プロパティは整数を取ります。たとえば、値が 5 の場合、ワークフローのコピーが 5 つ実行されます。各コピーには次の 2 つの新しい環境変数が割り当てられます。
-
$BITRISE_IO_PARALLEL_INDEX: ワークフローの各コピーの 0 から始まるインデックス。 -
$BITRISE_IO_PARALLEL_TOTAL: コピーの合計数。
並列処理の設定
構成をセットアップするには:
ワークフローエディター
コンフィギュレーション YAML
-
ワークフローエディターを開きます。
-
パイプライングラフで目的のワークフローを見つけ、歯車アイコンをクリックしてワークフロー設定にアクセスします。
-
で [構成] タブをクリックし、 パラレルコピー 値を入力して設定します。
価値の制限
値は固定数でなければなりません。使用できるのは整数のみです。最大許容値は 50 です
You can use an Environment Variable as the value: it allows you to dynamically calculate the optimal number of parallel copies during the build.
別のワークフローが並列構成のワークフローに依存している場合、そのワークフローは、ワークフローのすべてのコピーが成功した場合にのみ実行されます。
-
を開く コンフィギュレーション YAML ファイル。
-
で
workflowsパイプラインのプロパティで、必要なワークフローを見つけてください。 -
を追加
parallelプロパティをその値に設定し、値を設定します。価値の制限
The value has to be a fixed number. You can only use integers. The maximum accepted value is 50. You can use an Environment Variable as the value.
You can use an Environment Variable as the value: it allows you to dynamically calculate the optimal number of parallel copies during the build.
この例では、
run-testsワークフローは 5 回並行して実行されます。report-resultsワークフローは以下によって異なります。run-testsそのため、5 つのコピーがすべて成功した場合にのみ実行されます。pipelines: my-ci-pipeline: workflows: build-without-testing: {} run-tests: depends_on: [build-without-testing] parallel: 5 report-results: depends_on: [run-tests]
Supported use cases for Pipelines
We have prepared some Pipeline recipes based on common iOS and Android use cases. These contain some of the most frequent tasks our users need to run. You can find them in our GitHub repository.
[en] Troubleshooting a Pipeline
[en] If a Pipeline build fails, you have two main options:
-
[en] Rebuild the Pipeline. You can rebuild either the entire Pipeline, or the failed Workflows.
-
[en] Rebuild with remote access which allows you to access the build machine while the build is running.