M1 stacks
Bitrise offers the Apple silicon M1 stacks for all credit-based accounts. We recommend using the latest version of our Steps on the M1 stacks.
Apple announced the Apple silicon M1 chip, in 2020. This represents a fundamental change in hardware architecture and it means that in the future, all iOS and macOS development will take place on Macs with Apple silicon. As such, Bitrise is offering a virtualized M1 environment for CI/CD purposes: our Xcode stacks run on M1 machines by default. You can still select Intel-based Xcode stacks but we recommend switching over to M1 machines which offer significantly improved performance.
Selecting an M1-based stack for your build
You have two options for selecting an M1-based stack, just like with any other stack:
-
Selecting it in the Workflow Editor.
-
Adding it as a meta property in the bitrise.yml file.
Workflow Editor
bitrise.yml
-
Open your app on Bitrise.
-
Click the button on the main page.

-
On the Workflows & Pipelines pages, you can:
-
Click the button to get to the bitrise.yml tab of the Workflow Editor.
-
Select a Workflow from the list of the app's Workflows.
-
-
Find the relevant stack selector menu:
-
If you want to set the default stack for all Workflows, find the Default stacks section.
-
If you want to set Workflow-specific stacks, find the Workflow Specific Stacks section and choose a Workflow.
-
-
In the dropdown menu, select an Xcode stack with Xcode version 13 or higher.
-
In the Machine type for the default stack section, select one of the M1 machines.
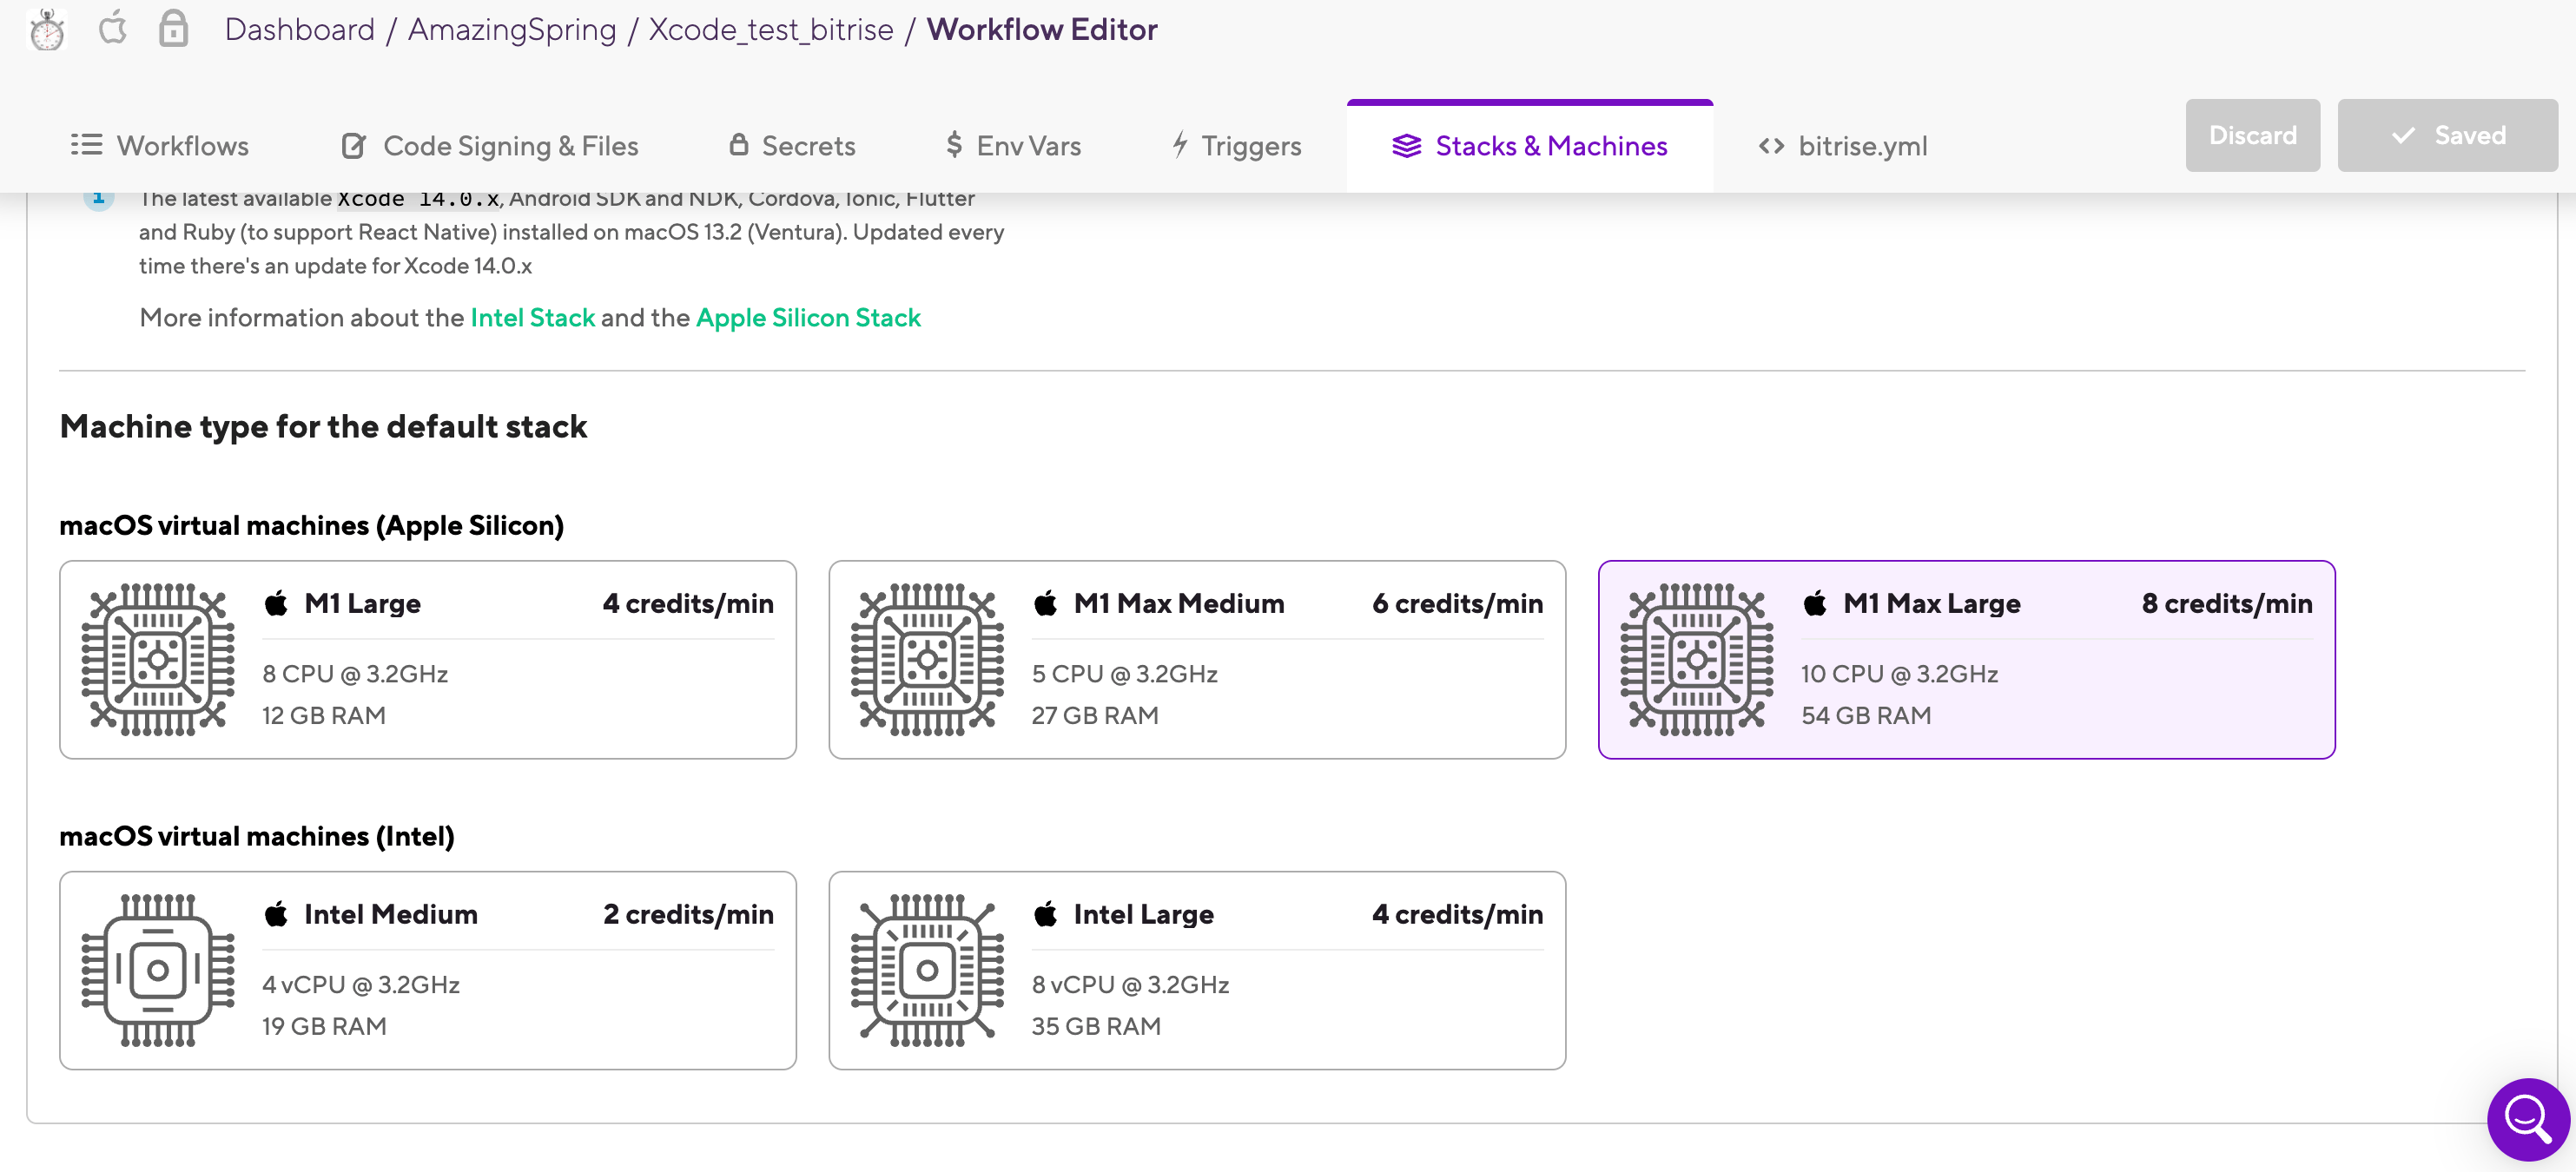
-
Click in the top right corner.
-
Open your app's
bitrise.ymlfile. -
Add a
metaentry with abitrise.ioproperty that contains two properties:stackandmachine_type_id, to specify the stack ID and the machine type.Find the stack IDs on the top of each stack report on the stack reports page. To use an M1-based stack, you must select one of the stacks with Xcode version 13 or higher.
Find the machine type here: Build machine types. For M1 machines, you have three options, depending on your subscription plan:
g2-m1.8core,g2-m1-max.5core,g2-m1-max.10core.You can set a default stack or Workflow-specific stacks:
-
For the default stack, add the
metaproperty at the top level of the structure. It should be on the same level as, for example,format_version. We recommend putting it at the end of the file:meta: bitrise.io: stack: osx-xcode-13.4.x machine_type_id: g2-m1.8core -
If you want to set a Workflow-specific stack, you need to add the meta entry under the Workflow itself:
workflows:
  deploy:
    meta:
      bitrise.io:
        stack: osx-xcode-13.4.x
        machine_type_id: g2-m1.8core
In this example, we're setting a Workflow-specific stack for the
deployWorkflow.
-
Transitioning to M1 from Intel-based stacks
Switching your development environment from Intel-based architecture to Apple silicon is a major change and it affects CI/CD as well.
Before transitioning to M1 machines on Bitrise, we recommend following these steps internally to make the transitioning phase as smooth as possible:
-
(Optional) Review Apple's official documentation.
-
Make sure that your Xcode version (Xcode 13.0 or above) supports the Apple silicon chip.
-
Update Homebrew, Ruby, and RubyGems with the latest versions.
-
Test your app using simulators and local physical devices.
-
Using instruments or Xcode debugging tools, monitor the app for crashes, memory leaks, or other issues.
-
Check for compatibility and performance issues.
After performing these steps, you can safely move on to transitioning your app on Bitrise as well!
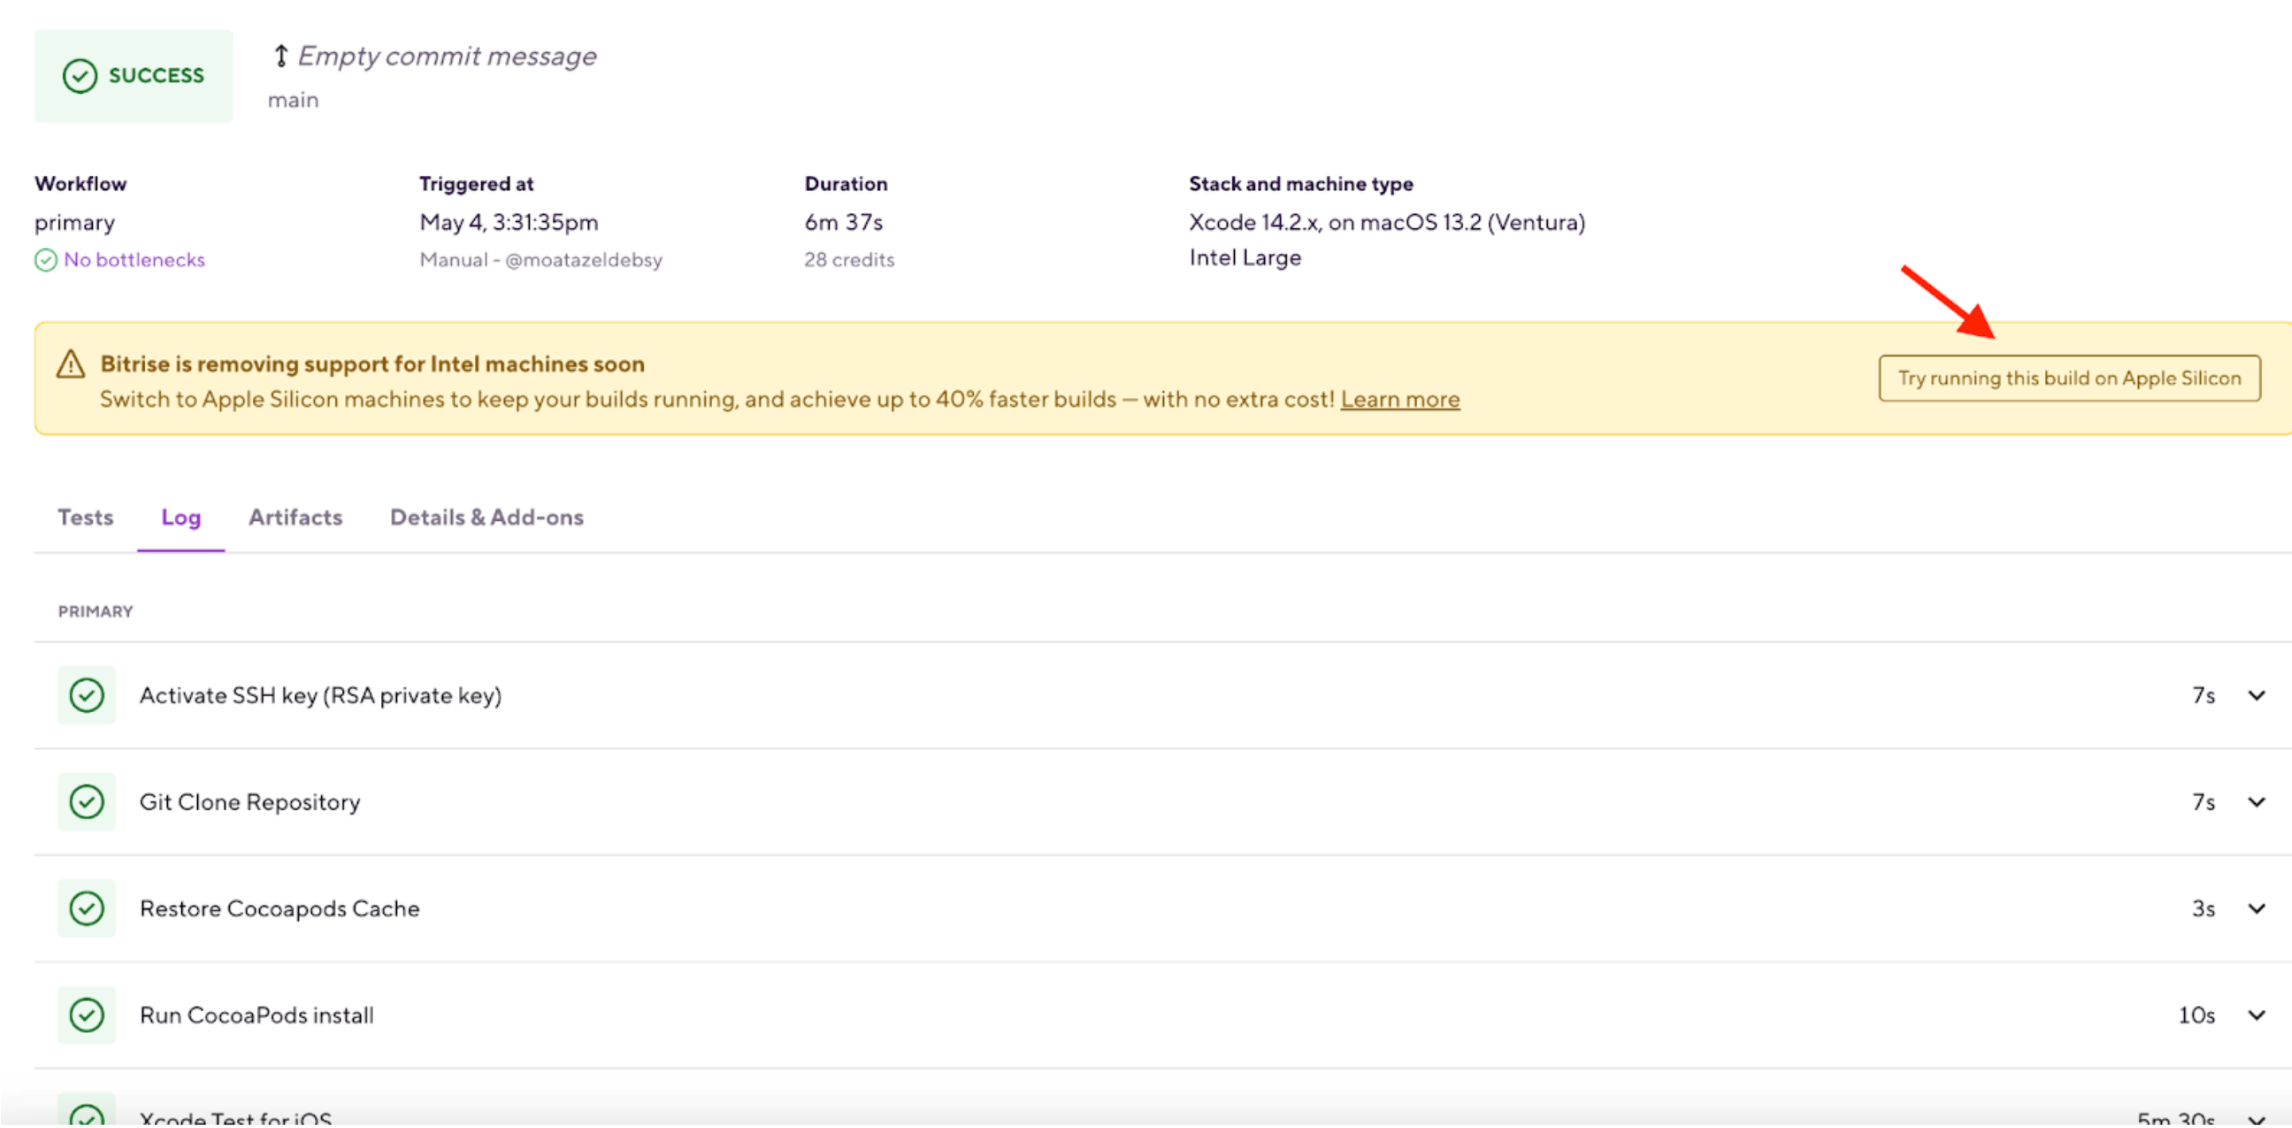
Rebuilding a successful build on an M1 stack
If your app on Bitrise is still using an Intel-based stack, you can re-run one of your successful builds on an M1 machine using the button.
 |
At Bitrise, we've tried to make sure the transition is as seamless as possible: we've updated our Steps, and we've installed M1-compatible versions of the most important tools on the M1 stacks.
This means that for the most part, if you use the official Bitrise Steps, your builds should work as they always did. Still, we strongly recommend testing everything locally on your own M1 machines. You can use the Bitrise CLI to do so.
Bitrise Step versions
Always use the latest version of any Bitrise Step in your Workflow on the M1 stacks! They are designed to be backwards compatible with the Intel-based stacks, too.
There are also some limitations, and some changes to be aware of when it comes to transitioning from Intel-based stacks to M1. We'll go through the most important ones.
Migration paths
There are two main migration paths to Apple silicon environments:
-
You can test your project on an Apple silicon development machine. If it builds and your tests run successfully, it will work on our M1 (Apple silicon) stacks, too.
-
You can run iOS Simulator and Xcode tests under Rosetta if your projects use a legacy framework that has no updated version available (that is, a version that contains the
iOS Simulator arm64architecture slice). This does not include the build itself which has no overhead compared to runningxcodebuild. For more info, check out Running iOS Simulator and tests under Rosetta.
Full Rosetta emulation
There is an alternative option for using Rosetta: you can run all CI tooling, including xcodebuild on a Rosetta 2 emulated stack: Using Rosetta emulated
stacks.
Running iOS Simulator and tests under Rosetta
Starting iOS Simulator under Rosetta to run your tests is simple:
-
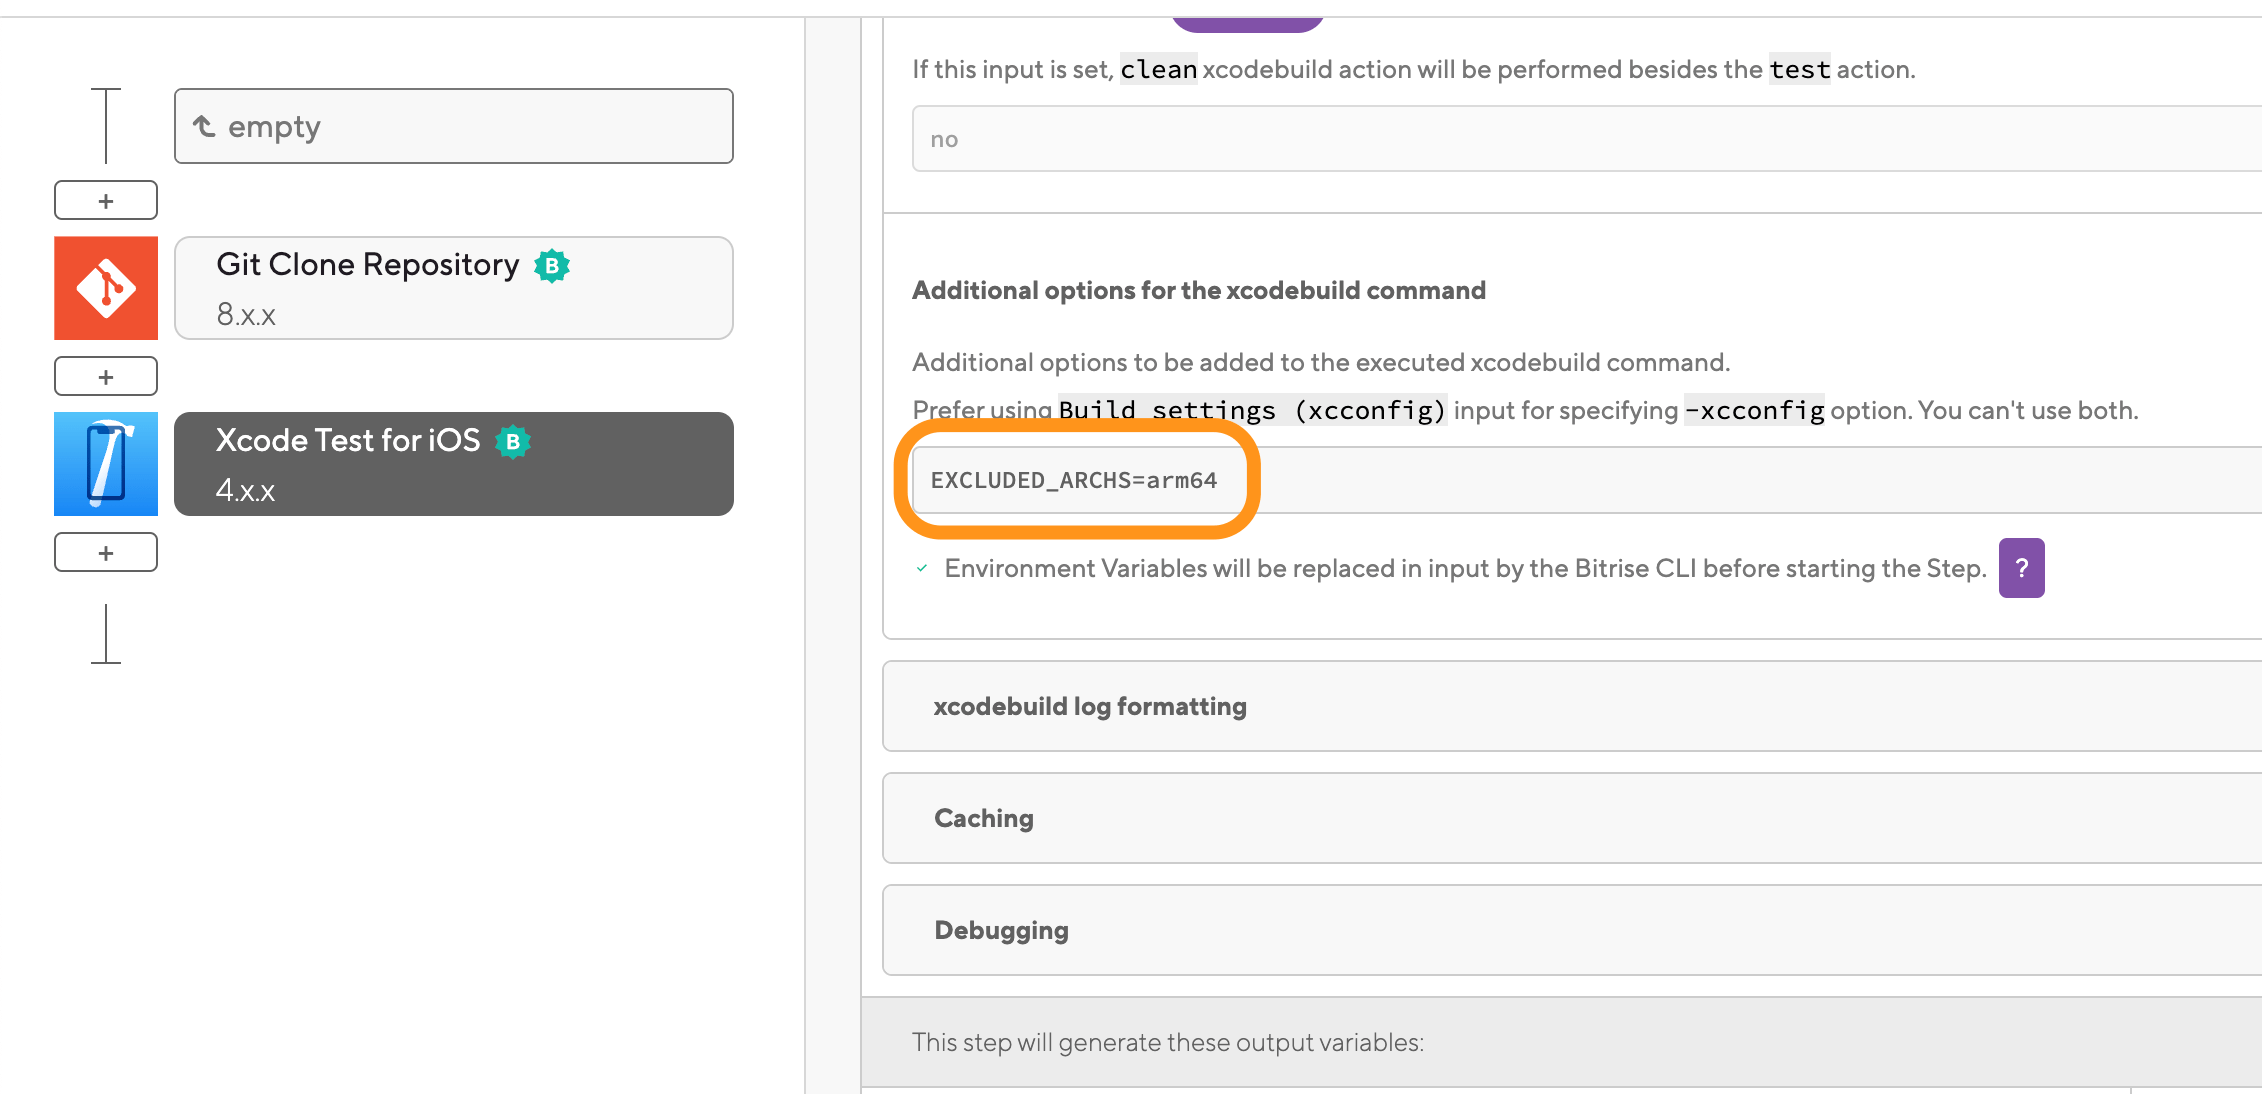
Add the Xcode Test for iOS Step or a custom Script Step to run your Xcode tests.
-
Add the
EXCLUDED_ARCHS=arm64option to xcodebuild:-
In the Xcode Test for iOS Step, add it to the Additional options for the xcodebuild command input in the xcodebuild configuration input group.
-
In a Script Step, add it at the end of the xcodebuild command:
xcodebuild -workspace Sample.xcworkspace -scheme Sample test -destination 'platform=iOS Simulator,name=iPhone 11' EXCLUDED_ARCHS=arm64
-
-
Run a build. Xcode will automatically start the iOS Simulator under Rosetta.
Setting the option in Xcode
You can also set the option in Xcode but you have to make sure to apply it to all test targets. For more information, check the relevant Apple tech note.
Using Rosetta emulated stacks
Rosetta is an emulator/translator designed by Apple to bridge the compatibilities between Intel and Apple silicon processors. It translates Intel-targeting executables so that they can run on M1-equipped machines.
Rosetta has been installed and enabled on specific stacks. The simplest way is to run your builds on a Rosetta 2 emulated Xcode stack. With this method, all CI tooling, including xcodebuild, will run under Rosetta.
Ruby and node installations
Using this method can cause issues with both Ruby and node installations.
-
Open your app on Bitrise.
-
Click the button on the main page.
-
On the Workflows & Pipelines pages, you can:
-
Click the button to get to the bitrise.yml tab of the Workflow Editor.
-
Select a Workflow from the list of the app's Workflows.
-
-
Go to the Stacks & Machines tab.
-
Open a stack selector dropdown menu: either in the Default Stack or the Workflow Specific Stacks section.
-
Choose a Rosetta 2 emulated Xcode-stack.

Configuring Build Settings in Xcode
To ensure that your app is compatible with M1 machines, you have to configure the Build Settings in Xcode:
-
Open your project in Xcode and go to the project settings. Select your target, and select .
-
Update your app’s architecture build settings to support building macOS, iOS, watchOS, and tvOS apps on Apple silicon.
-
Under the Architectures section, set Build Active Architecture Only to
Yesfor Debug and Release builds. This ensures that the compiler generates the binary for only one architecture.
Architecture build errors
Check out this article for possible solutions if you run into any architecture build errors.
Updating dependencies
It's important to ensure that all third-party libraries, frameworks, and other dependencies your app relies on are updated and compatible with the M1's ARM architecture.
This may require updating or replacing specific Carthage, SPM, and/or CocoaPods dependencies.
To update dependencies:
Carthage
CocoaPods
SPM
-
Navigate to your project directory containing the
Cartfile. -
Run the
carthage update --use-xcframeworkscommand to update all dependencies in yourCartfileto their latest compatible versions.
-
Navigate to your project directory containing the
Podfile. -
Run the
pod updatecommand to update all dependencies in yourPodfileto their latest compatible versions.
-
In Xcode, select "" > “" > "" from the menu.
To replace a specific dependency:
Carthage
CocoaPods
-
Open the
Cartfile. -
Replace the line containing the old dependency with the new one, specifying the desired version or branch.
-
Save the file and close the editor.
-
Run the command
carthage updatefrom the Terminal to fetch the new dependency and build the frameworks.
-
Open the
Podfile. -
Replace the line containing the old dependency with the new one, specifying the desired version or branch using the syntax
pod 'NewDependency', '~> version'. -
Save the file and close the editor.
-
Run the command
pod update NewDependencyfrom the Terminal to install the new dependency and update your project's workspace.
After updating your Carthage, SPM, and/or CocoaPods dependencies, review any custom build scripts or tools used in your project. These could include code analyzers or other development tools that you may need to update or replace with versions compatible with the ARM architecture.
Web services, APIs, plug-ins, and extensions
If your app relies on web services and APIs, ensure that these services are compatible and well-tested with your app running on Apple silicon.
If your app supports plug-ins or extensions, you may need to update or replace these components or provide guidelines for third-party developers to update their plug-ins or extensions.
Excluding ARM64 architecture for iOS simulator builds
Your app might rely on dependencies that do not have versions compatible with Apple silicon. If so, you will encounter a build error like one of these:
building for iOS Simulator, but linking in object file built for iOS,for architecture arm64
note: 'Example.xcframework' is missing architecture(s) required by this target(arm64), but may still be link-compatible. (in target 'ExampleApp' from project'ExampleApp')
In that case, you can configure your build settings to exclude ARM64 architecture when building your project.
fastlane
SPM
CocoaPods
Carthage
If you are using fastlane to build your app and need to exclude ARM64 architecture:
-
Add the following line to your build settings:
config.build_settings["EXCLUDED_ARCHS[sdk=iphonesimulator*]"] = 'arm64'
Example 1. Fastfile with ARM64 excludeddesc 'Run Tests' lane :run_tests do |options| APP = "#{APP}" unless options[:framework begin run_tests( scheme: APP, xcargs: "EXCLUDED_ARCHS='[sdk=iphonesimulator*] arm64'" ) rescue StandardError end end
For the Swift Project Manager, there are no specific settings to exclude ARM64 architecture. You need to configure the exclusion with setting the relevant xcodebuild flag:
-
In Xcode, you can exclude ARM64 architecture from all targets in the Xcode build settings: for details, see Apple's official documentation.
-
On Bitrise, you can append the relevant flag to the xcodebuild command in all official Xcode Steps. Find the Additional options for the xcodebuild command input and add
EXCLUDED_ARCHS=arm64.The supported Steps include:
For CocoaPods, you need to configure your Pod targets. The actual procedure differs somewhat depending on whether you own the Pod or if you use an external one.
-
For your own pods, add the following to the
.podspecfile:s.pod_target_xcconfig = { 'EXCLUDED_ARCHS[sdk=iphonesimulator*]' => 'arm64' } s.user_target_xcconfig = { 'EXCLUDED_ARCHS[sdk=iphonesimulator*]' => 'arm64' } -
For external pods where you can't control the
.podspecfile, paste the following snippet into yourPodfile:post_install do |installer| installer.pods_project.build_configurations.each do |config| config.build_settings["EXCLUDED_ARCHS[sdk=iphonesimulator*]"] = "arm64" end end
Overwriting build settings
The snippet ensures that the necessary build settings will be set every time you run pod install. You can manually exclude ARM64 in your Pod target's build settings but without this snippet, pod install overwrites those settings each time it runs.
-
Run the following script in a Script Step before calling any Carthage commands
xcconfig=$(mktemp /tmp/static.xcconfig.XXXXXX)
trap 'rm -f "$xcconfig"' INT TERM HUP EXIT

CURRENT_XCODE_VERSION="$(xcodebuild -version | grep "Xcode" | cut -d' ' -f2 | cut -d'.' -f1)00"
CURRENT_XCODE_BUILD=$(xcodebuild -version | grep "Build version" | cut -d' ' -f3)

echo'EXCLUDED_ARCHS__EFFECTIVE_PLATFORM_SUFFIX_simulator__NATIVE_ARCH_64_BIT_x86_64__XCODE_${CURRENT_XCODE_VERSION}__BUILD_${CURRENT_XCODE_BUILD} = arm64 arm64e armv7 armv7s armv6 armv8' >> $xcconfig

echo'EXCLUDED_ARCHS__EFFECTIVE_PLATFORM_SUFFIX_simulator__NATIVE_ARCH_64_BIT_x86_64__XCODE_'${CURRENT_XCODE_VERSION}' = $(EXCLUDED_ARCHS__EFFECTIVE_PLATFORM_SUFFIX_simulator__NATIVE_ARCH_64_BIT_x86_64__XCODE_$(XCODE_VERSION_MAJOR)__BUILD_$(XCODE_PRODUCT_BUILD_VERSION))' >> $xcconfig

echo 'EXCLUDED_ARCHS = $(inherited) $(EXCLUDED_ARCHS__EFFECTIVE_PLATFORM_SUFFIX_$(EFFECTIVE_PLATFORM_SUFFIX)__NATIVE_ARCH_64_BIT_$(NATIVE_ARCH_64_BIT)__XCODE_$(XCODE_VERSION_MAJOR))' >> $xcconfig

export XCODE_XCCONFIG_FILE="$xcconfig"

envman add --key XCODE_XCCONFIG_FILE --value "$xcconfig"
Xcode and MacOS version requirement
The most important requirement is that you need to use Xcode 13.0 or above. It is highly recommended to transition to Xcode 13.0 or higher anyway, as Apple no longer accepts apps submitted to the App Store if they were built with older Xcode versions.
As for the operating system, M1 requires macOS Monterey or later version. Big Sur isn't compatible with Apple silicon.
Android SDK version requirement
All Xcode stacks include the Android SDK, too, as part of our support for cross-platform apps.
On M1 stacks, Android 32 is installed, as Google hasn't introduced M1 compatibility to earlier versions.
Changes to Homebrew's default path
Homebrew is the most popular package manager for macOS and it is of course available on Bitrise, on both Intel-based and M1 stacks.
There is one important difference: the default path for packages has changed:
-
On Intel-based Macs, the default path for packages is
/usr/local/. -
On M1-based Macs, the default paths for packages are
/usr/local/bin/,/usr/local/share/, and/usr/local/lib/.
This is only important if your build uses hard-coded paths to access Homebrew packages. In that case you need to change the path to the M1 version.
Other known issues and limitations
M1 has some other limitations and known issues. We're working hard at making sure we have a working solution for most use cases.
Hanging builds issue
There is a bug in Apple's hypervisor framework that can cause issues in virtualized environments like ours. The issue can occur whenever a simulator is launched: for example, our Xcode Test for iOS Step uses an iOS simulator to run tests. Once the simulator starts, your build can hang indefinitely. This doesn't happen every time a simulator is launched so the majority of your builds will be unaffected but the issue can and does happen.
The issue has been reported to Apple and a fix coming out with macOS Ventura is being tested. In the meantime, we recommend using a workaround.
Detecting and aborting hanging Steps without output
If you are experiencing hanging Steps other than the Start Xcode simulator Step, check out our guide on Detecting and aborting hanging Steps without output.
The workaround is simple: you launch an Xcode simulator at the start of the build, check whether it hangs and if it does, restart the Workflow so that the hanging issue doesn't waste your time and credits.
-
Add the Start Xcode simulator Step as the very first Step Workflow.
It's important to launch the simulator before anything else, even before cloning the repository. If the issue doesn't occur, booting up the simulator should only take a few seconds and you can use it later in the Workflow to run your tests.
-
Add a 90-second boot timeout to the Step. You can do it either in the Workflow Editor or in the
bitrise.ymlfile:Destination device
Make sure to also set the simulator destination in the Device destination specifier input of the Step. In the
bitrise.ymlfile, the input's name isdestination.You can find the available destination devices in Xcode.
-
On the graphical UI of the Workflow Editor: find the Simulator boot timeout (in seconds) input and set it to 90.
-
In the
bitrise.yml, you need to set thewait_for_boot_timeoutinput to 90:- xcode-start-simulator: inputs: - destination: platform=iOS Simulator,name=iPhone 8,OS=latest - wait_for_boot_timeout: 90
-
-
Add the Trigger Bitrise workflow Step to your Workflow right after the Start Xcode simulator Step.
We will use this Step to detect whether the previous Step hung and if it did, to restart your build.
-
Set the Step to run even if a previous Step failed. You can do it either in the Workflow Editor or in the
bitrise.ymlfile-
In the graphical UI of the Workflow Editor: find the Run if previous Step failed toggle and switch it on.
-
In the
bitrise.ymlfile: set theis_always_runattribute totrue.- trigger-bitrise-workflow: is_always_run: true
-
-
Set the
run_ifattribute: the Step should only run if the Start Xcode simulator ended up with ahangedstatus.The Start Xcode simulator Step exports an Env Var that stores the status of the simulator. This is what we'll use to detect whether the build hung.
YAML mode only!
You can only do this in the
bitrise.ymlfile of your app.- trigger-bitrise-workflow: is_always_run: true run_if: '{{enveq "BITRISE_SIMULATOR_STATUS" "hanged"}}' -
Configure the API token and the Workflow ID:
-
Build Trigger API token: You can find it on the Code tab of your app's page on Bitrise.
-
Workflow ID: The name of the Workflow that you want to trigger. In this case, it should be the same Workflow.
In the
bitrise.ymlfile, the Step should look something like this:- trigger-bitrise-workflow: is_always_run: true run_if: '{{enveq "BITRISE_SIMULATOR_STATUS" "hanged"}}' inputs: - api_token: $TRIGGER_TOKEN - workflow_id: my-workflow-name -
- xcode-start-simulator:
    inputs:
    - destination: platform=iOS Simulator,name=iPhone 8,OS=latest
    - wait_for_boot_timeout: 90
- trigger-bitrise-workflow:
    is_always_run: true
run_if: '{{enveq "BITRISE_SIMULATOR_STATUS" "hanged"}}'
inputs:
- api_token: $TRIGGER_TOKEN
- workflow_id: my-workflow-name
That's it. If your build hangs at the simulator stage, it will automatically restart itself within 90 seconds, ensuring that the issue doesn't end up wasting a huge amount of time.