Build triggers
You can configure automatic build triggers on Bitrise by specifying a trigger event and a Workflow. You can trigger builds from code pushes, pull requests or Git tags.
Existing trigger configurations
This page details information about target-based build triggers, defined within a Workflow or a Pipeline. We recommend this approach for all new users as it offers a more granular and flexible build trigger system.
Existing configurations might use legacy, project-based triggers. Read more about them: Legacy project-based triggers.
Use build triggers to start one or more Bitrise builds automatically. A trigger's definition contains a code event and one or more conditions that the event must match in order to trigger a build.
You can define triggers within a Workflow or a Pipeline. They allow a single code event to trigger multiple different Workflows or Pipelines so you can run all the relevant parts of your CI process together based on the scope of code change, without bundling everything into a single Workflow or Pipeline. Each build will run independently and deliver individual results.
For the detailed syntax of triggers and the exact trigger conditions, see YAML syntax for build triggers.
Code events
You can use three types of code events to trigger builds:
-
Code push: Trigger a build automatically whenever you push code using commits that match your trigger conditions. For example, a commit to the specified branch of the project's repository triggers a build.
-
Pull request: Trigger a build automatically whenever a pull request matches your trigger conditions. For example, you can specify source and/or destination branches where any pull request will trigger a build.
Initial PR event
A pull request only triggers a build once, at its initial event. In most cases, that initial event is the creation of the pull request. For example, converting a PR to a draft PR will never trigger another build. To trigger builds for updates to a pull request, configure code push triggers for the new commits.
-
Git Tag: Trigger a build automatically whenever a commit with a specific tag triggers a build.
Conditions
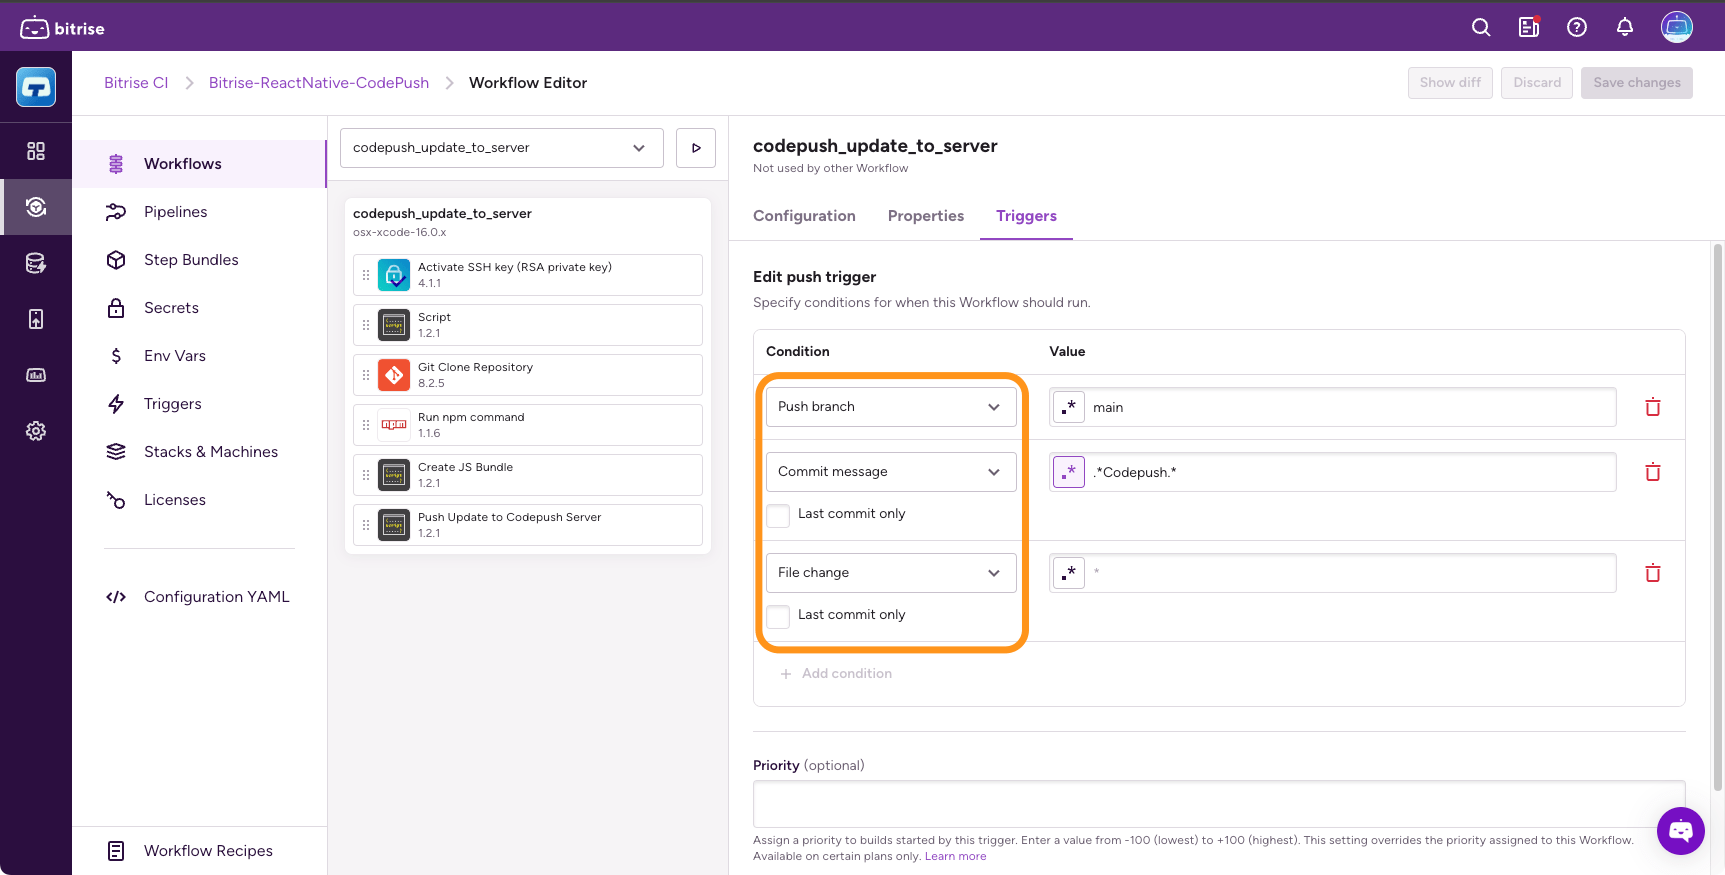
A trigger condition is a filter for code events: instead of triggering a build on every pull request, you can configure triggers for pull requests targeting a specific branch.
Different Git providers support different conditions. For the full table, see Supported trigger conditions.
Trigger conditions can be combined within a single trigger: for example, you can set up a pull request trigger that only triggers a build if the PR targets a specific branch AND contains a specific label.
Creating build triggers
You create build triggers directly in a Workflow or Pipeline. Such triggers allow a single code event to trigger multiple Workflows or Pipelines. You can create triggers via the UI or in the configuration YAML file.
To create triggers:
Workflow Editor
Configuration YAML
-
Log in to Bitrise and select Bitrise CI on the left, then select your project.
-
Click the button on the main page.

-
Select a Workflow.
-
Select the Triggers tab on the Workflow's page.
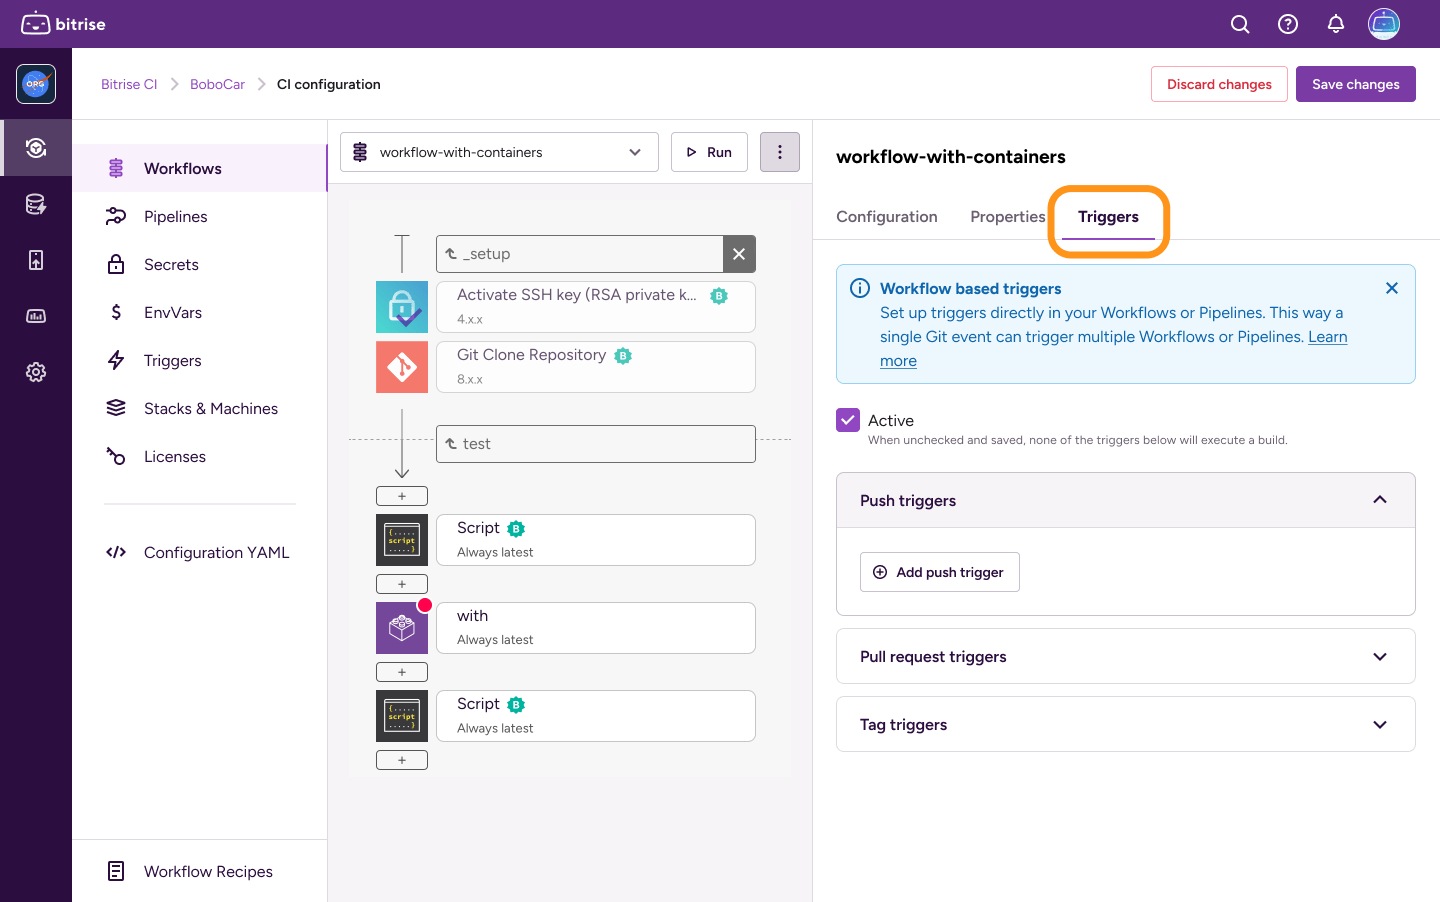
-
Select the trigger type and click the button.
-
Configure your trigger in the dialog.
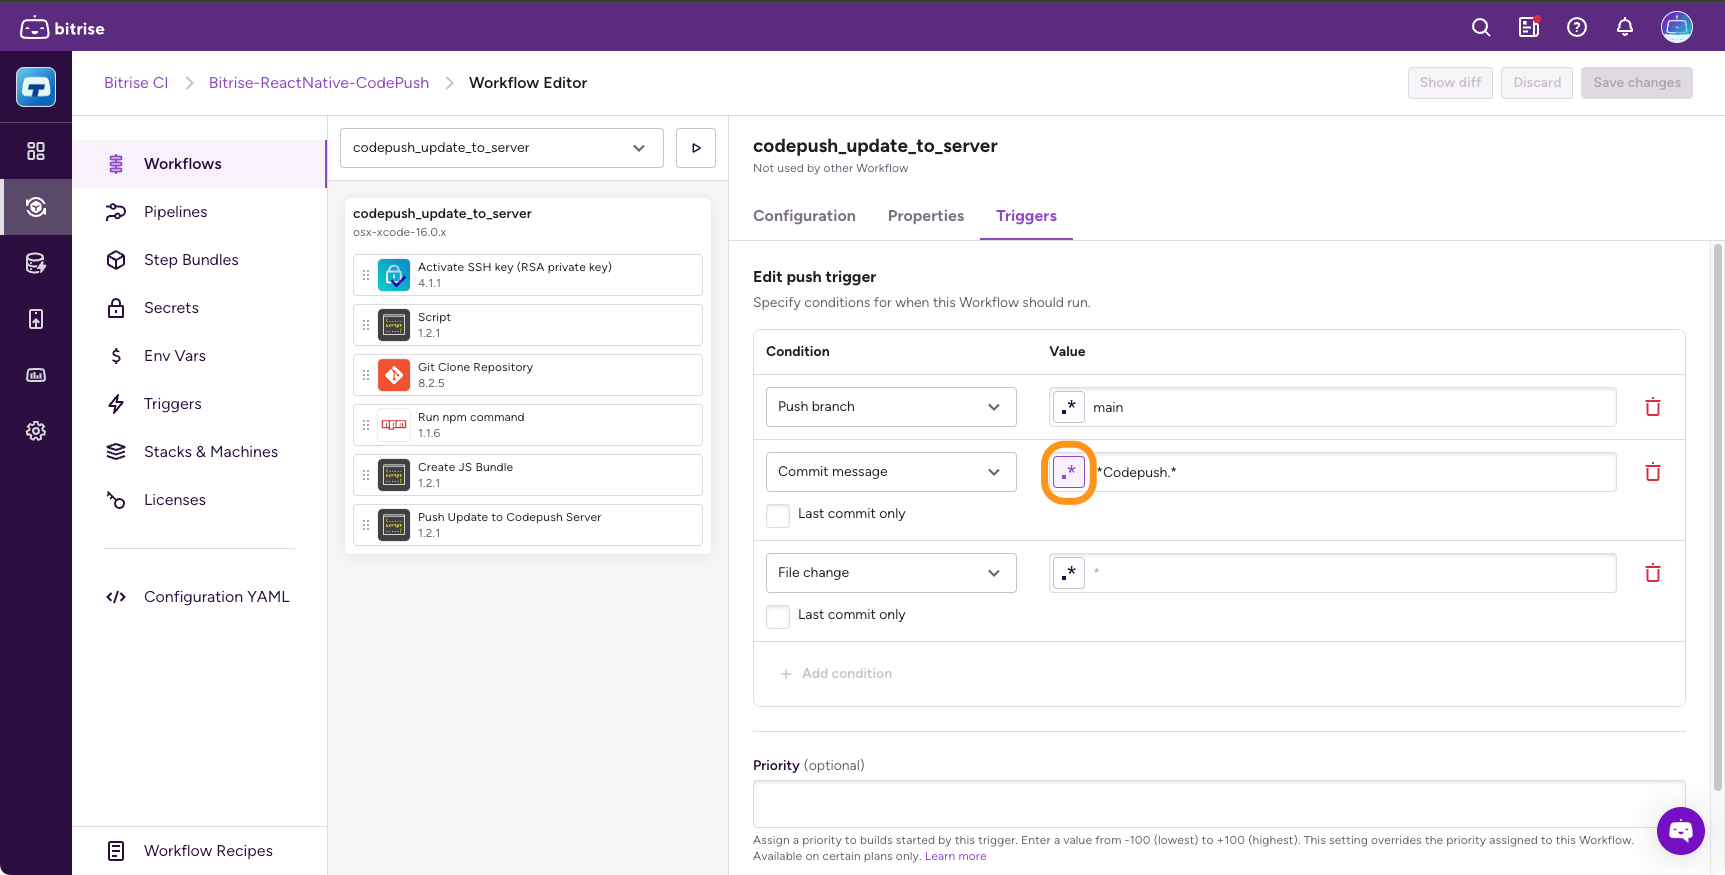
Click the regex pattern button to turn on regular expressions when defining a value for the trigger condition.
-
When done, click .
-
Open your configuration YAML file.
-
Find the Workflow.
-
In the Workflow, add a
triggersproperty.my-workflow: triggers:
-
Create your triggers. You can find the exact syntax for the different trigger types here: YAML syntax for build triggers.
For example, this trigger starts a build with the Workflow called
my-workflow:my-workflow: triggers: push: - commit_message: your_messageYou can use two properties for pattern matching:
-
patternallows you to use simple wildcard matching. -
regexallows you to use complex pattern matching with regular expressions.
my_awesome_workflow triggers: push: - branch: main - commit_message: pattern: "hello" last_commit: true pull_request: - source_branch: "*" -
-
Save the configuration.
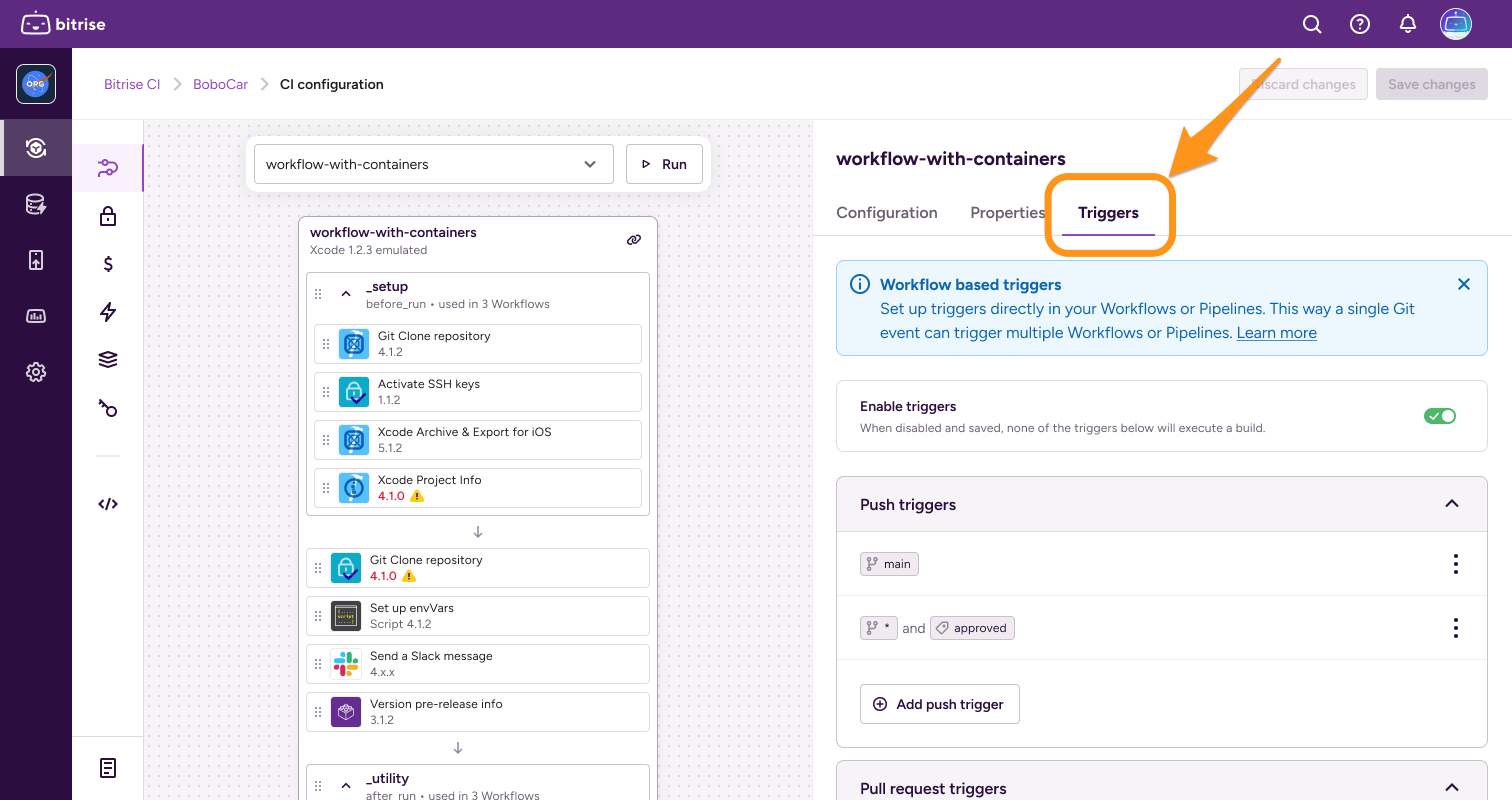
Adding a new target-based trigger on the Triggers page
You can quickly add new target-based triggers without leaving the Triggers page. For example, after reviewing your active triggers, you can immediately add another one without switching context, speeding up your setup process.
-
Go to your project's Triggers page.
-
If you don't have triggers yet, you’ll see a new Add Trigger button in the middle on the Triggers page. Click Add trigger and fill out the dialog.

-
If you already have target-based triggers, the add trigger button is above the triggers in the top-right corner. Click add trigger and fill out the dialog.

Adding a trigger here creates a specific workflow, which then appears under that workflow’s Triggers tab on the Workflows page for easy management.
Disabling a trigger
You can temporarily disable any build trigger. A disabled trigger doesn't trigger builds but retains all configuration information. You can reactivate a disabled trigger at any time.
To disable a build trigger:
Workflow Editor
Configuration YAML
-
Open the Workflow Editor on Bitrise.
-
Select a Workflow or Pipeline.
-
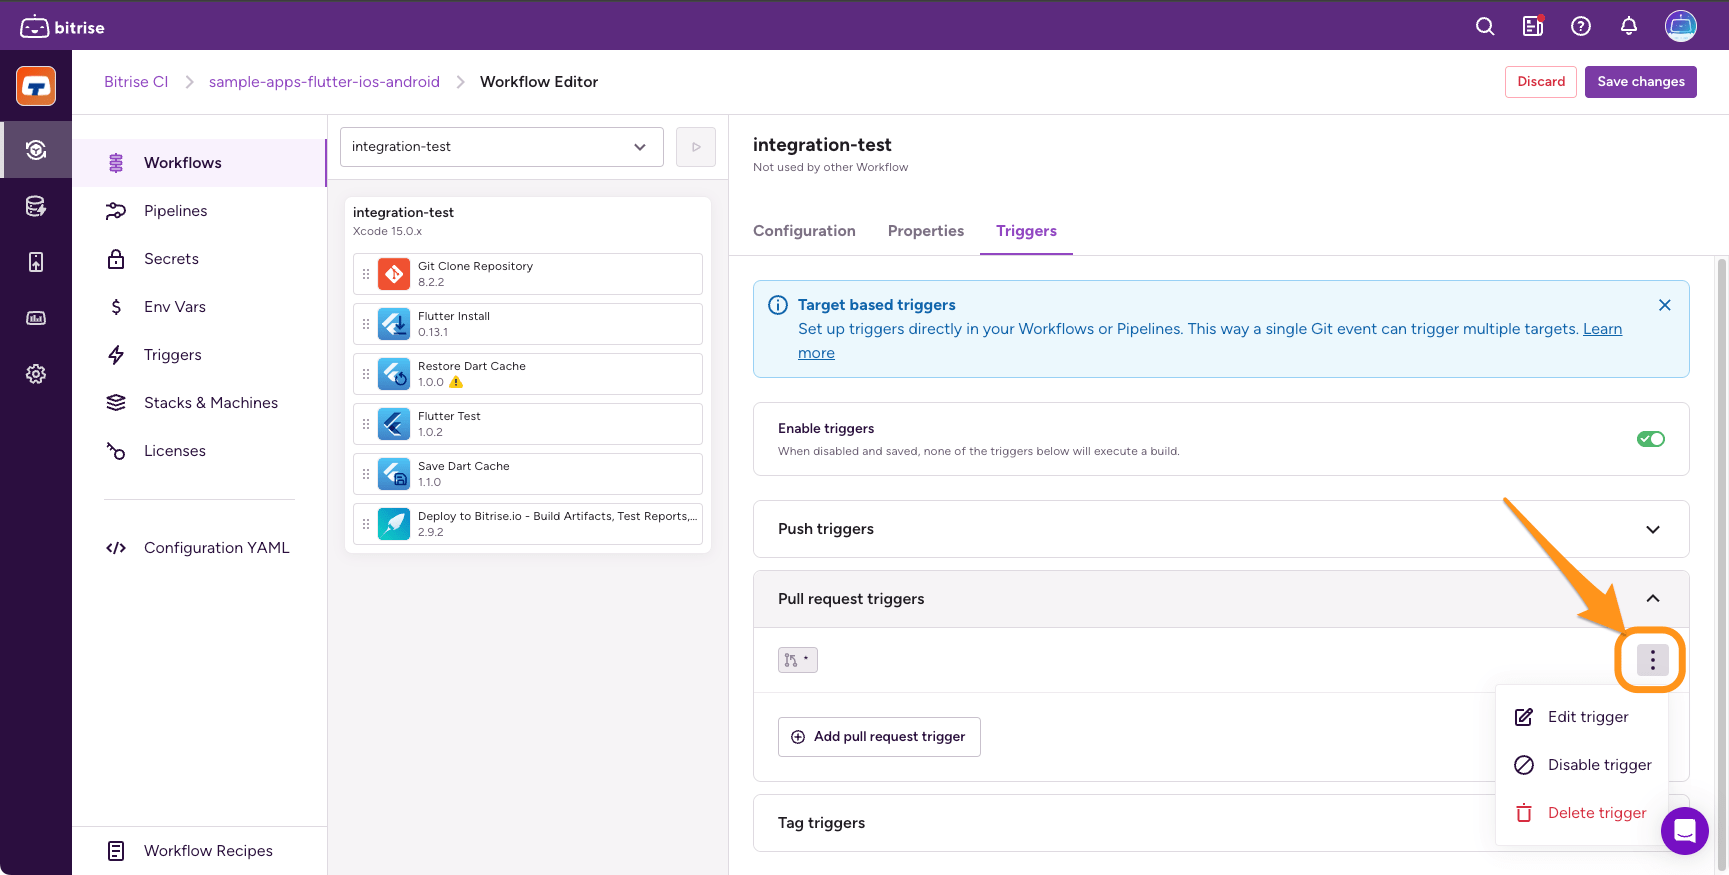
On the Workflow page, select the Triggers tab.
-
Find the trigger you need and click the vertical ellipsis next to its name.
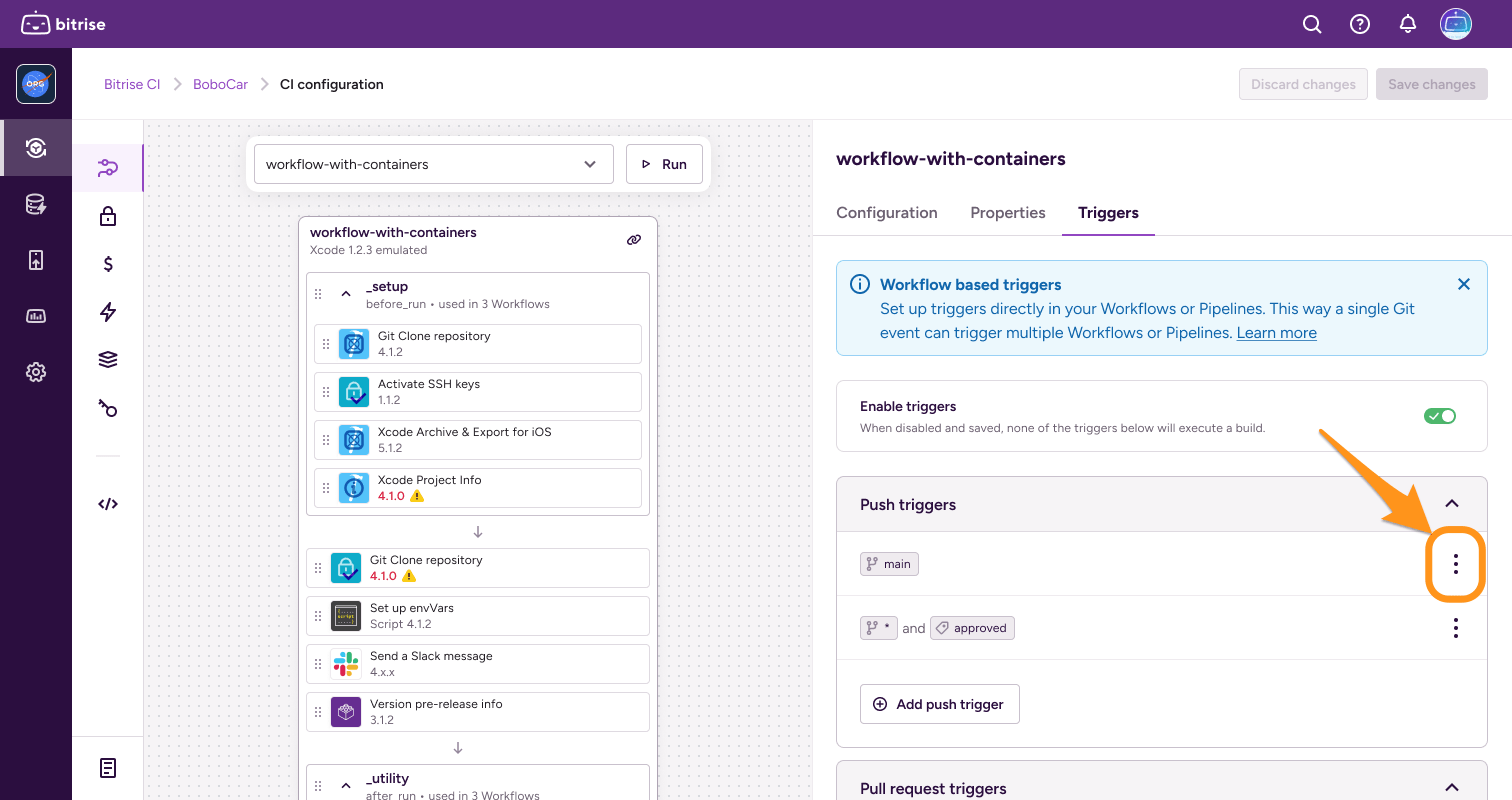
-
Select Disable trigger.
-
Open your configuration YAML file.
-
Find the Workflow or Pipeline and its
triggersproperty. -
Add
enabled: falseto the trigger you want to disable.triggers: push: - branch: main enabled: false
Trigger for the most recent Git commit
By default, when using the Commit message or File change condition in a code push trigger, Bitrise evaluates all commit messages and all changed files included in a single code push.
However, you can configure your triggers to evaluate only the last commit in a push. If a push contains multiple commits, only the most recent one will be evaluated.
Workflow Editor
Configuration YAML
-
Select either the Commit message or the File change condition.
-
Under the condition, enable Last commit only.
-
Open your configuration YAML file and go to a Workflow.
-
Add a new push trigger. In the example, we're using the
commit_messagecondition.my-workflow: triggers: push: - commit_message: your_message -
Add the
last_commitproperty and set it totrue.my-workflow: triggers: push: - commit_message: your_message last_commit: true
Supported trigger conditions
Not all trigger conditions are available for all Git providers. As a general rule, all our trigger conditions are available for the cloud service of the three most frequently used Git providers: GitHub, GitLab, and Bitbucket. For other providers, or self-hosted Git repositories, check out the detailed table for both push triggers and pull request triggers.
|
Git provider |
Branch |
Commit message |
Files changed |
|---|---|---|---|
|
GitHub (cloud) |
|
|
|
|
GitHub (self-hosted) |
|
|
|
|
GitLab (cloud) |
|
|
|
|
GitLab (self-hosted) |
|
|
|
|
Bitbucket (cloud) |
|
|
|
|
BitBucket Server (self-hosted) |
|
|
|
|
Assembla |
|
|
|
|
Deveo (Perforce) |
|
|
|
|
Gogs |
|
|
|
|
Azure DevOps |
|
|
|


|
Git provider |
Source branch |
Target branch |
Labels |
Comments |
Commit message |
Changed files |
|---|---|---|---|---|---|---|
|
GitHub (cloud) |
|
|
|
|
|
|
|
GitHub (self-hosted) |
|
|
|
|
|
|
|
GitLab (cloud) |
|
|
|
|
|
|
|
GitLab (self-hosted) |
|
|
|
|
|
|
|
Bitbucket (cloud) |
|
|
N/A |
|
|
|
|
BitBucket Server (self-hosted) |
|
|
N/A |
|
|
|
|
Assembla |
|
|
N/A |
|
|
|
|
Deveo (Perforce) |
|
|
|
|
|
|
|
Gogs |
|
|
|
|
|
|
|
Azure DevOps |
|
|
|
|
|
|
Trigger priority
Triggers can be assigned a priority setting: this determines the priority of a build triggered by a specific trigger. The higher the priority, the higher the build is in the build queue.
You can assign a priority either in the Workflow Editor or in the configuration YAML file of your project. The priority is always an integer between -100 and 100: the higher the number, the higher the priority. The default priority is 0.
For more information about build priority, and the order of precedence between different types of priorities, check out Build priority.
Triggering builds from draft PRs
GitHub and GitLab offers a feature called draft pull request (or merge request in the case of GitLab): when you create a pull request (PR), you can choose to create a pull request that is ready for review or a draft pull request. Draft pull requests cannot be merged, and code owners are not automatically requested to review draft pull requests.
Git provider limitations
This feature is only supported for GitHub and GitLab repositories.
By default, opening a draft PR triggers builds. You can disable this at any time.
If opening a draft PR triggers a build, submitting it for review (converting it to "full" PR, in other words) will not trigger another. You can check out the exact code events that trigger builds depending on the draft PR trigger settings: Build trigger behavior for draft PRs.
Each separate trigger has its own toggle: you can configure your app so that certain triggers start a build from draft PRs while other triggers don't.
Disabling builds from a draft PR
Skipping Steps if a build is triggered by a draft PR
This guide tells you how to disable triggering builds from a draft PR altogether. You can, however, also skip certain Steps in a build that is triggered by a draft pull request. You just need to use a run_if condition and the GITHUB_PR_IS_DRAFT Environment Variable:
for more information, see Enabling or disabling a Step conditionally.
Workflow Editor
bitrise.yml
-
Log in to Bitrise and select Bitrise CI on the left, then select your project.
-
Click the button on the main page.
-
Open your Workflow and select the Triggers tab.
If you have a Pipeline, you can only disable the setting in the configuration YAML file.
-
Find the trigger you need and click the vertical ellipsis next to its name.
-
Select Edit trigger from the menu.
-
Uncheck the Include draft pull requests option and click .
-
Open your configuration YAML file.
-
Find the
triggerselement in all Workflows or Pipelines you want to modify. -
Add
draft_enabled: falseto the pull request triggers you need.workflows: primary: triggers: pull_request: - draft_enabled: false
Build trigger behavior for draft PRs
The table shows whether a build is triggered when a specific action is performed regarding draft PRs, depending on the draft PR trigger settings. For example, converting a draft PR to a PR doesn't trigger a build if the draft PR trigger is enabled but it does trigger a build when it's disabled.
|
Action |
Draft PR trigger is enabled |
Draft PR trigger is disabled |
|---|---|---|
|
Open a draft PR |
|
|
|
Push a commit to a draft PR |
|
|
|
Convert a draft PR to PR |
|
|
|
Convert PR to draft PR |
|
|
Merge queue support
GitHub Merge Queues allow multiple pull requests (PRs) to be merged automatically into a branch. You can verify the changes in each PR with a Bitrise build by setting up a trigger with gh-readonly-queue/* as the branch filter. You can read more about this prefix in the GitHub documentation.
The merge queue will only function correctly if your builds, triggered for the queue, report the same status names as the PR builds.
For example, with the configuration below, all branches that are merged from a merge queue, trigger a build with the ci-pipeline Pipeline:
pipelines:
  ci-pipeline:
    triggers:
      push:
      - branch: "gh-readonly-queue/*"
    status_report_name: ci/bitrise/<project_slug>/pr
Trigger variables
A number of Environment Variables related to build triggers are available during an automatically triggered build. These variables can give detailed context about build triggers and pull request attributes. Use these trigger variables to:
-
Use pull request data, such as comments, labels, and changed files, to automate complex workflows and decision-making processes.
-
Understand who and how your builds are triggered and use that to better debug your workflows
-
Implement precise build conditions to reduce unnecessary runs, saving time and resources.
You can find all trigger variables and their definition in our reference table: Table 2, “Env Vars exposed by bitrise.io”.
Trigger variables are only available if the requirements are met. For example, the BITRISE_GIT_PULL_REQUEST_COMMENT variable is only available if the build is triggered by a PR comment; in other words, the build trigger has a pr_comment condition. You can find the exact
conditions in Table 2, “Env Vars exposed by
bitrise.io”.
Use cases for trigger variables
Here are some example use cases for trigger variables. These are merely suggestions: you can experiment with variables to find what suits your needs best.
BITRISE_GIT_PULL_REQUEST_COMMENT_ID: Use the pull request comment ID to post a status update directly to the original comment on the pull request. This can include details such as success, failure, logs, or any other relevant information.
BITRISE_GIT_CHANGED_FILES : Identify modified parts of the codebase and based on these changes, trigger specific test suites, such as running frontend tests for UI changes and backend tests for API modifications.
Use BITRISE_GIT_COMMIT_MESSAGES and BITRISE_GIT_PULL_REQUEST_LABELS to determine the deployment environment. For instance, if a commit message includes "[staging]" or a label "ready-for-staging" is present, deploy the code to the staging environment.