Connecting to a VPN during a build
To connect to a VPN during a build, make sure that you have a Step establishing a VPN connection, such as Set up OpenVPN server.
You might require a VPN connection for your build, to be able to connect to your server, either to git clone your repository or to access a private API.
To connect to a VPN, you need to:
-
Make sure your local network address space does not clash with the Bitrise virtual machines' address space as this can cause an error with the VPN.
-
Install and configure the required VPN components.
-
Connect to the VPN.
You can configure and connect a VPN anywhere in your Workflow - BEFORE you would use the VPN connection, of course. For example, if you require a VPN connection to access your repository, you have to connect before the Git Clone Step.
SSH sessions
When you choose your VPN tool and do the setup/configuration, you have to be careful NOT TO RESTART OR ABORT existing SSH sessions! The bitrise.io workers will abort the build if the SSH connection between the build’s Control/Master machine and the build virtual machine terminates!
Accessing a repository via VPN
If the repository of your Bitrise project can be only accessed via VPN, you have two things to keep in mind above all:
-
During builds, the VPN connection must be established before cloning the repository to our virtual machines: in practice, this means the Step establishing the connection must be placed before the Git CloneStep in your Workflow.
-
When adding a new project, you need a workaround: use a dummy repository that can be accessed without a VPN during the process of adding the project.
Let’s go through this workaround!
-
Create an empty repository that is accessible without a VPN connection.
-
Add a new project, using this repository as the source. Make sure it is a private project! There is no need to register a webhook.
-
Open your project on Bitrise with a user that has the Admin role on the project.
-
On the main page of the project, click on the Project settings button.
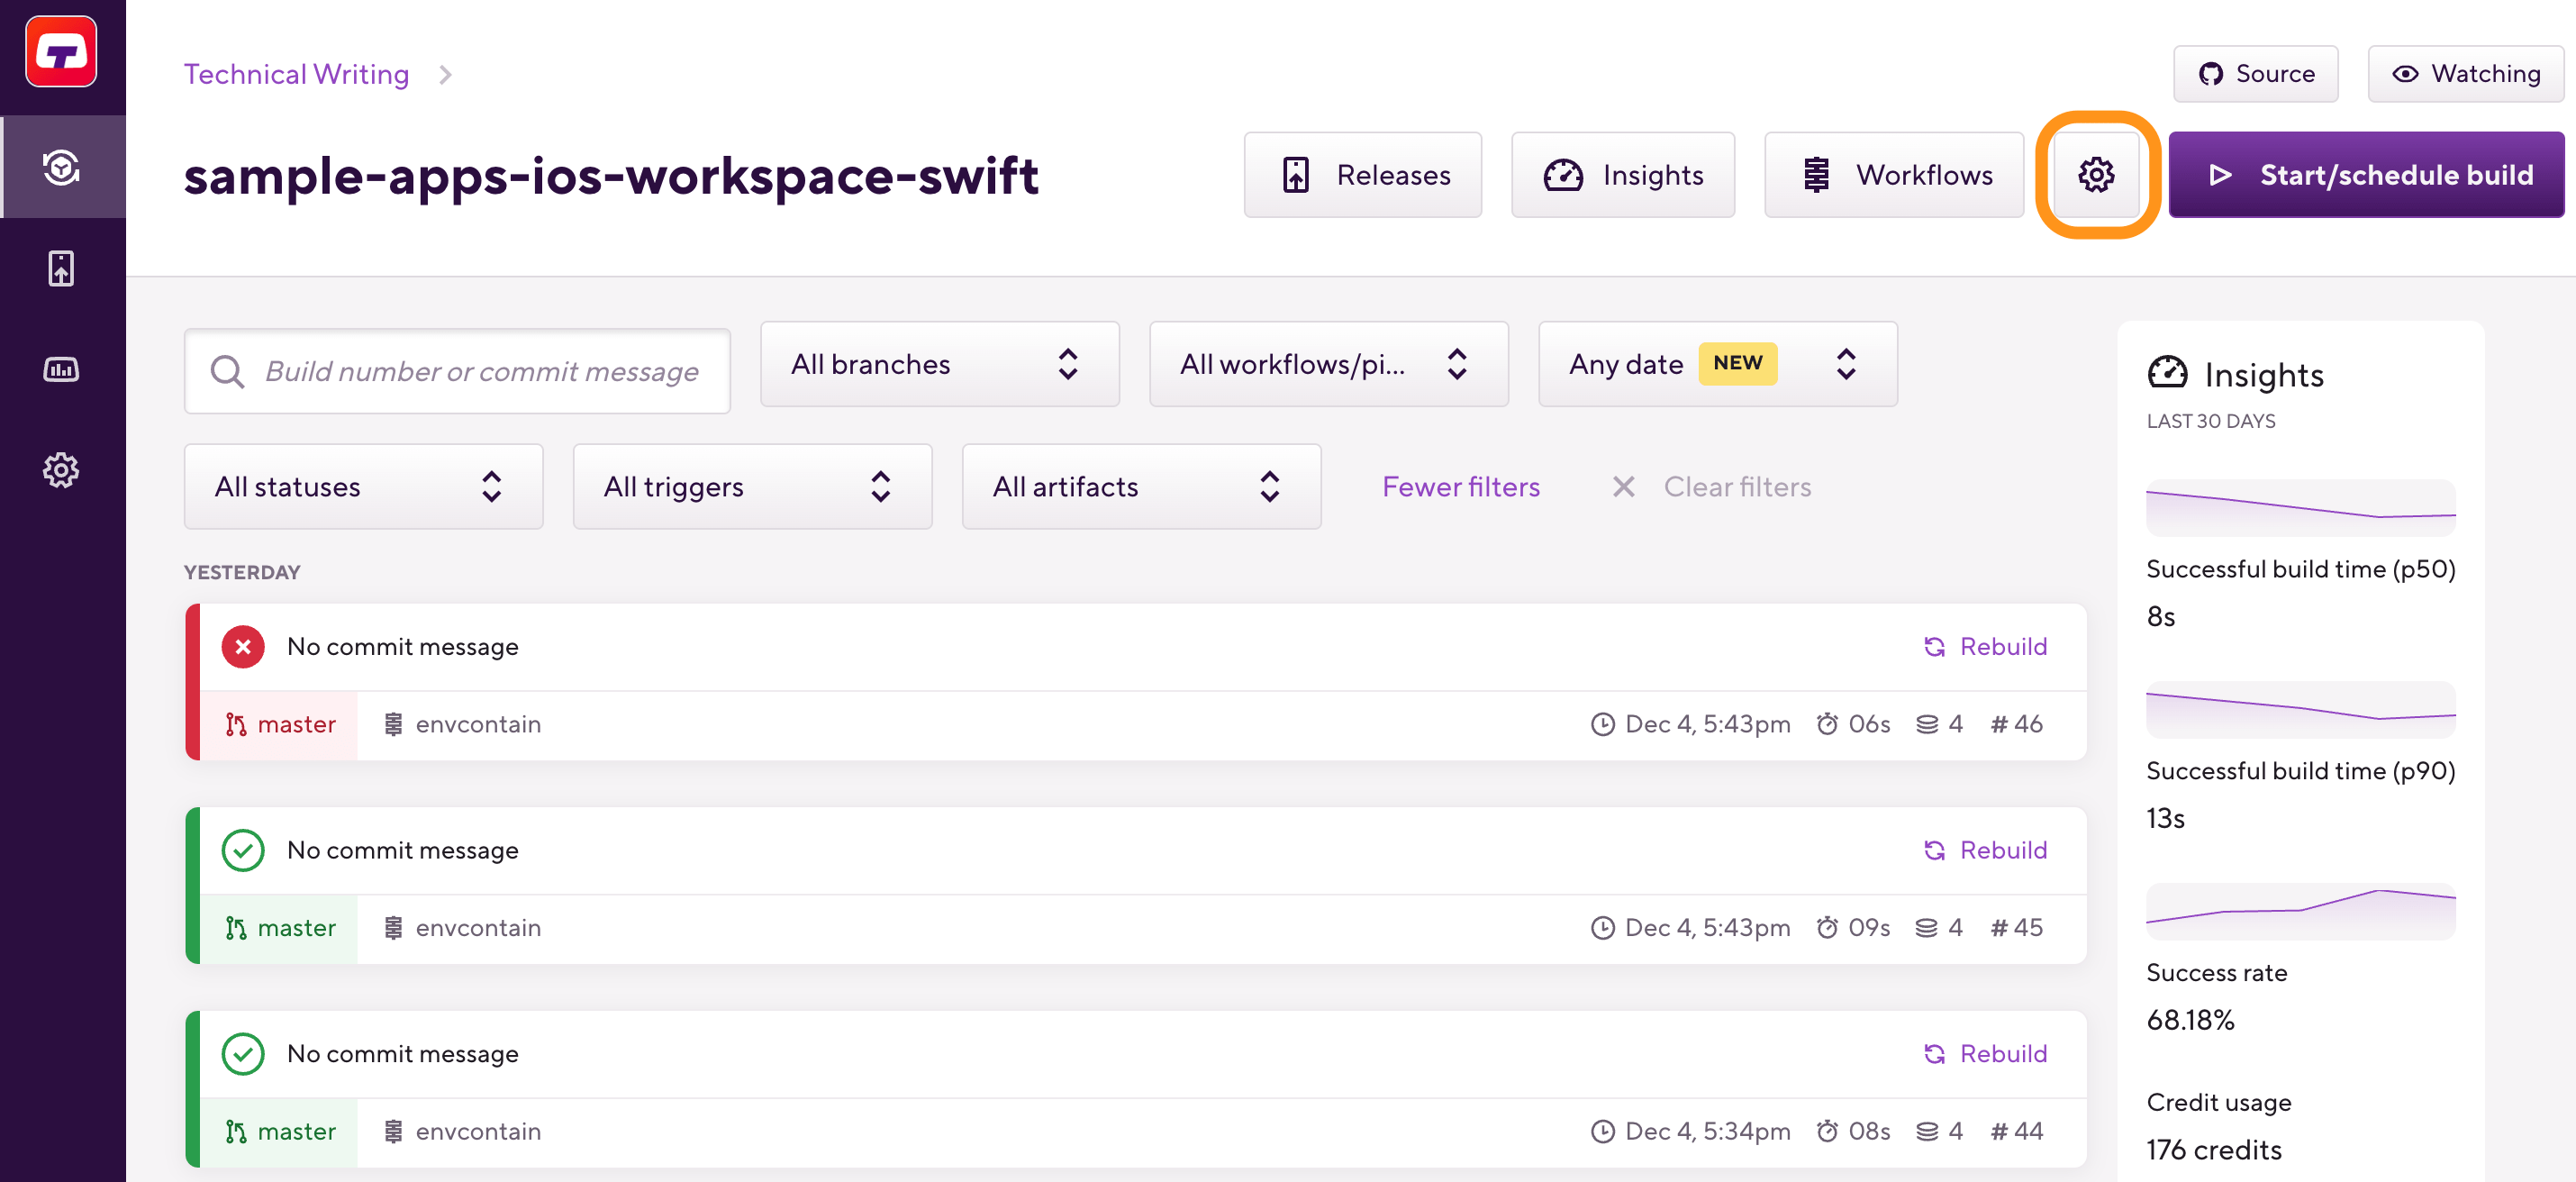
-
On the left, select Git and click .
-
In the dialog, paste the new repository URL.
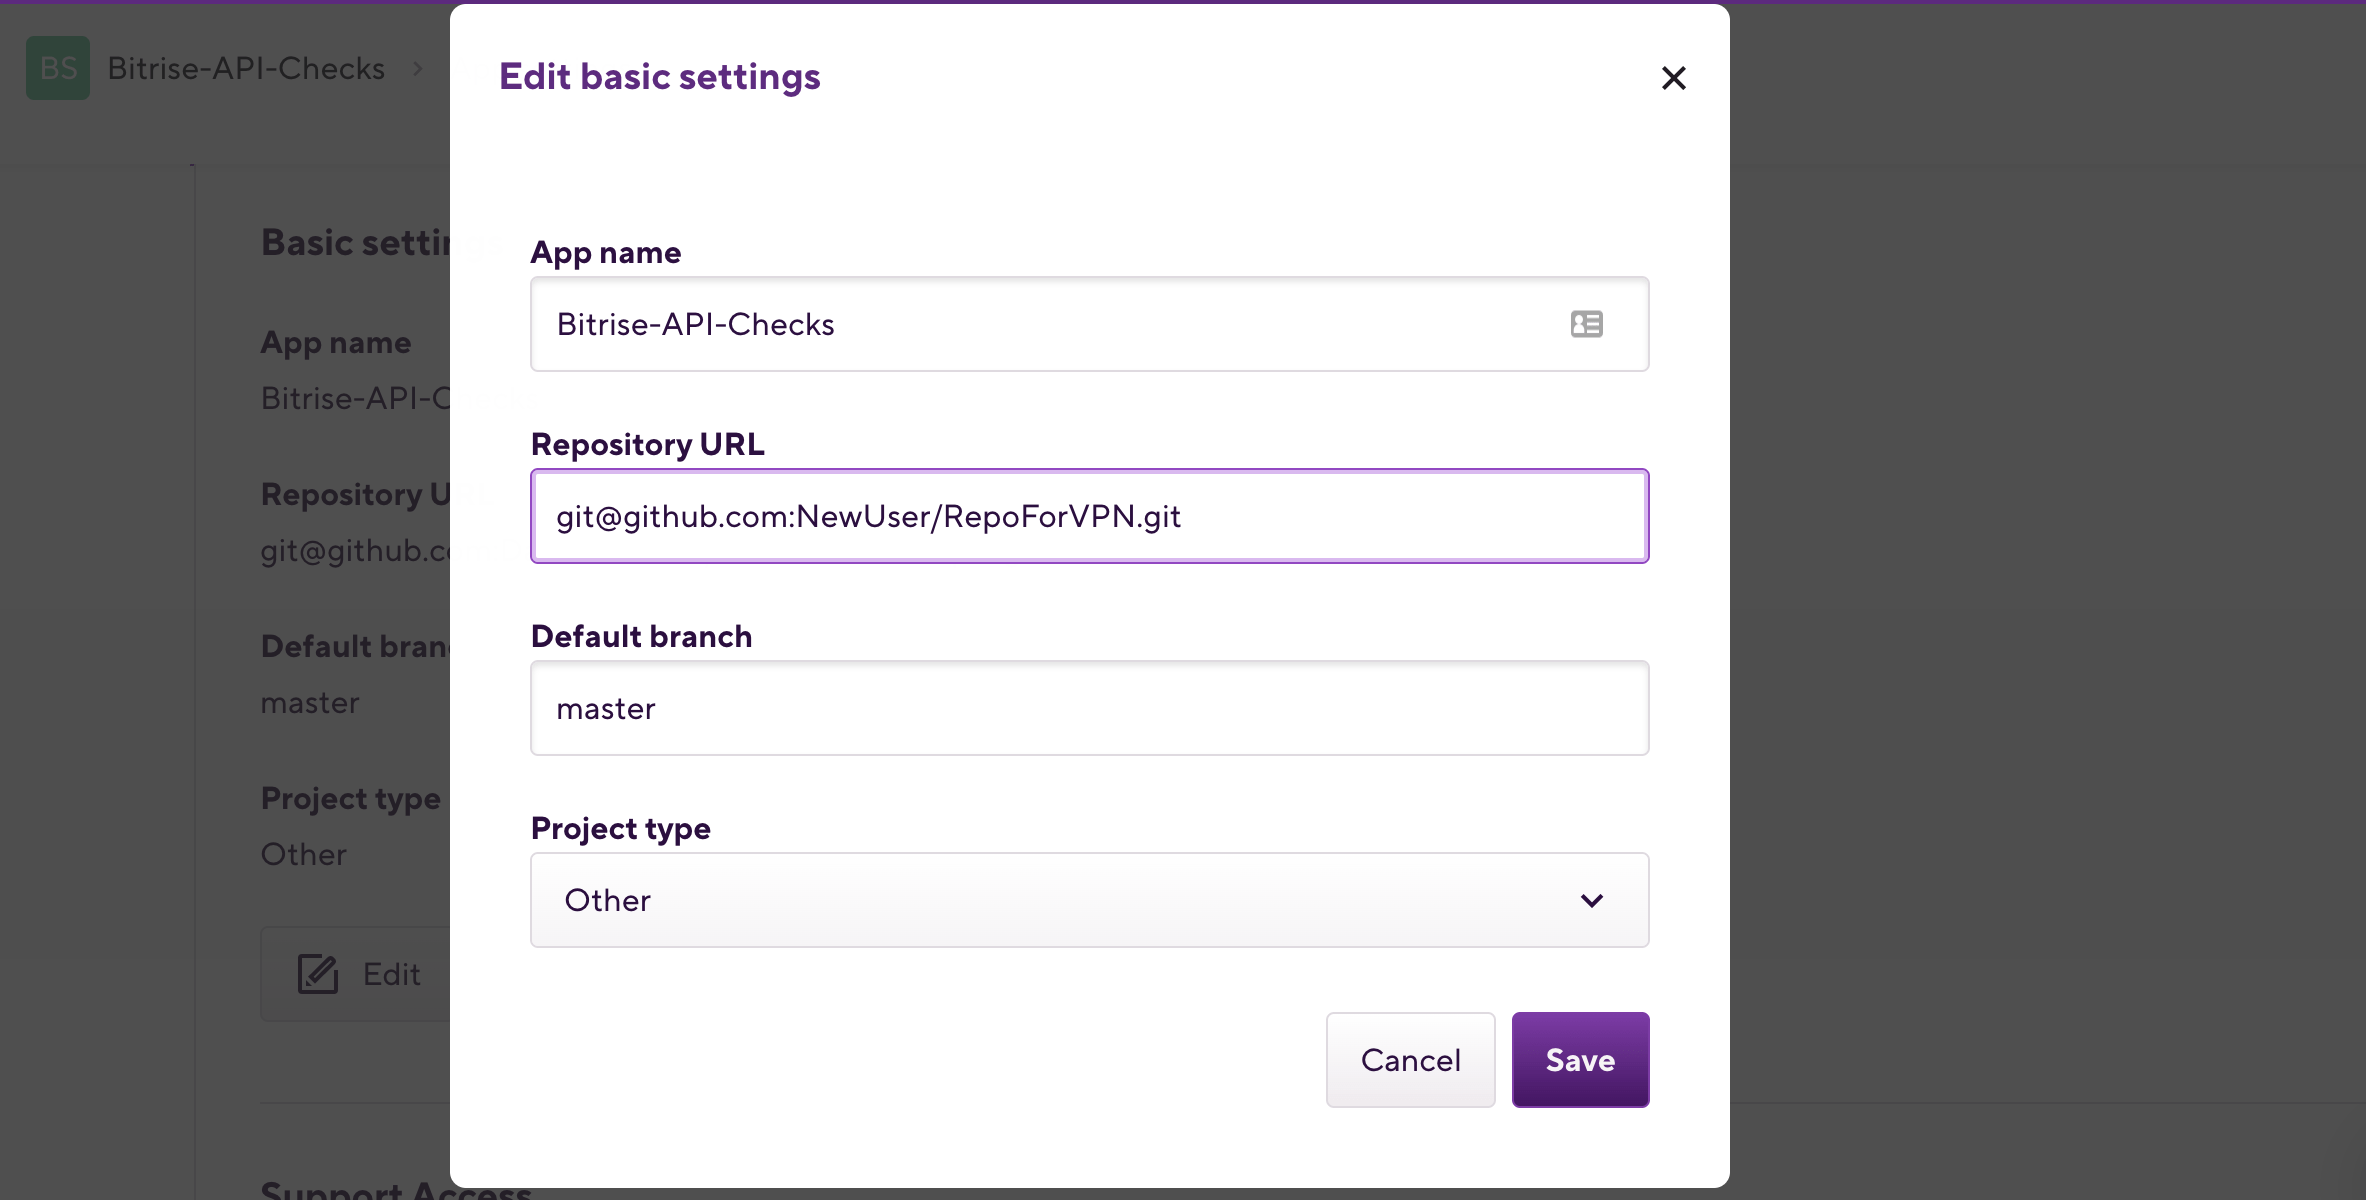
-
Click .
-
Place the Step or Steps establishing the VPN connection before any Steps that have to access your repository in your Workflow.
And you’re done. For the different methods of establishing a VPN connection, take a look at our example configurations.
Example VPN configurations
In this section, we present three example configurations for connecting to a VPN during a build:
Using the Connect to OpenVPN Server Step
To use the Connect to OpenVPN Server Step, you need to build an OpenVPN server in advance, and then encode your certificate files and your private key.
-
Encode the following in Base64:
-
CA certificate
-
client certificate
-
client private key
You can base64 encode files with the following command:
$ base64 <filepath>
-
-
Open your project on Bitrise and go to the Workflow Editor.
-
Register the encoded certificates and the key as Secrets.
We recommend using the following keys as they are the default inputs for the VPN Step:
-
CA certificate:
$VPN_CA_CRT_BASE64 -
Client certificate:
$VPN_CLIENT_CRT_BASE64 -
Private key:
VPN_CLIENT_KEY_BASE64
-
-
Add the Connect to OpenVPN Server Step to your Workflow.
Add the Step before any Steps that might require VPN connection.
-
Add the previously created Secrets to their respective inputs:
-
Base64 encoded CA Certificate
-
Base64 encoded Client Certificate
-
Base64 encoded Client Private Key
If you created the Secrets with the recommended keys, you do not have to change the inputs.
-
-
Fill in the other required inputs.
-
Host: the Open VPN Server IP or hostname
-
Port: OpenVPN Server Port number
-
Protocol: OpenVPN Server Protocol
-
Using Strongswan VPN
This is an example script which you can either save into your repository and run it from there, or just copy paste its content into a Script Step in your bitrise configuration (bitrise.yml / Workflow).
The script uses Strongswan VPN to connect to a VPN. It works on either macOS or Linux. Once the script has run successfully, any subsequent Bitrise Step can access devices and services over the VPN connection.
#!/usr/bin/env bash
set -e

echo "WAN IP"
# This prints the servers Internet IP adress to the log, useful for debugging
curl http://httpbin.org/ip

case "$OSTYPE" in
  linux*)
    echo "Configuring for Linux"

    # Variables
    etc_dir=/etc
    etc_sudo='sudo' # Sudo is needed for Linux Strongswan configuration

    # Install strongswan
    echo "Installing Strongswan..."
    sudo apt-get install -y strongswan

    ;;
  darwin*)
    echo "Configuring for Mac OS"

    # Variables
    etc_dir=/usr/local/etc
    etc_sudo='' # Sudo is NOT needed for Mac OS Strongswan configuration

    # Install Strongswan using homebrew
    echo "Installing OpenSSL..."
    # Manually install OpenSSL first to save time, since installing Strongswan directly compiles OpenSSL from source instead
    brew install openssl
    echo "Installing Strongswan..."
    brew install strongswan

    ;;
  *)
    echo "Unknown operative system: $OSTYPE, exiting"
    exit 1
    ;;
esac


# Method for rendering a template string file (when run, returns the input string with $VARIABLES replaced from env)
render_template() {
  eval "echo \"$(cat $1)\""
}

# Create a temporary directory to hold files
temp_dir=/tmp/vpn-config
mkdir $temp_dir

# IPsec config file, see examples at https://wiki.strongswan.org/projects/strongswan/wiki/IKEv1Examples and https://wiki.strongswan.org/projects/strongswan/wiki/IKEv2Examples
echo "Downloading ipsec.conf..."
wget https://www.example.com/ipsec.conf.template -O $temp_dir/ipsec.conf.template
# IPsec credentials file, see documentation at https://wiki.strongswan.org/projects/strongswan/wiki/IpsecSecrets
echo "Downloading ipsec.secrets..."
wget https://www.example.com/ipsec.secrets.template -O $temp_dir/ipsec.secrets.template
# In some cases you might need to download the certificate, or certificate chain, of your other VPN endpoint
echo "Downloading server.crt..."
wget https://www.example.com/server.crt -O $temp_dir/server.crt

echo "Rendering config templates"
render_template $temp_dir/ipsec.conf.template > $temp_dir/ipsec.conf
render_template $temp_dir/ipsec.secrets.template > $temp_dir/ipsec.secrets

echo "Installing configuration"
$etc_sudo cp $temp_dir/ipsec.conf $etc_dir/ipsec.conf
$etc_sudo cp $temp_dir/ipsec.secrets $etc_dir/ipsec.secrets
$etc_sudo cp $temp_dir/server.crt $etc_dir/ipsec.d/ocspcerts/server.crt

# Start the ipsec service
echo "Starting ipsec"
sudo ipsec start

# We're sleeping between commands, mostly since Mac OS seems to have some problems otherwise
sleep 1

# Output some helpful status to the log
echo "Status ipsec"
sudo ipsec statusall

sleep 1

# Switch out myconnection with the name of your connection in ipsec.conf
echo "Initiating VPN connection"
sudo ipsec up myconnection

sleep 1

case "$OSTYPE" in
  linux*)
    ;;
  darwin*)
    # In Mac OS El Capitan, the `sudo ipsec up` command consistently fails the first time, but succeeds after a restart of the ipsec service
    echo "Restarting ipsec"
    sudo ipsec restart

    sleep 1

    echo "Initiating VPN connection"
    sudo ipsec up myconnection

    sleep 1

    # This step might apply if you are routing all traffic trough the IPsec connection (that is, if your remote IP range is 0.0.0.0/0)
    # Mac OS El Capitan seems to have problems getting the DNS configuration from the Strongswan interface. Also IPv6 sometimes causes issues. So we're manually turning off IPv6 and forcing a new DNS configuration.
    echo "Disabling IPv6 and forcing DNS settings"
    # Fetch main interface
    main_interface=$(networksetup -listnetworkserviceorder | awk -F'\\) ' '/\(1\)/ {print $2}')
    # Completely disable IPv6
    sudo networksetup -setv6off "$main_interface"
    # Switch 10.0.0.1 with your DNS server
    sudo networksetup -setdnsservers "$main_interface" 10.0.0.1
    ;;
  *) ;;
esac

# Your VPN connection should be up and running. Any following steps of your Bitrise workflow can access devices over your VPN connection 🎉
Using Cisco VPN
You can use the Cisco VPN connect Step: it connects with Cisco VPN provided by VPN3000 Concentrator, Juniper/Netscreen, IOS and PIX using vpnc.
-
Log in to Bitrise and select Bitrise CI on the left, then select your project.
-
Click the button on the main page.
-
Add the Cisco VPN connect Step at the start of your Workflow.
-
Provide VPN client settings and credentials required for the Step either by:
-
Using the existing vpnc configuration file:
vpnc.conf -
Using the Command line options input of the Step. The options specified in this input will take precedence over the configuration file!
-
For more information on setting up vpnc, check the vpnc homepage and the vpnc manual.