Running instrumented tests for Android apps
Instrumented tests run on Android devices, whether physical or emulated. On Bitrise, you can run instrumented tests using the adb tool.
Instrumented tests run on Android devices, whether physical or emulated. On Bitrise, you can run instrumented tests using the adb tool. To run your instrumented tests, you need two Steps in your Workflow:
-
The Android Build for UI testing Step builds both an APK and a test APK. For example,
MyappDebug.apkandMyAppDebugAndroidTest.apk. The Step stores the path to these APKs in two output Environment Variables:BITRISE_APK_PATHandBITRISE_TEST_APK_PATH. You can use these Env Vars to access the APKs in subsequent Steps in the same Workflow. -
The Android Instrumented Test Step runs the instrumented tests using the APKs built in the previous Step.
To run instrumented tests for Android:
Workflow Editor
bitrise.yml
-
Add the Android Build for UI testing Step to your Workflow.
-
Make sure the Project location input points to the root directory of your Android app.
-
Set the module and the variant you want to build in the Module and the Variant input.
You can check the available modules and variants of your project in the Project window in Android Studio.

-
In the Options input group, you can set the location for the generated APK files in the APK location pattern input.
The input takes a file pattern as a value. The default value is
*/build/outputs/apk/*.apk. -
Optionally, you can pass additional Gradle arguments to the build task in the Additional Gradle Arguments input.
-
Add the Android Instrumented Test Step to the Workflow, at some point after the Android Build for UI testing Step.
-
Make sure that the Main APK path and the Test APK path inputs point to the correct location.
By default, the values of the two inputs are the
BITRISE_APK_PATHand theBITRISE_TEST_APK_PATHEnvironment Variables, respectively. These variables are exported by the Android Build for UI testing Step. As such, in the vast majority of cases, you don't have to modify the value of these inputs.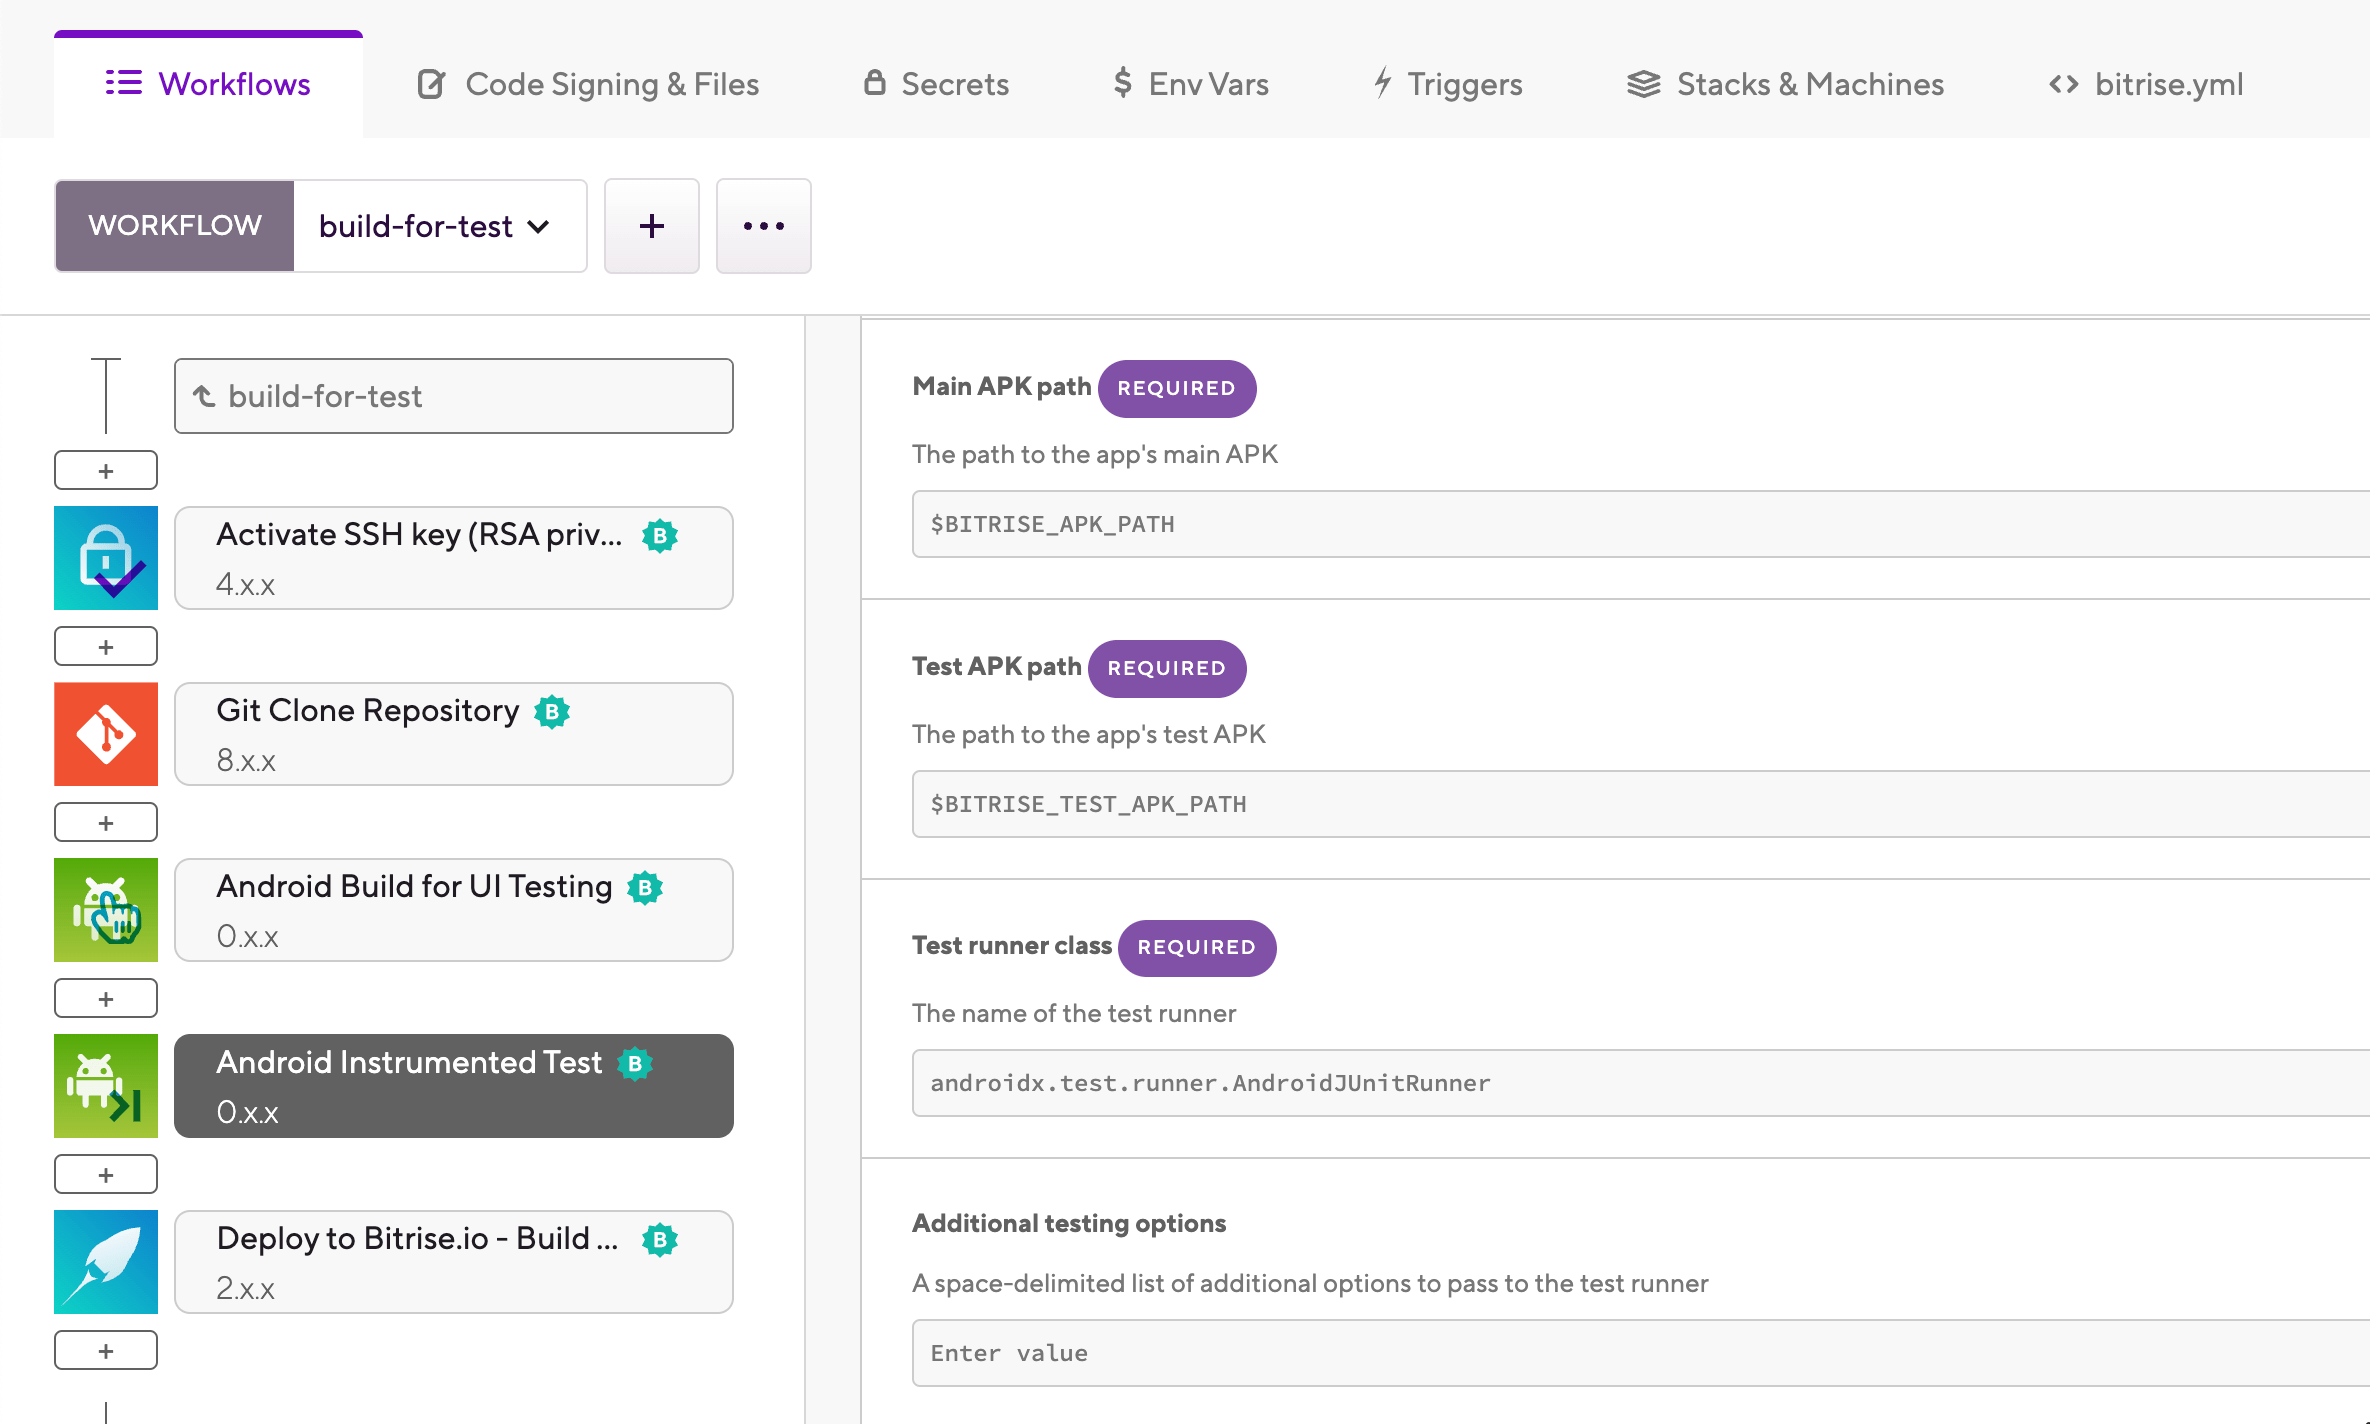
-
In the Test runner class input, specify the test runner you wish to use.
The default runner is the AndroidJUnitRunner class.
-
Optionally, you can pass additional options to the test runner with the Additional testing options input.
With this input, you issue commands to the activity manager tool of the
adbshell. For more information about the commands you can issue, see the official documentation for adb.
-
Add the
android-build-for-ui-testingStep to your Workflow.steps: - git-clone: {} - android-build-for-ui-testing: inputs: - deploy-to-bitrise-io: {} -
Make sure the
project_locationinput points to the root directory of your Android app.steps: - git-clone: {} - android-build-for-ui-testing: inputs: - project_location: $BITRISE_SOURCE_DIR - deploy-to-bitrise-io: {} -
Set the module and the variant you want to build in the
moduleand thevariantinput.You can check the available modules and variants of your project in the Project window in Android Studio.
steps: - git-clone: {} - android-build-for-ui-testing: inputs: - module: app - variant: debug - project_location: $BITRISE_SOURCE_DIR - deploy-to-bitrise-io: {} -
In the
apk_path_patterninput, you can set the location for the generated APK files.The input takes a file pattern as a value. The default value is
*/build/outputs/apk/*.apk.steps: - git-clone: {} - android-build-for-ui-testing: inputs: - arguments: flag - module: app - variant: debug - apk_path_pattern: '*/build/outputs/apk/*.apk' - project_location: $BITRISE_SOURCE_DIR - deploy-to-bitrise-io: {} -
Optionally, you can pass additional Gradle arguments to the build task in the
argumentsinput.steps: - git-clone: {} - android-build-for-ui-testing: inputs: - arguments: --task - module: app - variant: debug - apk_path_pattern: '*/build/outputs/apk/*.apk' - project_location: $BITRISE_SOURCE_DIR - deploy-to-bitrise-io: {} -
Add the
android-instrumented-testStep to the Workflow, at some point after theandroid-build-for-ui-testingStep.steps: - git-clone: {} - android-build-for-ui-testing: inputs: - arguments: flag - module: app - variant: debug - apk_path_pattern: '*/build/outputs/apk/*.apk' - cache_level: all - project_location: $BITRISE_SOURCE_DIR - android-instrumented-test: inputs: - deploy-to-bitrise-io: {} -
Make sure that the
main_apk_pathand thetest_apk_pathinputs point to the correct location.By default, the values of the two inputs are the
BITRISE_APK_PATHand theBITRISE_TEST_APK_PATHEnvironment Variables, respectively. These variables are exported by theandroid-build-for-ui-testingStep. As such, in the vast majority of cases, you don't have to set the value of these inputs.steps: - git-clone: {} - android-build-for-ui-testing: inputs: - arguments: flag - module: app - variant: debug - apk_path_pattern: '*/build/outputs/apk/*.apk' - cache_level: all - project_location: $BITRISE_SOURCE_DIR - android-instrumented-test: inputs: - main_apk_path: $BITRISE_APK_PATH - test_apk_path: $BITRISE_TEST_APK_PATH - deploy-to-bitrise-io: {} -
In the
test_runner_classinput, specify the test runner you wish to use.The default runner is the AndroidJUnitRunner class.
steps: - git-clone: {} - android-build-for-ui-testing: inputs: - arguments: flag - module: app - variant: debug - apk_path_pattern: '*/build/outputs/apk/*.apk' - cache_level: all - project_location: $BITRISE_SOURCE_DIR - android-instrumented-test: inputs: - test_runner_class: androidx.test.runner.AndroidJUnitRunner - main_apk_path: $BITRISE_APK_PATH - test_apk_path: $BITRISE_TEST_APK_PATH - deploy-to-bitrise-io: {} -
Optionally, you can pass additional options to the test runner with the
additional_testing_optionsinput.With this input, you issue commands to the activity manager tool of the
adbshell. For more information about the commands you can issue, see the official documentation for adb. For example, the valueKEY1 true KEY2 falsewill be passed to adb asadb shell am instrument -e "KEY1" "true" "KEY2" "false" [...].steps: - git-clone: {} - android-build-for-ui-testing: inputs: - arguments: flag - module: app - variant: debug - apk_path_pattern: '*/build/outputs/apk/*.apk' - cache_level: all - project_location: $BITRISE_SOURCE_DIR - android-instrumented-test: inputs: - test_runner_class: androidx.test.runner.AndroidJUnitRunner - additional_testing_options: KEY1 true KEY2 false - main_apk_path: $BITRISE_APK_PATH - test_apk_path: $BITRISE_TEST_APK_PATH - deploy-to-bitrise-io: {}
Run your tests and view their results in the build logs.