Generate and deploy multiple flavor APKs in a single Workflow
You can generate, code sign and deploy multiple flavor (multi-flavor) APKs/AABs in one workflow using our Gradle Runner Step.
You can generate, code sign and deploy multiple flavor (multi-flavor) APKs/AABs in one Workflow using our Gradle Runner Step. Flavor means enhancing an app’s core code with features resulting in different versions of the same app (just to mention the most common examples: free/paid, demo/full). Check out the official Android Studio guide on build types, flavors and build variants for more info! In this tutorial, you will need to do some settings to Android Sign and Google Play Deploy Steps - so keep your eyes peeled!
Generating multi-flavor APKs
To generate APK files for several different flavors:
-
Log in to Bitrise and select Bitrise CI on the left, then select your project.
-
Click the button on the main page.
-
Insert Gradle Runner Step after the Android testing Steps. Android Build Step can only build one variant so if this Step is part of your Workflow, then we advise you to replace it with our Gradle Runner Step.
-
Click the Config section of the Step.
-
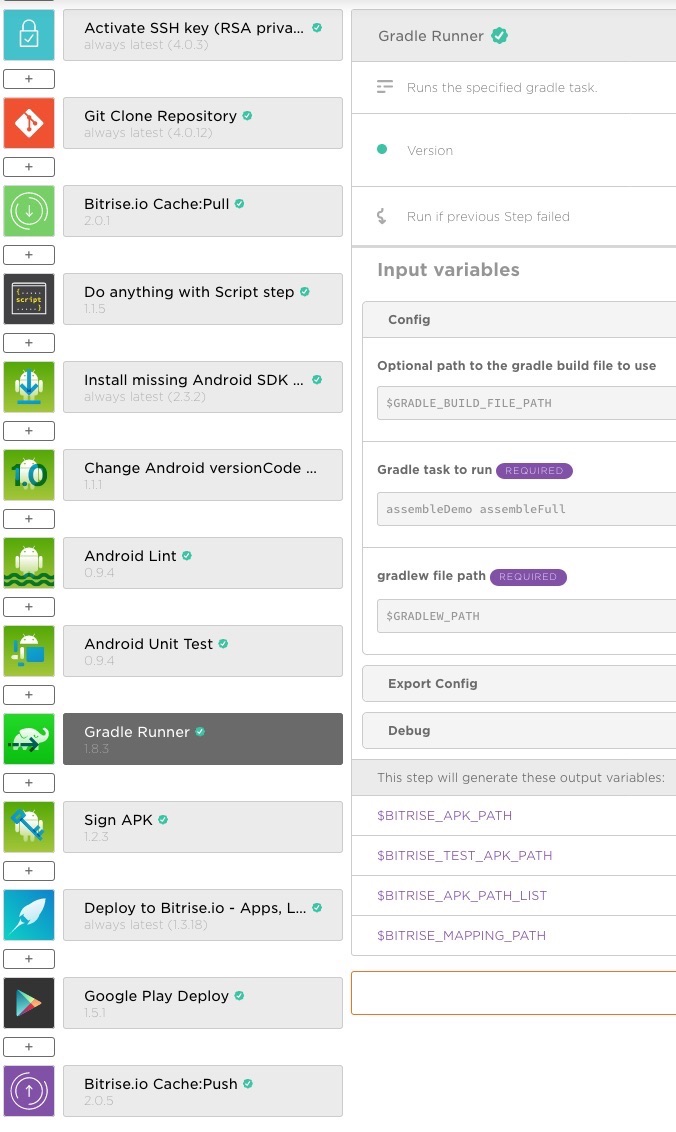
Specify assemble Gradle tasks by adding your build variants’ task names in the Gradle task to run Step input field - as many task names as many build variants you want to build in one workflow. Each task name must be exactly the same build variant name what you have listed in the Build Variant window of Android Studio! Make sure you separate them only with a space, no need for a comma ! In this image, you can see the order of the Steps for the deploy workflow and the Gradle Task to run Step input with two build variants:
assembleDemoandassembleFull(for APKs) orbundleDemoandbundleFull(for AABs)
-
Gradle Runner generates a
$BITRISE_APK_PATH_LIST/$BITRISE_AAB_PATH_LISTEnvironment Variable output that contains APKs/AABs built for ALL build variants defined above. We will need this output Environment Variable later.
Signing and deploying multi-flavor APKs
-
Log in to Bitrise and select Bitrise CI on the left, then select your project.
-
Click the button on the main page.
-
Add one Android Sign Step AFTER the Gradle Runner Step if it’s missing from your Workflow.
-
Set the App file path input to
$BITRISE_APK_PATH_LISTor$BITRISE_AAB_PATH_LISTdepending on which app format you built in the previous Gradle Runner Step.This will make sure all APKs or AABs get code signed with the keystore file you uploaded to the Code Signing tab. The Step will export either the
$BITRISE_SIGNED_APK_PATH_LISTor the$BITRISE_SIGNED_AAB_PATH_LISTEnvironment Variable output which contains the path of the signed app files for each build variant. -
Make sure you set the following input fields in the Android Sign Step:
-
Keystore url
-
Keystore password
-
Keystore alias
-
-
Add the Google Play Deploy Step AFTER the Android Sign Step.
-
Set the
$BITRISE_SIGNED_APK_PATHor the$BITRISE_SIGNED_AAB_PATHEnvironment Variable in the APK or App Bundle file path Step input field so that the Google Play Deploy Step can release all your build variants to the app store.