Configuring Pipelines
Configure a Bitrise Pipeline by adding Workflows and optionally, defining dependencies between the Workflows.
Pipelines with stages
If you have an existing Pipeline configuration from before December 2024, you probably have stages in your Pipeline. We strongly recommend to stop using stages and instead focus on configuring dependencies between Workflows. These dependencies determine the order of execution in a Pipeline. This eliminates unnecessary waiting time in stages and allows you to create more flexible CI configurations.
You can keep using Pipelines with stages but they will receive no updates in the future. You can have both types of Pipelines in the same configuration YAML file but you can't mix and match the two types: you can't have both stages and Workflow dependencies in the same Pipeline.
You can find the documentation for Pipelines with stages here: Pipelines with stages.
You can convert a Pipeline with stages into the new format: Converting a Pipeline with stages into a graph Pipeline.
You can define your Pipelines under a pipelines element in a configuration YAML file. You can use the following elements to set up a Pipeline:
-
A Pipeline name: the human readable identifier of the Pipeline.
-
The
workflowselement: this contains a list of the Workflows that are part of the Pipeline. -
The
depends_onproperty: This is a property of theworkflows elementand accepts an array of Workflow names. It defines the dependencies between Workflows.
For example, here's a simple Pipeline configuration:
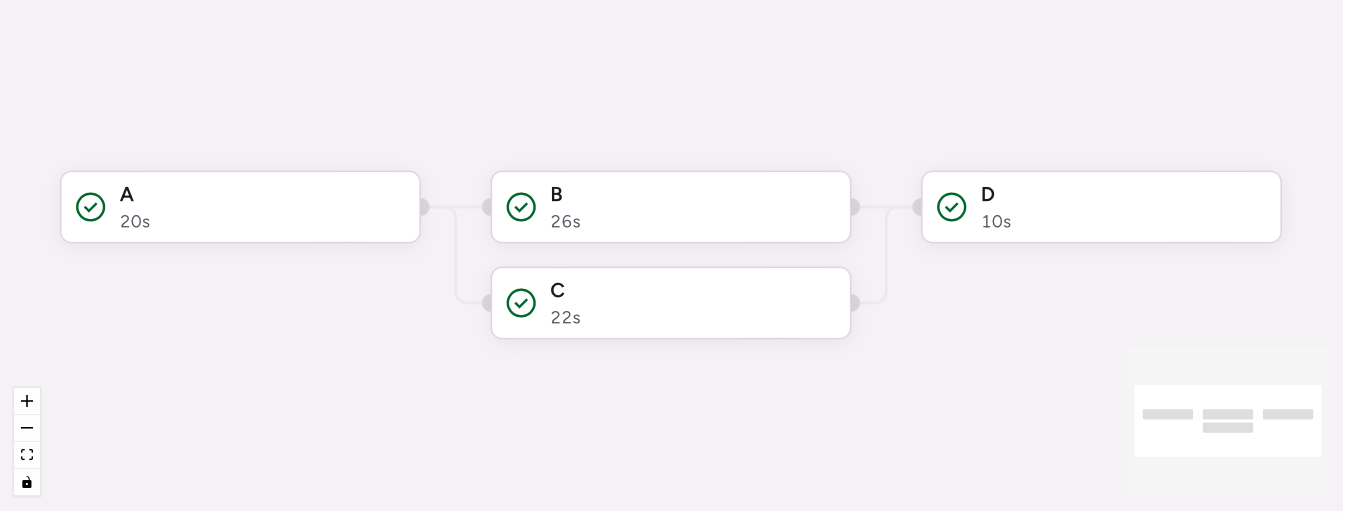
In this Pipeline, we have four Workflows:
-
Workflow A runs first.
-
Once Workflow A is finished, Workflows B and C start at the same time.
-
Workflow D starts only when both Workflows B and C are successfully finished.
Creating a Pipeline
Workflow Editor
Configuration YAML
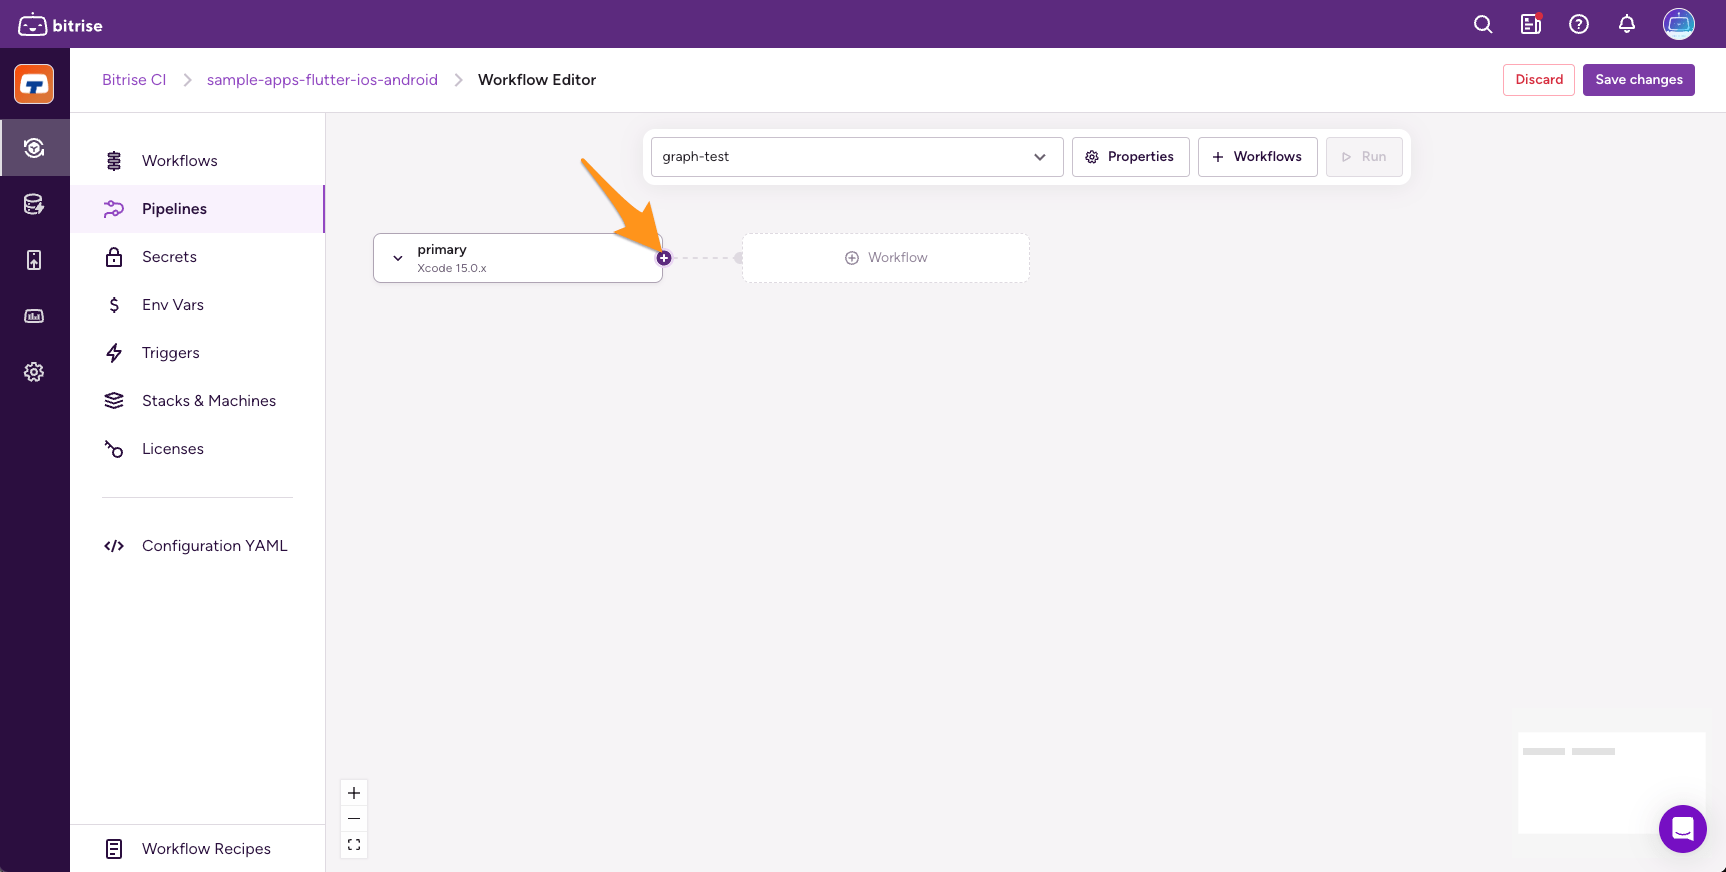
Open the Workflow Editor and select Pipelines on the left. Click and set a name, then click again.
To add your first Workflow, click Workflows.

You can keep adding Workflows this way. This method creates no dependencies between Workflows: they will all run at the same time.

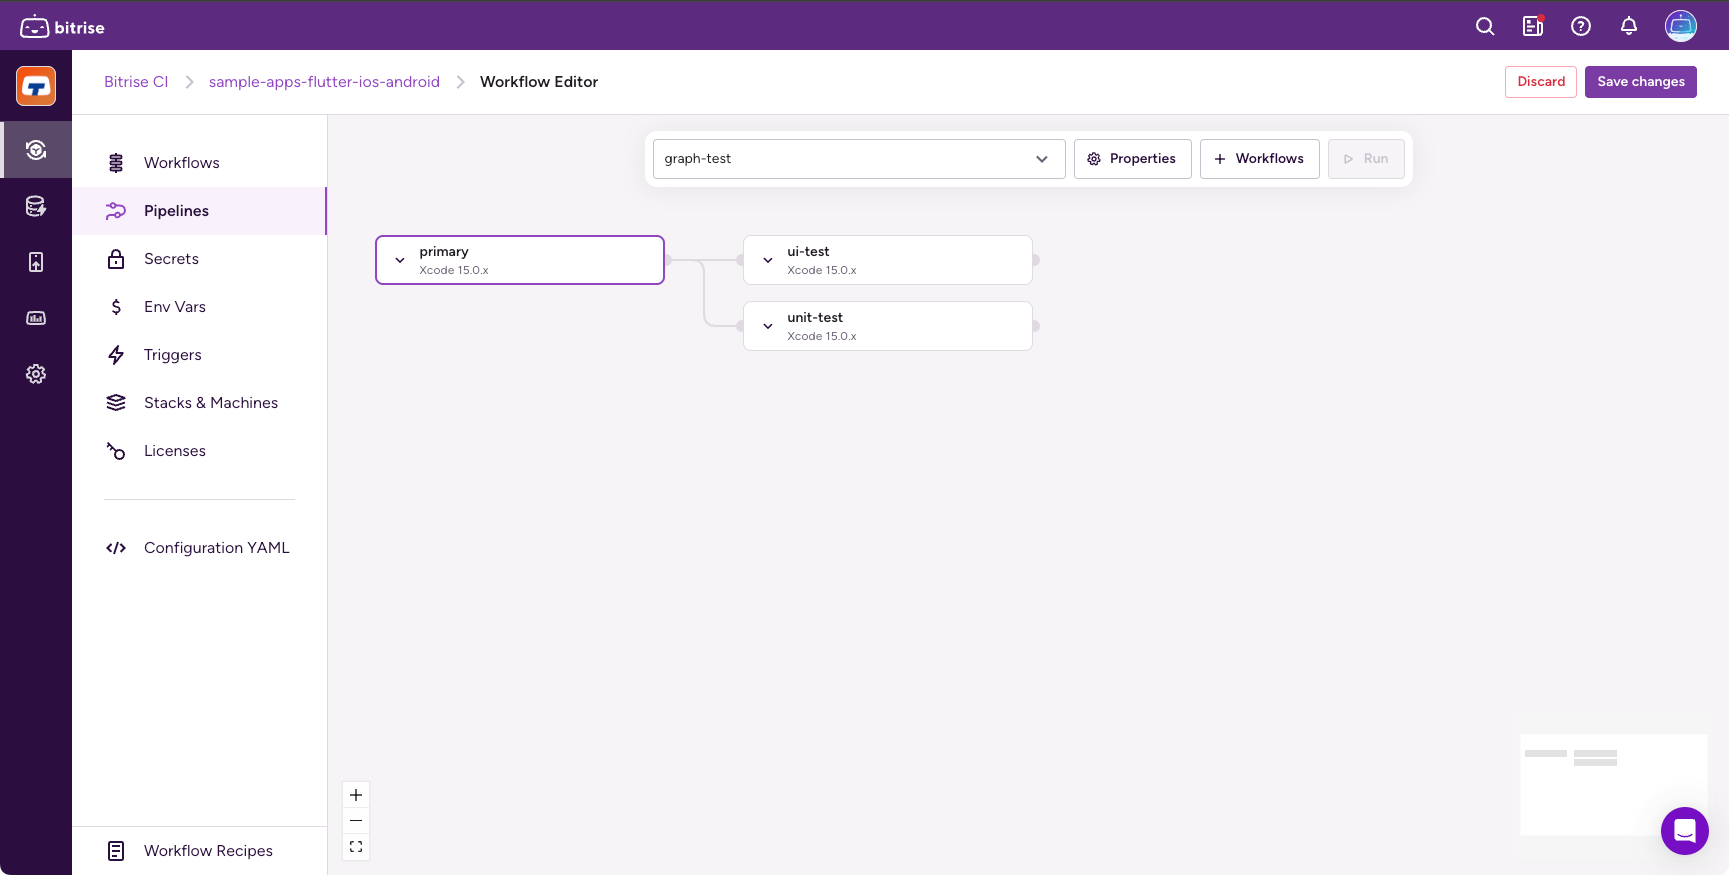
A Workflow can depend on one or more Workflows: if any of the Workflows it depends on fails, the Workflow won't run. To create Workflow dependencies, hover over the right end of a Workflow and click the plus sign:
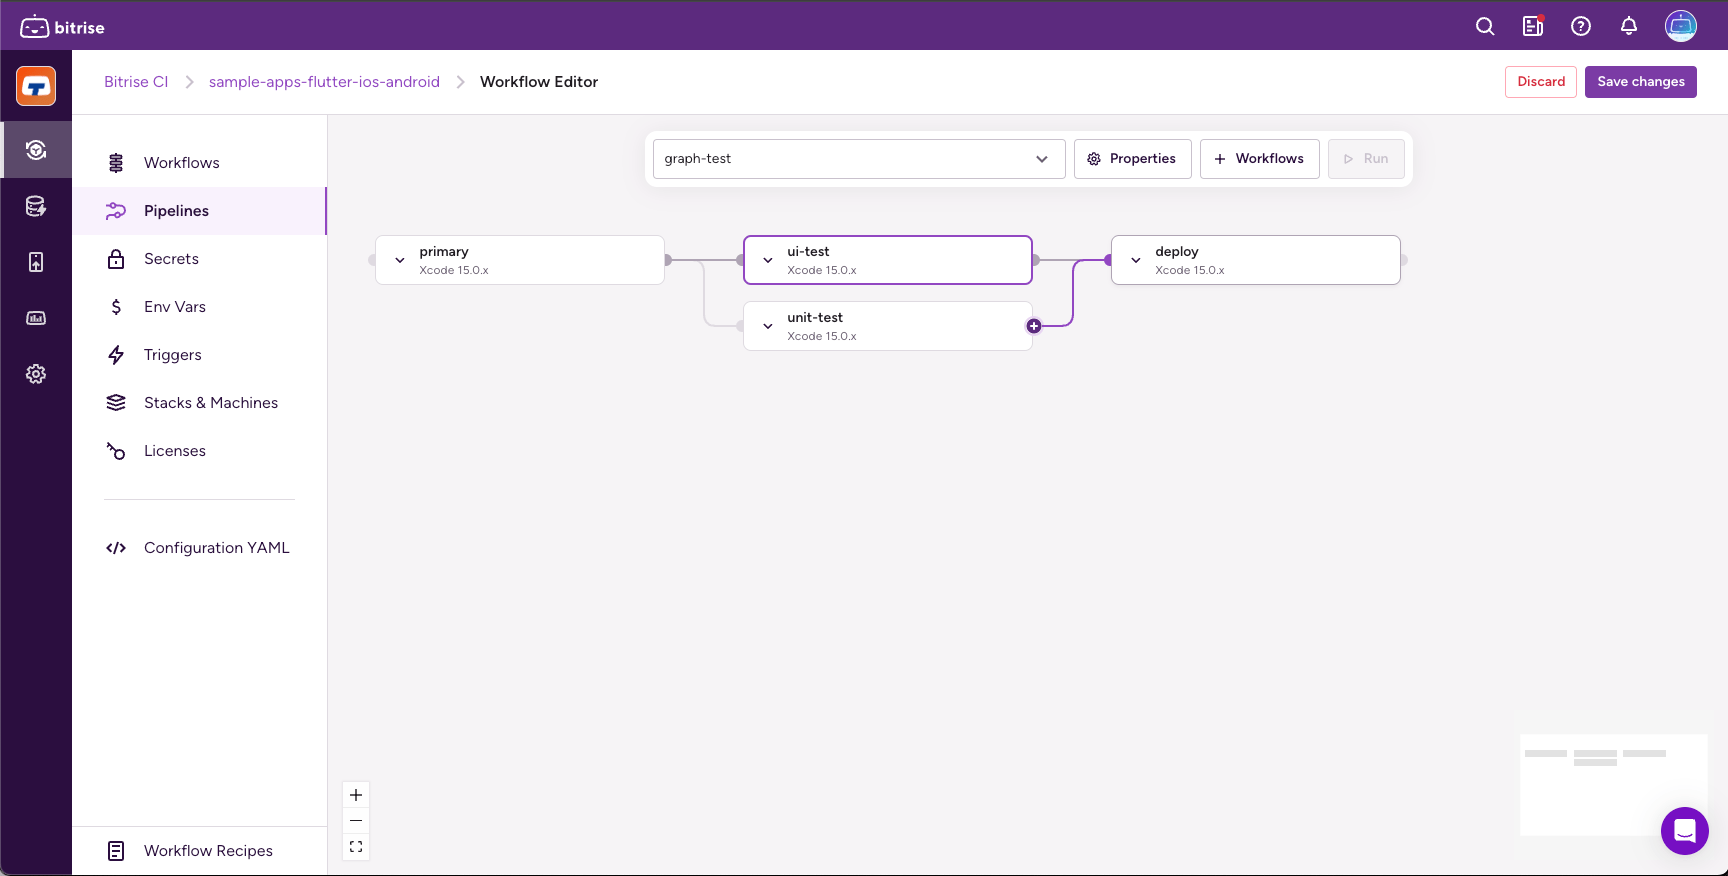
You can add multiple dependent Workflows to the same Workflow this way:
The same Workflow can depend on two or more different Workflows: you can create a path by dragging from the plus sign to another Workflow already in the Pipeline:
A bare minimum Pipeline configuration consists of a single Workflow:
pipelines:
  example:
    workflows:
      A: {}
You can have multiple Workflows that all run in parallel:
pipelines:
  example:
    workflows:
      A: {}
      B: {}
      C: {}
A Workflow can depend on one or more Workflows: if any of the Workflows it depends on fails, the Workflow won't run. To create Workflow dependencies, you need to use the depends_on property:
pipelines:
  example:
    workflows:
      A: {}
      B:
        depends_on:
        - A
      C:
        depends_on:
        - A
      D:
        depends_on:
        - B
        - C
If a Workflow depends on multiple Workflows, both YAML array syntaxes can be used:
# Option 1
D:
  depends_on:
  - B
  - C
# Option 2
D:
  depends_on: [A, B]
Configuration restrictions
-
A Pipeline can have a maximum of 200 Workflows. Each must be an existing Workflow under the root level
workflowselement. -
Utility Workflows can't be added to a Pipeline. If you want to use utility Workflows, include them as part of a regular Workflow.
-
Each Workflow can be added to the same Pipeline only once. You can't include the same Workflow in multiple different parts of a Pipeline.
-
Any Workflow defined in the dependency list must be part of the same Pipeline.
-
The dependency graph resulting from your configuration can't contain a circle or loop. Such an error will builds from starting.
Conditional Workflow execution in a Pipeline
Use run_if expressions to control Workflow execution: you can set conditions under which a Workflow should or should not run.
Workflow Editor
Configuration YAML
-
Open your Pipeline.
-
Hover over the Workflow you need and click the gear icon to open the Edit Workflow dialog.
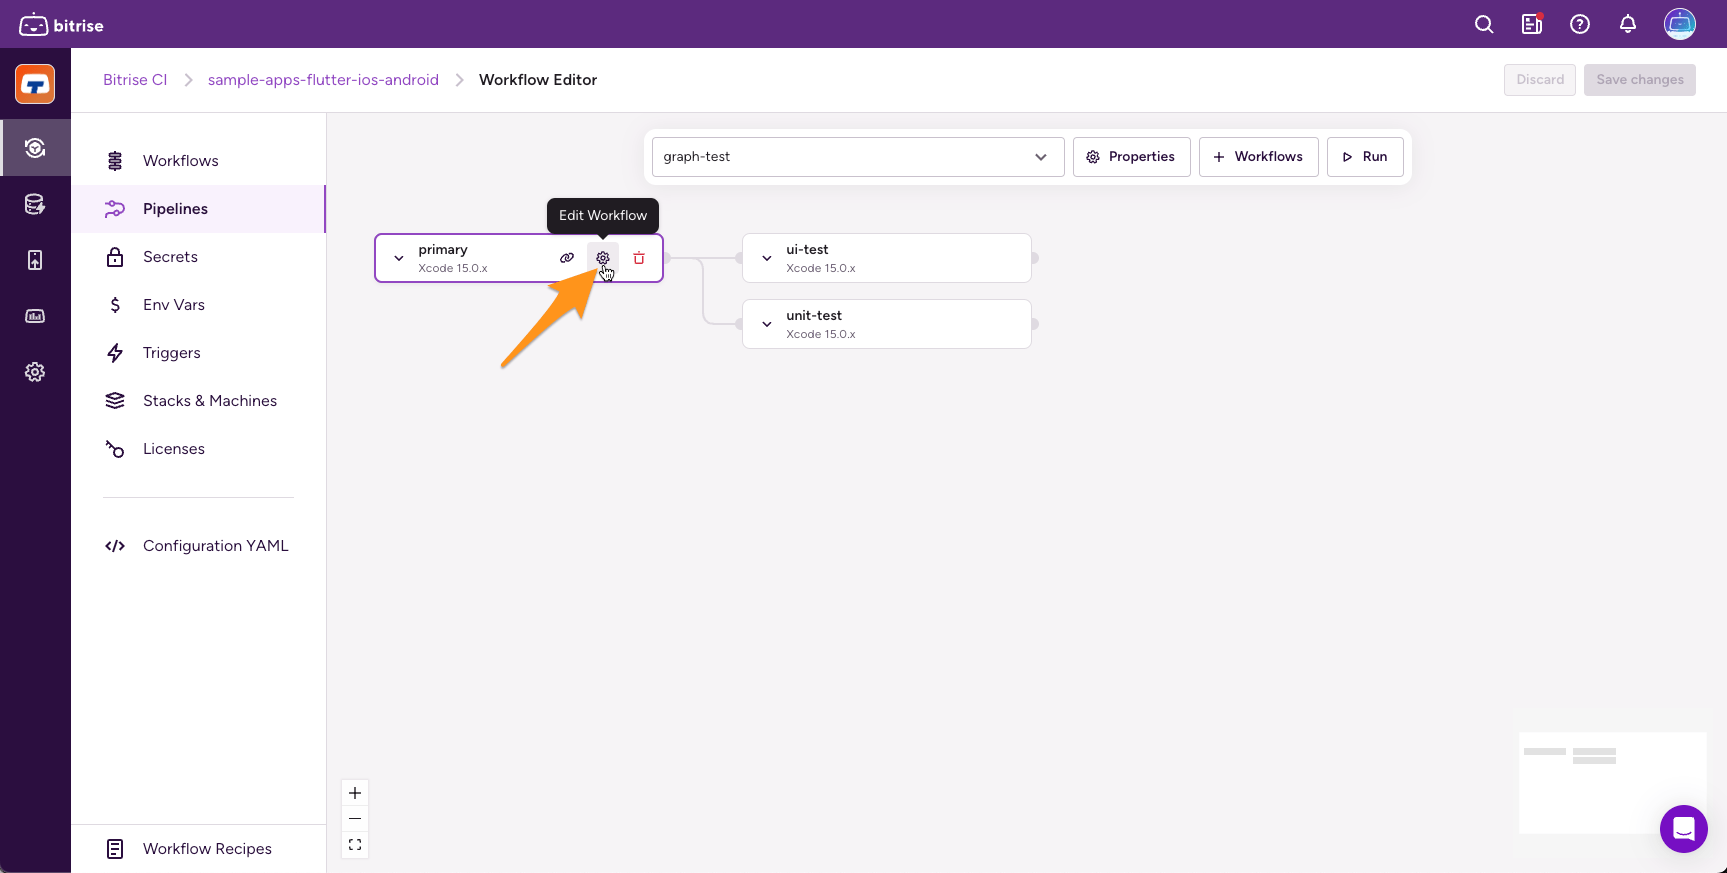
-
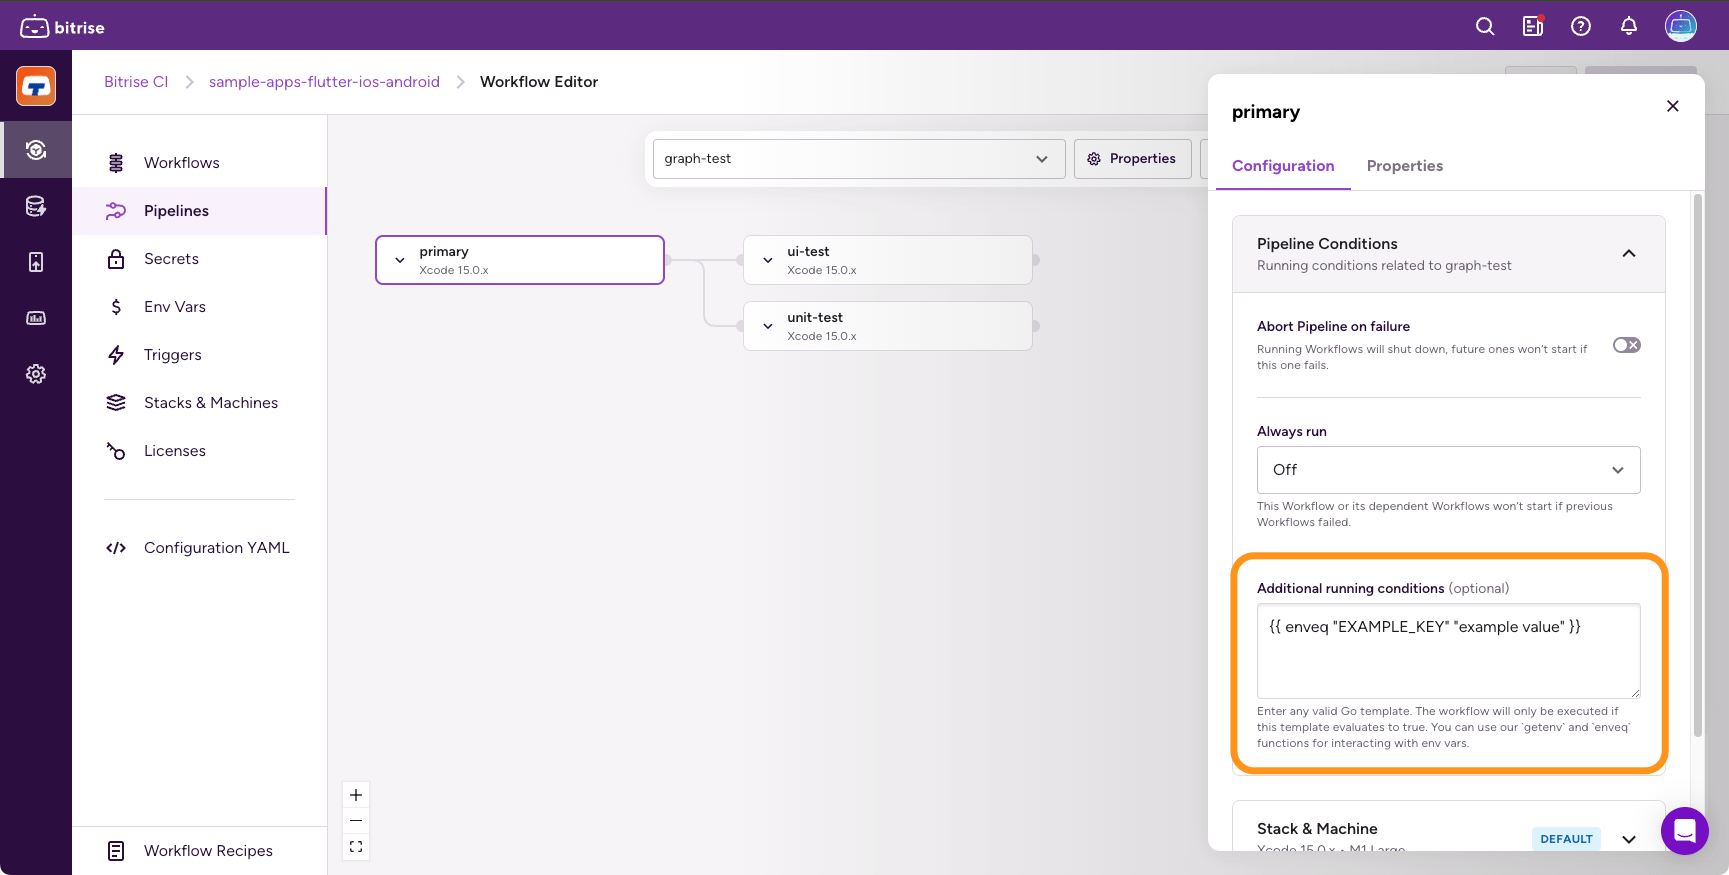
Select Pipeline Conditions.
-
In the Additional running conditions input, add a valid Go template.
The input accepts three helper functions:
-
getenv: Accesses an Environment Variable's value. -
enveq: Compares an Environment Variable to a given value. -
envcontain: Checks whether an Environment Variable contains a given string.
-
-
Close the Edit Workflow dialog, and click Save changes.
In Pipelines, the run_if property needs an expression field that contains a Go template:
pipelines:
  example:
    workflows:
      A: {}
      B:
        run_if:
          expression: {{ enveq "EXAMPLE_KEY" "example value" }}
        depends_on: [A]
The expression field accepts three helper functions:
-
getenv: Accesses an Environment Variable's value. -
enveq: Compares an Environment Variable to a given value. -
envcontain: Checks whether an Environment Variable contains a given string.
The Bitrise CLI evaluates the expression during runtime: a Workflow only runs if its run_if expression evaluates to true. A Workflow that is skipped because of a run_if expression is counted as a successful Workflow so its dependent Workflows will
run.
In this example, B will only run if the EXAMPLE_KEY Environment Variable has the value example value.
Always executing a Workflow in a Pipeline
You can mark a Workflow to make sure it runs even if a Workflow it depends on failed.
Transitive dependency
Even if a Workflow is configured to always run, its dependent Workflows might not run. If one or more of its parent Workflows failed, the Workflow in question will still run but its dependent Workflows might not.
For example, let's say we have Workflow C that depends on Workflow B. Workflow B depends on Workflow A. Of the three Workflows, only B is set to always run:
-
If A fails, B will run but regardless of its result, C won't run because by depending on B, it also depends on A.
-
C only runs if both A and B are successful.
Workflow Editor
Configuration YAML
-
Open your Pipeline.
-
Hover over the Workflow you need and click the gear icon to open the Edit Workflow dialog.
-
Select Pipeline Conditions.
-
Set the Always run input to Workflow.
This setting means the Workflow will run even if one or more of its parent Workflows fail. However, its dependent Workflows might not run!
Use the should_always_run property. It requires a string to specify the scope of the configuration. It has two available values:
-
none: If a parent Workflow fails, the Workflow will not run. This is the default value. -
workflow: If a parent Workflow fails, the Workflow will run anyway.
pipelines:
  example:
    workflows:
      A: {}
      B:
        depends_on: [ A ]
        should_always_run: workflow
      C:
        depends_on: [ B ]
      D:
        depends_on: [ C ]
        should_always_run: workflow
In this example:
-
If A fails, B still runs.
-
If either A or B fails, C won't run.
-
If C won't run or runs but fails, D will still run.
Aborting the Pipeline on Workflow failure
You can configure the Pipeline to immediately terminate when any given Workflow fails. By default, the Pipeline won't terminate
Workflow Editor
Configuration YAML
-
Open your Pipeline.
-
Hover over the Workflow you need and click the gear icon to open the Edit Workflow dialog.
-
Select Pipeline Conditions.
-
Toggle the Abort Pipeline on failure input on.
If the Workflow in question fails, the Pipeline will immediately stop running.
Add the abort_on_fail field set to true to the selected Workflows:
pipelines:
  example:
    workflows:
      A: {}
      B:
        abort_on_fail: true
In this example, the Pipeline stops running if Workflow B fails: Workflow A will be aborted and no subsequent Workflows will run.
Pipeline priority
You can set a priority for each Pipeline. The priority setting determines the position of the Pipeline build in the build queue: the higher the priority, the sooner the Pipeline build will run.
You can assign a priority either in the Workflow Editor or in the configuration YAML file of your project. The priority is always an integer between -100 and 100: the higher the number, the higher the priority. The default priority is 0.
For more information about build priority, and the order of precedence between different types of priorities, check out Build priority.
Sharing files between Workflows in a Pipeline
To share files between Workflows in a Pipeline, you can use the Deploy to Bitrise.io Step and the Pull Pipeline intermediate files Step. The Step downloads Pipeline intermediate files to a local folder.
To configure file sharing:
Workflow Editor
Configuration YAML
-
Add the Deploy to Bitrise.io Step to the Workflow that generates the file(s) you need.
-
In the Pipeline Intermediate File Sharing input group, find the Files to share between Pipeline Workflows input and add the files as a newline-separated list of colon-separated items using the following structure:
<file_or_directory_path>:<environment_variable_key>.You can use another Environment Variable as a filepath: for an iOS project,
$BITRISE_IPA_PATH:BITRISE_IPA_PATHis a valid way to share a generated IPA with other Workflows. -
Add the Pull Pipeline intermediate files Step to any Workflow that needs the generated files.
-
Use the Intermediate file source input to specify a set of Workflows from which you need files.
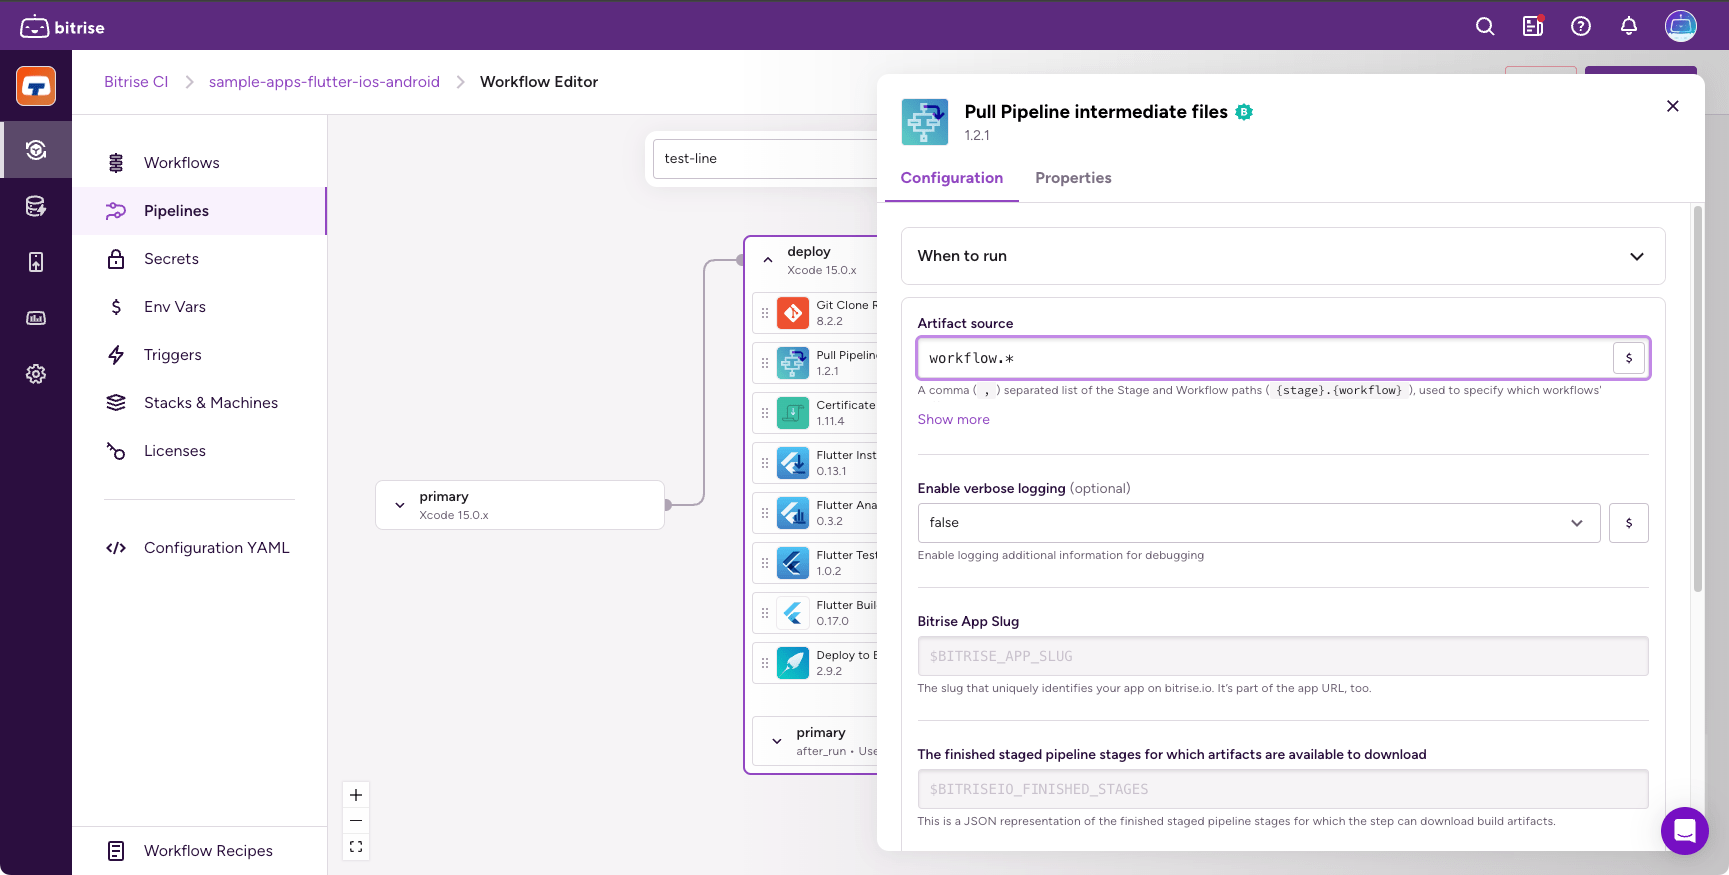
You can use wildcards in the input. In the example above, we’re pulling all intermediate files from all Workflows which have a name starting with
workflow. -
When the Step finishes, your files and directories specified via the Deploy to Bitrise.io - Apps, Logs, Artifacts Step should be available.
-
Add the Deploy to Bitrise.io Step to the Workflow that generates the file(s) you need.
-
Add the files to the
pipeline_intermediate_filesinput as a newline-separated list of colon-separated items using the following structure:<file_or_directory_path>:<environment_variable_key>.You can use another Environment Variable as a filepath: for an iOS project,
$BITRISE_IPA_PATH:BITRISE_IPA_PATHis a valid way to share a generated IPA with other Workflows.steps: - deploy-to-bitrise-io: { inputs: - pipeline_intermediate_files: "$BITRISE_IPA_PATH:BITRISE_IPA_PATH" -
Add the Pull Pipeline intermediate files Step to any Workflow that needs the generated files:
steps: - pull-intermediate-files: {} -
Use the
artifact_sourcesinput to specify a set of Workflows from which you need files:steps: - pull-intermediate-files@1: inputs: - artifact_sources: workflow.*You can use wildcards in the input. In the example above, we’re pulling all intermediate files from all Workflows which have a name starting with
workflow. -
When the Step finishes, your files and directories specified via the Deploy to Bitrise.io - Apps, Logs, Artifacts Step should be available.
For more information and details, check out the Step repository.
Sharing Env Vars between Workflows
You can reuse any environment variable from a Workflow and reuse it in subsequent Workflows using the Share Pipeline variables Step.
Optional Workflows using run_if conditions
You can easily combine the Share Pipeline variables Step with run_if expressions to create Pipelines with optional Workflows. For more information, check out Enabling or disabling a Step conditionally.
To do so:
-
Add the Share Pipeline variables Step to the Workflow.
-
Optionally, you can define additional run conditions in the Additional run conditions input. The Step will only run if the conditions you specify here are true.
-
Add the Env Var(s) you would like to use in subsequent Workflows in the Variables to share between Pipeline Workflows input.
Using environment variable keys
You can define Env Vars using a
{key}={value}syntax. For example,MY_ENV_KEY=value, orINSTALL_PAGE_URL=$BITRISE_PUBLIC_PAGE_URL.If you want to use the default environment variable keys, you can use a shorthand syntax. For example,
EXISTING_ENV_KEY.Sharing Env Vars using this Step does not override existing Env Vars defined in the app.
Parallelism in Pipelines
Parallelism allows you to split the execution of a single Workflow in a Pipeline over many runners in a single instruction. This is particularly useful for test sharding: you can reuse a single testing Workflow several times over, without needing to specify boilerplate code for each shard.
Parallelism allows you to split the execution of a single Workflow in a Pipeline over many runners in a single instruction. This is particularly useful for test sharding: you can reuse a single testing Workflow several times over, without needing to specify boilerplate code for each shard. At runtime, Bitrise automatically creates a set of parallel Workflows and provides you with the shard number and total number of shards as environment variables.
You can also use a parallel configuration to build and test multiple white label apps from the same codebase, or to achieve any other goal that requires running the same CI jobs multiple times.
Parallelism overview
Graph pipelines only
Parallelism isn't available for Pipelines containing stages. To take advantage of the feature, convert your stage-based Pipelines into graph Pipelines: Converting a Pipeline with stages into a graph Pipeline.
You can create a parallel configuration for a Workflow by using the parallel property. A Pipeline can have multiple Workflows with a parallel configuration. These Workflows can depend on other Workflows. If a Workflow depends on a Workflow with a parallel configuration, it will depend on the
execution of all copies of the Workflow.
The parallel property takes an integer for a value: for example, if the value is 5, five copies of the Workflow will be executed. Each copy receives two new environment variables:
-
$BITRISE_IO_PARALLEL_INDEX: a zero based index for each copy of the Workflow. -
$BITRISE_IO_PARALLEL_TOTAL: the total number of copies.
Configuring parallelism
To set up the configuration:
Workflow Editor
Configuration YAML
-
Open the Workflow Editor.
-
In the Pipeline graph, find your Workflow and click the gear icon to access the Workflow configuration.
-
On the Configuration tab, find the Parallel copies input and set a value.
Value limitations
The value has to be a fixed number. You can only use integers. The maximum accepted value is 200.
You can use an Environment Variable as the value: it allows you to dynamically calculate the optimal number of parallel copies during the build.
If another Workflow depends on the Workflow with a parallel configuration, it will run only if all copies of the Workflow have been successful.
-
Open your configuration YAML file.
-
In the
workflowsproperty of your Pipeline, find the Workflow you need. -
Add the
parallelproperty to it and set a value.Value limitations
The value has to be a fixed number. You can only use integers. The maximum accepted value is 50. You can use an Environment Variable as the value.
You can use an Environment Variable as the value: it allows you to dynamically calculate the optimal number of parallel copies during the build.
In this example, the
run-testsWorkflow is executed five times in parallel. Thereport-resultsWorkflow depends onrun-testsso it only runs once all 5 copies have been successful.pipelines: my-ci-pipeline: workflows: build-without-testing: {} run-tests: depends_on: [build-without-testing] parallel: 5 report-results: depends_on: [run-tests]
Supported use cases for Pipelines
We have prepared some Pipeline recipes based on common iOS and Android use cases. These contain some of the most frequent tasks our users need to run. You can find them in our GitHub repository.
Troubleshooting a Pipeline
If a Pipeline build fails, you have two main options:
-
Rebuild the Pipeline. You can rebuild either the entire Pipeline, or the failed Workflows.
-
Rebuild with remote access which allows you to access the build machine while the build is running.